• Home
    • Recipes
    • The Roast Chicken Project
    • Allie Dreams of Cake
    • Sunday Suppers
  • Travel
  • About
Menu

Tea and Fog

Street Address
City, State, Zip
Phone Number

Your Custom Text Here

Tea and Fog

  • Home
  • Recipes
    • Recipes
    • The Roast Chicken Project
    • Allie Dreams of Cake
    • Sunday Suppers
  • Travel
  • About

Shrimp & Grits Skewers

September 6, 2016 Allie
Shrimp & Grits skewers

I know, Labor Day is over and apparently that means the end of summer, so here's a fun play on a dish for you!

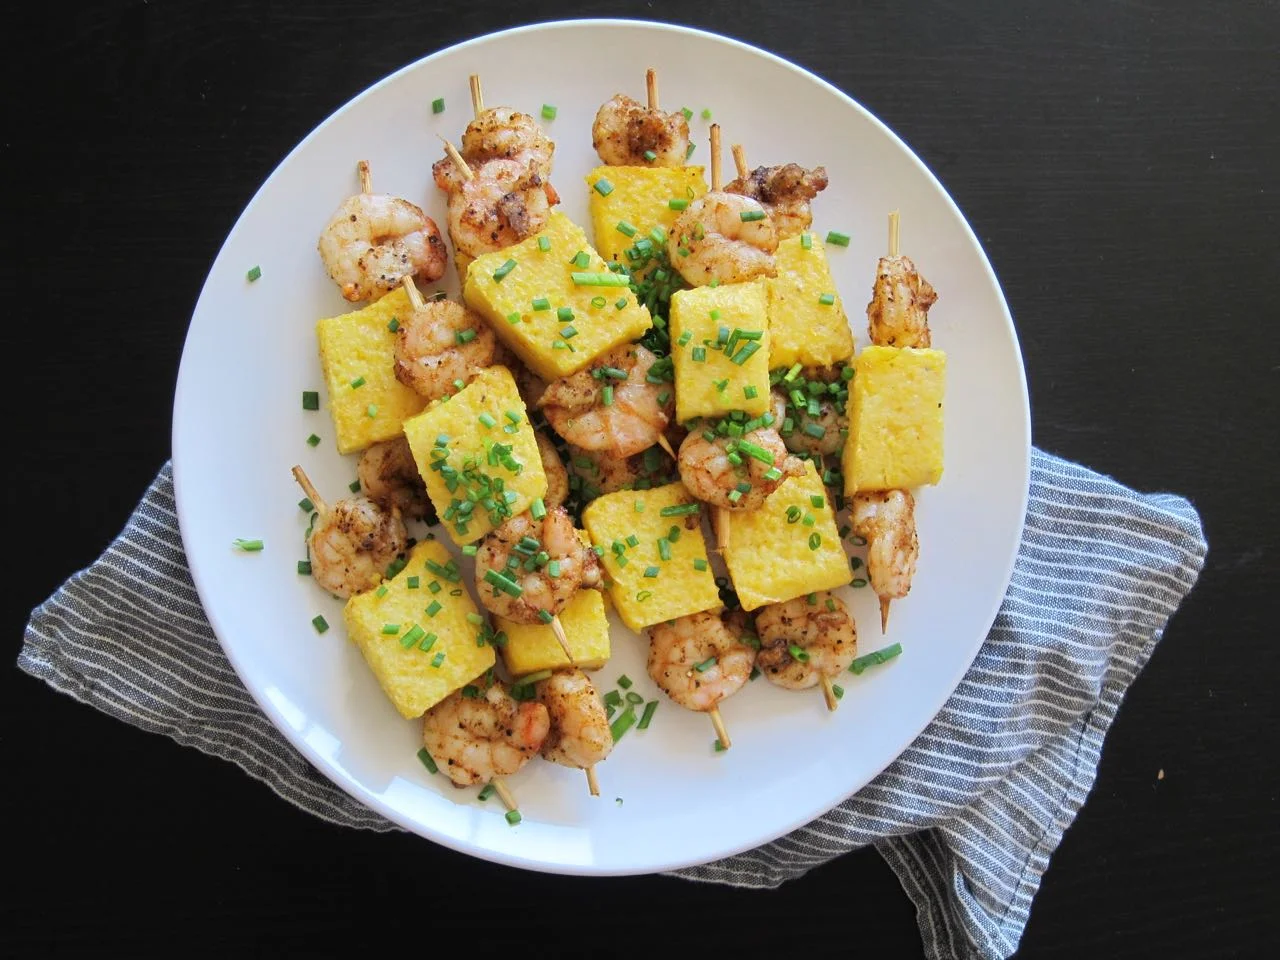
I got it into my head that turning shrimp and grits, traditionally served in a bowl, would be super cute as skewers. Because why make something the simple way it's always been made when I can make it harder on myself?

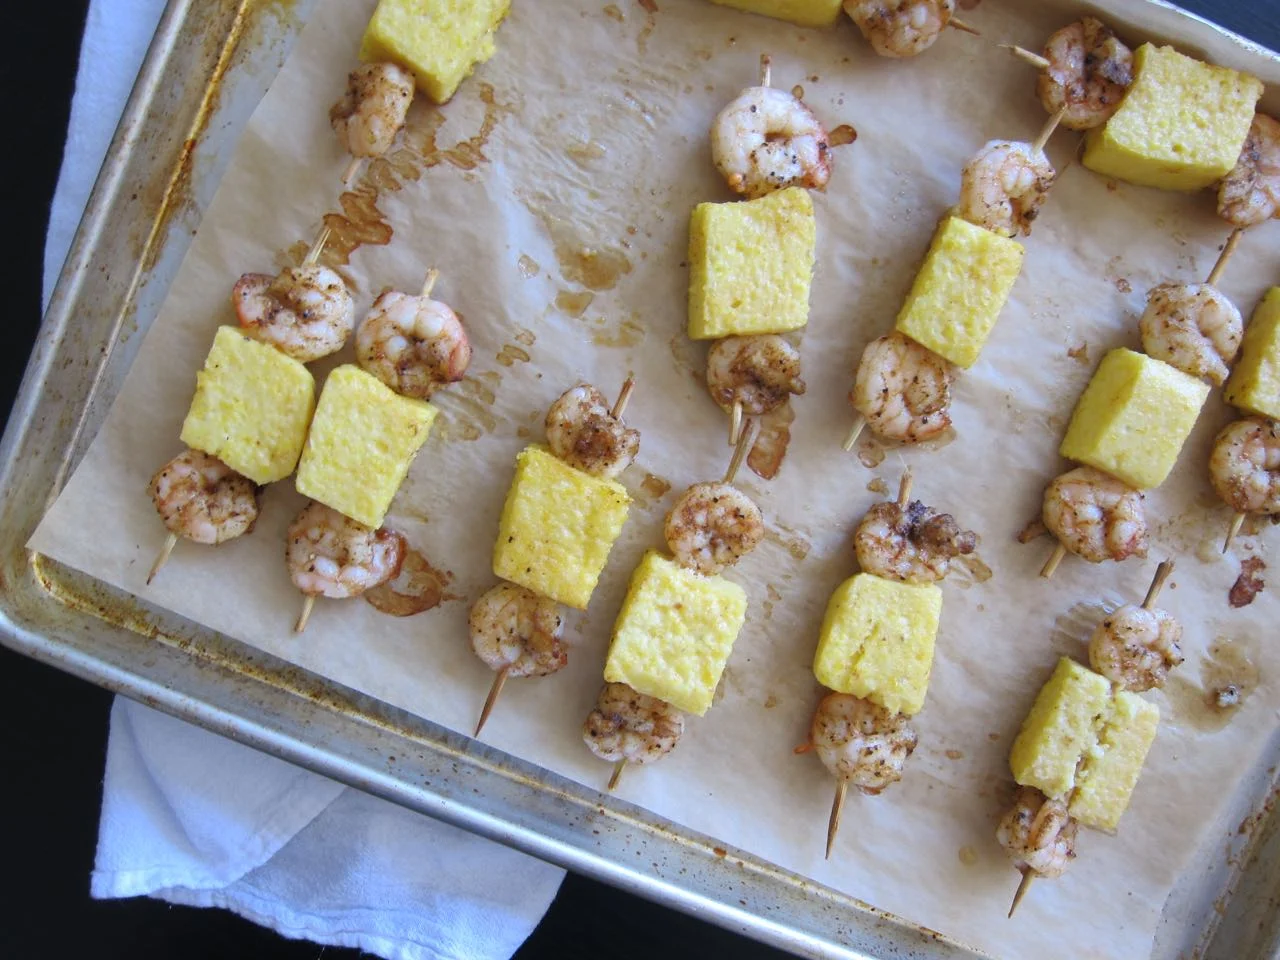
So I cooked up a batch of extra thick, extra cheesy yellow grits and chilled them into a giant block. I then cut that block into cubes and skewered them with some shrimp that I tossed in way too much cajun seasoning mix. And you know, it sort of worked! I originally planned to grill these on my grill pan, but there were some logistical challenges to that plan caused by combining flat shrimp with cubes of grits, so I ended up broiling them instead, which was just as delicious and, just as I suspected, super fun to eat. 

The cheesy grits soften into crispy, creamy bites from the broiling, and the shrimp counterbalance with  just the right amount of heat from the cajun seasoning. I think this was a pretty good, basic first pass, and I'm already dreaming of a redo with andouille sausage, peppers, and more.

cheese grits
chilled cheese grits
Shrimp & Grits skewers

Shrimp & Grits Skewers

  • 1 lb large shrimp, deveined and shelled
  • 1 cup dry polenta or grits
  • 3 cups water
  • 4 oz sharp white cheddar cheese, shredded
  • 1/2 tsp salt
  • pinch cayenne pepper
  • olive oil
  • cajun seasoning
  • 8-10 wooden skewers, broken in half
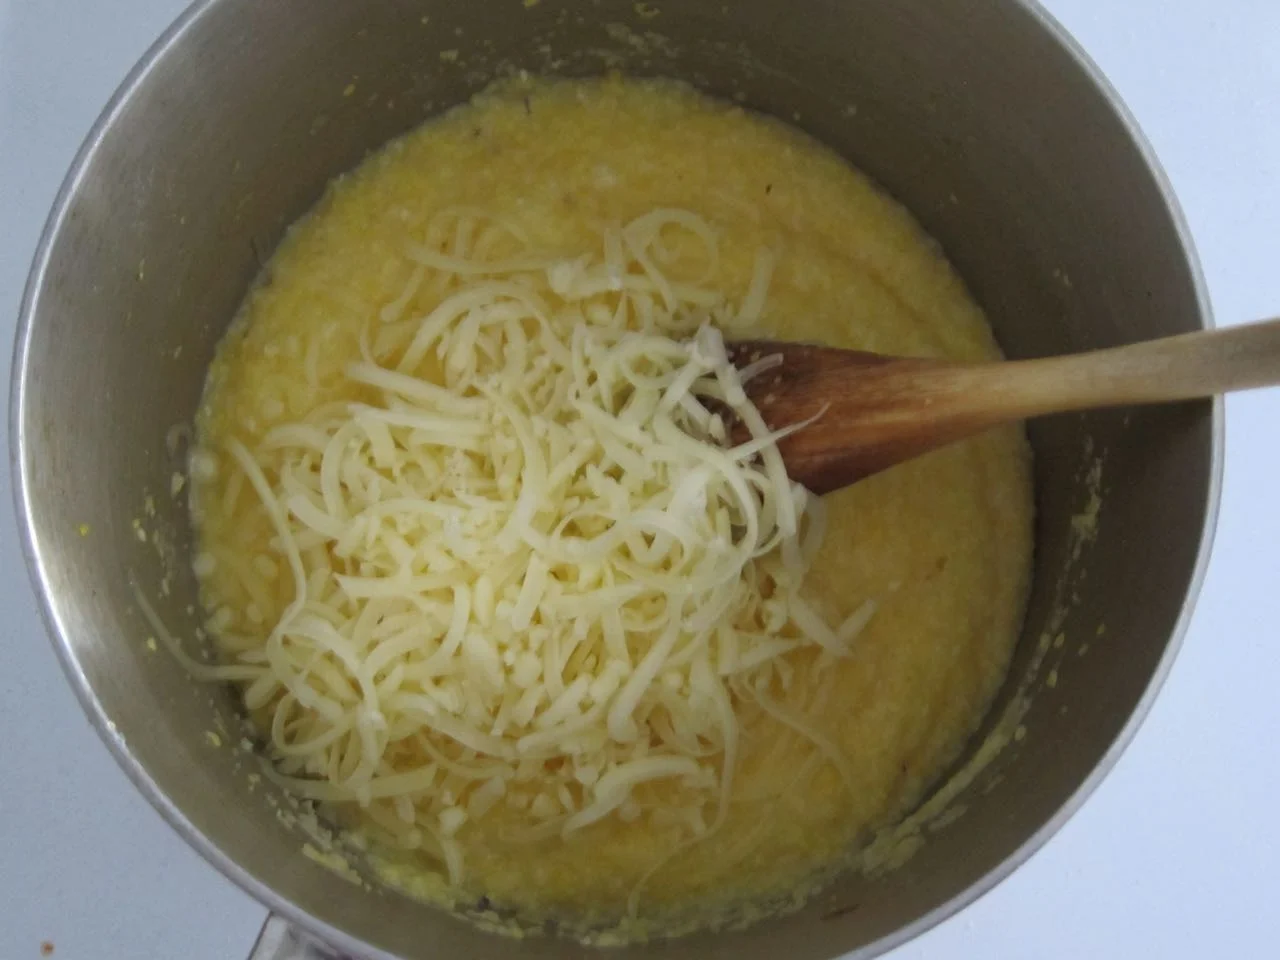
  1. Make grits. Bring water and 1/2 tsp salt to a boil. Whisk in the grits and reduce heat. Cook slowly, stirring frequently, until mixture is thick like oatmeal, about 10 minutes.  
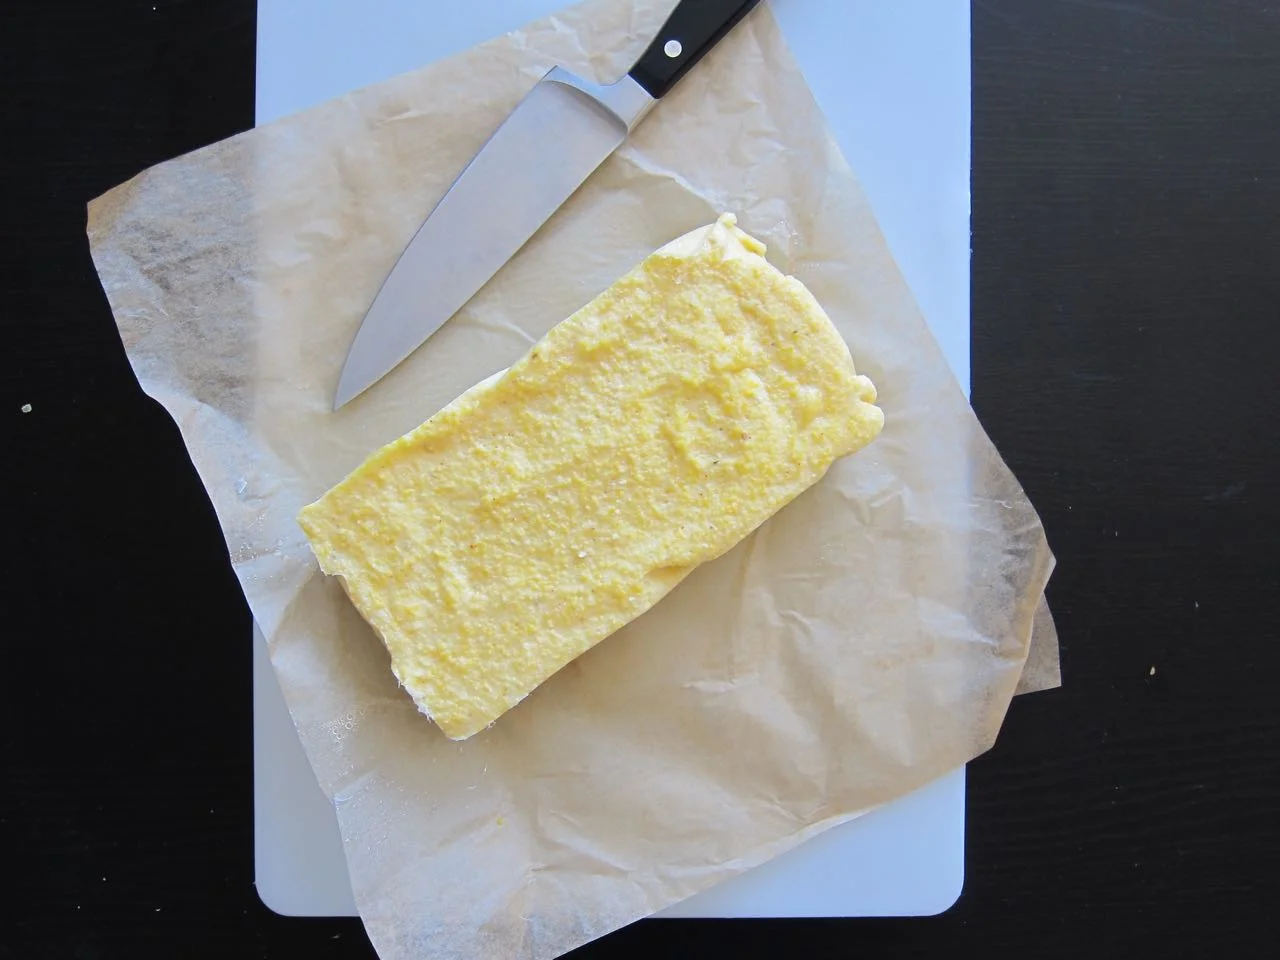
  2. Stir in the cheese and cayenne pepper. The mixture should thicken considerably. Pour the mixture into a parchment lined loaf pan and let cool completely. Chill in the refrigerator until firm (this is best done a day ahead).
  3. When ready to assemble skewers, toss the shrimp with a tablespoon or so of olive oil and as much cajun seasoning as you want. Preheat your broiler.
  4. Cut the chilled grits into large cubes and slide onto skewers, alternating with the shrimp. Place skewers on a parchment lined baking sheet and broil until shrimp are cooked through, flipping halfway through cooking. This should only take a few minutes on each side. Garnish with chives and serve hot.

Notes:

  • This is a very very basic version here, but you could definitely dress these skewers up with some roasted bell peppers, onions, and andouille sausage for a full flavor version of shrimp and grits!
  • To me, the best grits are actually the yellow polenta sold by Bob's Red Mill. It's the closest I've found to the yellow grits that I grew up eating at my grandparents' house. Those grits are unfortunately impossible to find outside North Carolina, so for the rest of the country, the Bob's version is a pretty close second.
In Recipes Tags Main Dish, Sides & Appetizers
Comment

Green Chile Spinach, Cheese & Mushroom Enchiladas

September 2, 2016 Allie
Green Chile Spinach, Cheese & Mushroom Enchiladas

When I was in 7th grade, half the girls in school had their lockers plastered with ripped out magazine photos of Freddie Prinze Jr. This was 1999, and peak Freddie fever was happening in a post-I Know What You Did Last Summer and She’s All That world. 

I, on the other hand, was decorating my locker at the time with the ripped out magazine pages displaying Haribo ads, you know, the ones where the gummy bears were playing spin the bottle with happy cola? Obviously, I was super cool. 

But I did watch all of Freddie Prinze Jr.'s rom-com movies in the late 90s/early aughts, including She’s All That, and then all the weird ones after like Down to You, Girls and Boys and the one with Christina from Parenthood where he’s just kind of there and there’s a bunch of models for some reason. I also was one of probably two people to watch that one movie with a bleached blonde Matthew Lillard where they were space pilots fighting an army of purple alien lions (at least, that’s my memory of it anyway and how do these things get made?).

So you can imagine how weird it is to see him appearing all salt and pepper-haired on the cover of a cookbook, making me feel ancient. I mean, I know the 90’s are back, but I was not prepared for it to happen in quite this shocking of a manner.

But really, when I first heard FPJr was coming out with a cookbook, I was not surprised. I think his love of food and cooking was always kind of a runner in the background of stories about him, and I remember reading some interview with Sarah Michelle Gellar where she was complaining about the media scrutiny around her weight and relating some nonsense tabloid story where apparently Freddie and his friends had to come over and cook for her to make her better. So based on that nugget of a tale, I knew he must have some real chops in the kitchen.  

And you know what? It’s a pretty good cookbook! I was on the fence about buying it, because ugh, another celebrity cookbook, but then I went to Boston in July and flipped through my sister’s copy. Yes, there are the standard β€œbest” pancakes and french toast recipes that don’t seem too innovative, but there are also tons of recipes showcasing the influence of his New Mexico upbringing and all those cute pictures of him in the kitchen with Buffy and their cute kids, so I was pretty much sold. 

So, I got my own copy and decided to make some enchiladas. He had a pretty good sounding green chile chicken enchilada recipe, but I was in the mood for cheese and spinach, so I took his recipe and ran with it in a vegetarian direction. It was a different method for enchiladas than I’ve made in the past, using flour tortillas and with more focus on the filling and no real sauce, but man was this good. It came out like a super hearty and creamy enchilada dish, where all of the different parts melted together in to a cheesy, gooey, almost lasagna-like casserole, with just enough heat from the chiles. The leftovers were even better. I brought this for lunch to work for 3 days straight, and I was so, so sad when I finished the last bite.

Roasted Green Chiles
Chile Mushroom Spinach Enchiladas
Chile Spinach Mushroom Enchiladas
Unbaked Enchiladas
Mushroom Spinach Enchiladas

Green Chile Spinach, Cheese & Mushroom Enchiladas

Adapted very liberally from Freddie Prinze Jr.(!!)

Serves 4

  • 1/8 cup olive oil
  • 3/4 lb green chiles, roasted and chopped (see note)
  • pinch of salt
  • 1/4 tsp black pepper
  • 2 cloves of garlic, minced
  • 1 can semi-condensed mushroom soup (see note)
  • 1 bag frozen, chopped spinach (about 2 cups)
  • 1 tbs butter
  • 8-10 medium sized flour tortillas 
  • 1 1/4 cup shredded monterey jack cheese
  • 1 cup shredded white cheddar cheese
  1. Heat oven to 400 degrees.
  2. In a large skillet, heat the oil over low heat, then add the chopped chiles and cook until fragrant. Add the salt, pepper and garlic and cook for 2 minutes more. Add the spinach and cook to dry it out a bit, another couple of minutes. Remove from the heat and stir in the mushroom soup with the filling. Taste and adjust the seasoning if necessary.
  3. Grease an 8x8 baking dish or cast iron skillet with the butter. Mix the cheeses together in a bowl. Warm the tortillas (either on the stove or in the microwave) and keep warm, covered, on a plate.
  4. Get your assembly line ready: from left to right, place your tortillas, your cheese, your filling, and your buttered skillet. Use a small cutting board or plate to roll enchiladas on.
  5. One at a time, lay a tortilla flat on the cutting board or plate, then place a bit of the cheese along the middle of the tortilla. Dollop a few spoonfulls of the filling and roll tightly. Place seam side down in the pan, then repeat with remaining tortillas until pan is full.
  6. Top the rolled enchiladas with the rest of the filling and remaining cheese. Cover skillet with foil and bake for 10 minutes. Remove the foil and bake 10 minutes more, until cheese is turning golden and is bubbling. Let sit for 10 minutes then serve!

Notes:

  • You want to try to find green Hatch chiles for this recipe, although Anaheims work well as a substitute, and in fact are what I used here. To roast, broil on a sheet pan until blistered and charred, turning periodically to roast all sides. Remove from oven and place peppers in a sealed plastic bag and let cool for a few minutes. Remove from the bag, and peel. The few minutes of steaming should make the skins slide right off, but a little stuck on is fine, that's just flavor! Remove the stems and seeds and chop the chiles into a rough dice. This is really super easy but if it sounds like too much work you can usually find canned hatch chiles in the Hispanic foods aisle of most major grocery chains.
  • I call for semi-condensed soup here, which I had never heard of until I tried to go buy condensed cream of mushroom soup the other day. I used the Amy's brand I found at Whole Foods. If you can't find a semi-condensed soup, Adding a few tablespoons of water to the mixture should work well, or you can just use the condensed soup alone and have a slightly thicker filling. The original recipe called for an optional cup of stock, which you could also add if you like a very wet style enchilada.
  • The amount of filling you use in each rolled tortilla is vague, I know, but that's because I really didn't put enough in mine, but I liked the effect of spooning all the remaining filling on top. If you want your enchiladas a little fuller, I would say definitely add more to each, just make sure they are not so full that they won't stay rolled.

Β 

In Recipes Tags Main Dish
Comment

Moroccan(ish) Roast Chicken

August 30, 2016 Allie
Moroccan(ish) Roast Chicken

Roast Chicken Project #7 - Preserved Lemon and Moroccan Spice Roast Chicken

I'm calling this Moroccan-ish because I drew on some North African flavors, but I don't know that anything like this is actually served in Morocco. It will, however, be served forever after in my apartment because I kind of hit it out of the park with this one. 

I thought, seeing as I've hit the halfway point of the Roast Chicken Project, that maybe I was ready to test my skills and fly without a recipe for this one. So, I turned away from my recipe books, blogs, and magazines, and decided to use what I had learned so far. Dare I say I even got a little experimental?

Here are the "rules" I kept to, based on the last 6 months of research:

1. Keep it simple: no brining, basting, or other special cooking techniques, including trussing or tying the legs up with string.

2. Make it flavorful: I had a jar of preserved lemons in the fridge and a dubiously aged spice mix in the pantry. 

3. Let it rest: give it a good night's sleep, uncovered, in the fridge for the driest, crispiest skin.

4. Crank the oven up: My oven stubbornly hovers around the 400-425 degree zone, but I cranked it as high as I could and kept the roasting time as short and intense as possible, for crispy skin and a juicy bird.

5. Have fun! I know I said no brining in step one, but I did get adventurous and sort of brine with the preserved lemon tucked under the skin of the breast and thighs overnight. At least, that's what I'm assuming happens when you leave a super salty, acidic mixture in direct contact with your chicken for 12+ hours.

Ras El Hanout Rubbed Chicken
Creamy Harissa Dressing
Moroccan Chicken

The result was one of the easiest, yet tastiest birds I've roasted yet. The chicken skin crisped right up and bronzed in the oven without any extra help from additional fat, and had abundant flavor from the spice mix. The meat was juicy, tender, and perfectly cooked, and infused with the unique, sharp, pickley and lemony flavor that only comes from preserved lemons. Finished with a squeeze of lemon and served with good greens tossed in a spicy, creamy dressing, it was as simple, yet delicious a meal as I've had from this project yet.

Preserved Lemon & Ras El Hanout Chicken

Moroccan(ish) Roast Chicken

  • One 3-4 lb whole chicken
  • 1/4 cup preserved lemon, chopped
  • 2 tbs moroccan spice mix (Ras-El-Hanout)
  • salt

For serving (optional):

  • salad greens such as arugula, baby spinach, mesclun or a mix
  • a few tbs chopped fresh mint
  • 1/4 cup buttermilk
  • 2-3 tbs mayonnaise
  • 1 1/2 tbs harissa (store-bought or make your own)
  • 1 tsp chopped preserved lemon (optional but if leaving out sub 1/2 tsp salt or more to taste)
  • 1 tsp olive oil
  • a squeeze of fresh lemon juice
  1. The night before you want to roast your chicken, get it ready for bed. Pat chicken skin with paper towels to dry. Gently slide a finger under the skin on the breast and thighs to loosen, then fill each "pocket" with a bit of the chopped preserved lemon. Rub any extra in the cavity of the chicken (now might be a good time to make sure there are no bags of gizzards and livers in there). Salt the chicken generously all over the skin and in the cavity, then rub all over with the spice mixture. Place chicken in a large bowl or on a plate and refrigerate, uncovered, overnight until ready to roast.
  2. When ready to roast, remove chicken from fridge and let come to room temperature for at least 30 minutes, up to an hour. Preheat oven to 400-425 degrees. Roast chicken for 60-75 minutes, checking for doneness at an hour (see notes). Temperature in the thickest part of the thigh (not on the bone) should read 160-165 degrees and juices should run clear.
  3. While chicken is roasting, make your dressing, if using. Combine buttermilk, 2 tbs mayonnaise, harissa, preserved lemon, 1 tbs fresh mint, olive oil, and lemon juice in a small bowl and whisk together. Taste and adjust seasoning if necessary. Adjust to desired thickness by adding more mayo or buttermilk.
  4. When chicken is done, remove from oven and let rest 10-20 minutes, then carve and serve with lemon wedges. Toss the greens with the dressing and garnish with remaining fresh mint and serve on the side with the chicken.

Notes:

  • I call for a 400-425 degree oven here, because sadly, my oven just can't do more than that on most days. If you are lucky enough to have a functioning oven, I'd say roast at 450 and check for doneness at 45 or 50 minutes, depending on the size of your bird.

Β 

In Recipes, The Roast Chicken Project Tags Main Dish
Comment
← Newer Posts Older Posts →

For those who plan their next meal while eating the last.

Β 

INSTAGRAM

🎢When pizza’s on a bagel*, you can have pizza anytime**!🎢

*donut
** after you fry some donuts
FINALLY perfected these Burnt Honey Butter Biscuits & what good timing! It’s carb season & we are all hibernating! 🐻
Final thoughts on Small Thanksgiving: take your sweet potato + marshmallow combo firmly into dessert or even breakfast, and consider a cozy mashed potato soup with stuffing croutons to use up those leftovers. Stay safe & Happy Thanksgiving! πŸ˜·πŸ¦ƒ
Part 2 of Small Thanksgiving: all the stuff to stuff yourself with! An Italian sausage pasta-inspired stuffing and a vegetarian, spiced wild rice stuffed squash. Everything serves 4-6, gather safely this year! πŸ˜·πŸ¦ƒ #thanksgiving #smallthanksgiving #v
Now that we (and the world?) can let out that collective sigh of relief, I can  finally think about my favorite holiday! Everyone is probably (hopefully 😷)looking at smaller gatherings this year, so I’m sending some Small Thanksgiving ideas ou
So happy Disney keeps justifying my dumb baking purchases! This matcha shortbread is delicious, but make a good sandwich cookie it does not. I hid all the broken pieces πŸ™ˆ
Subscribe to Tea and Fog!

RECENT RECIPES

Featured
polenta with rosemary and goat cheese.jpeg
Salmon Wellington and Warm Rice Salad.jpeg
Pizza Donut Hero.jpeg
Burnt Honey Butter Biscuits.jpeg
Mashed Potato Soup with Stuffing croutons.jpeg
sweet potato donuts with marshmallow frosting.jpeg