• Home
    • Recipes
    • The Roast Chicken Project
    • Allie Dreams of Cake
    • Sunday Suppers
  • Travel
  • About
Menu

Tea and Fog

Street Address
City, State, Zip
Phone Number

Your Custom Text Here

Tea and Fog

  • Home
  • Recipes
    • Recipes
    • The Roast Chicken Project
    • Allie Dreams of Cake
    • Sunday Suppers
  • Travel
  • About

Roasted Mustard Broccoli & Tikka Masala Sauce

May 17, 2019 Allie
Roasted Mustard Broccoli in Tikka Masala Sauce

There are two kinds of people I’m just never going to agree with:

  1. People who don’t like leftovers.

  2. People who don’t like vegetables.

If you identify as one of those types, we can probably be friends, but you may not want to come eat at my house. If you identify with both of those statements, well, we can still be friends but I’m going to judge you, harshly.

I won’t address the issues with leftovers today, but I do want to talk about vegetables. If you say you don’t like them, then the only explanation I can think of is that you are just doing them wrong. Why do people hate vegetables so much? Why don’t they get more love? Sure, this may be the era of superfoods like kale, and ok, we’ve discovered how to turn cauliflower into almost anything, but I want everyone to be excited about vegetables for what they are, not just trying to rationalize eating them for wellness or using them as virtuous replacements for other ingredients.

Vegetables are delicious! I mean, truly, the flavor and variety is so astonishing! Why can’t they get more starring roles?

I think about this a lot whenever I go out to eat. The meat dishes on the menu sound good, sure, but I always find myself drawn to the appetizers or vegetable sides, where the more interesting things are happening. Oh, you roasted a chicken and paired it with mashed potatoes? Yawn. I can do that. You turned broccoli into tacos? HOW DID YOU DO THAT?? I MUST TRY IT!

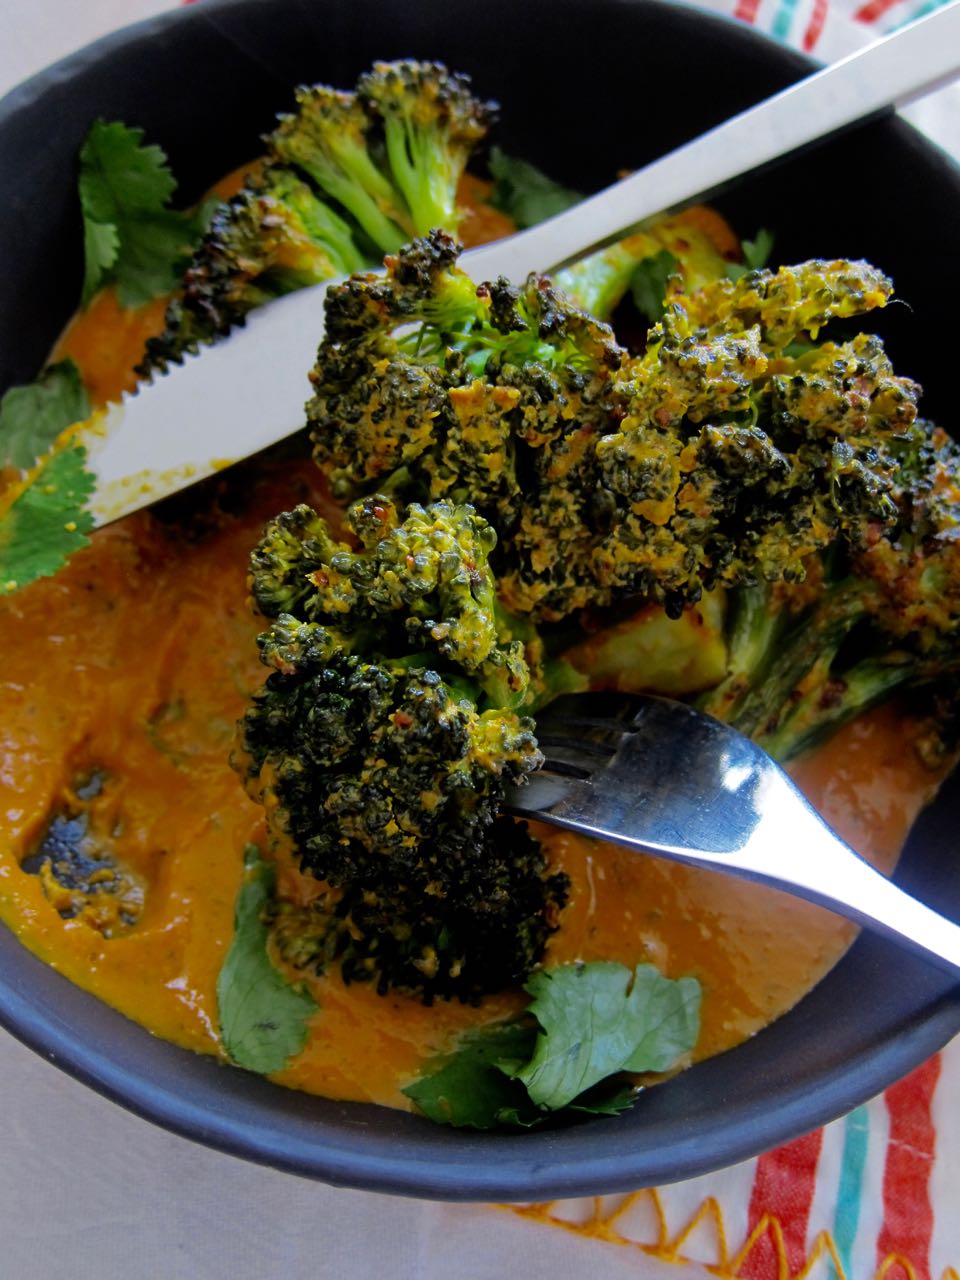
When I was in London this past Winter I went to dinner at Gunpowder, an Indian restaurant on the South Bank near Tower Bridge. I ordered the mustard fish and the mustard broccoli (I guess I just like mustard?). The fish was incredible, full of flavor and steamed to perfection in a banana leaf. But it was the broccoli that grabbed my attention. What I had expected to be a simple plate of grilled veggies came out as a pile of thick, charred broccoli stems arrayed atop an orangey, spiced sauce and accompanied by a steak knife. A steak knife! Anytime you get a knife with your veggies, you know it’s gonna be fun. I think the man sitting next to me agreed. We both uttered a “whoa” when the server placed the broccoli in front of me, and looked at each other in shared admiration of broccoli asserting itself in such a way.

The knife turned out to be necessary for breaking down the florets, which were large enough that I felt like I was doing cruciferous butchery. The sauce revealed itself to be a tikka masala-ish mixture that paired so well with the smoky, charred broccoli, I was kind of astounded that I’ve only ever had it with chicken. Why does it never get paired with veggies? It’s the perfect compliment. I mean, especially for cauliflower, which just tastes like whatever you add to it, right? But the broccoli added just enough of a bitter contrast to really counter the rich, creamy sauce. I loved it so much I knew I’d be adding it to my home repertoire of main dishes.

And here we are! I roasted the broccoli for simplicity and because I don’t have a grill. You can finish it under the broiler if you really want that charred, smoky flavor. The sauce is a fairly basic tikka masala, and served with a side of rice, makes a really full, rich meal for a weeknight that nevertheless won’t weigh you down. I think the sauce would also be excellent on it’s own to have in your arsenal, for nights when you’ve got some meat, tofu, or really anything extra sitting around that needs a little help (see? Leftovers! Maybe I am addressing that issue today).

broccoli & tikka masala.jpg
mustard marinated broccoli.jpg
roasted mustard broccoli.jpg
Tikka Masala sauce.jpg
Roasted broccoli & tikka masala

Roasted Mustard Broccoli & Tikka Masala Sauce

Broccoli & Tikka Masala both adapted from Bon Appetit. This makes an excellent side dish or a hearty main served over basmati rice.

For the Mustard Roasted Broccoli:

  • 2 small heads broccoli, broken into florets (or cut into thick steaks)

  • kosher salt

  • 1/2 cup plain greek yogurt

  • olive oil, plus more for pan

  • 1 tbs whole grain mustard

  • 1 1/2 tsp smoked paprika

  • 1/2 tsp amchoor powder

  • 1 tsp cumin

  • 1 tsp turmeric

For the Tikka Masala sauce:

  • 3 tbs ghee (or butter)

  • 1 small white onion, thinly sliced

  • 1/4 cup tomato paste

  • 6 cardamom pods

  • 3 dried chiles de arbol

  • 1 tsp ground ginger

  • 2 tsp turmeric

  • 1 tsp garam masala

  • 1 tsp ground coriander

  • 1 tsp cumin

  • 2 tsp kosher salt

  • 1 28 oz can whole peeled tomatoes

  • 2 cups heavy cream

  • 3/4 cup chopped cilantro, plus more for serving

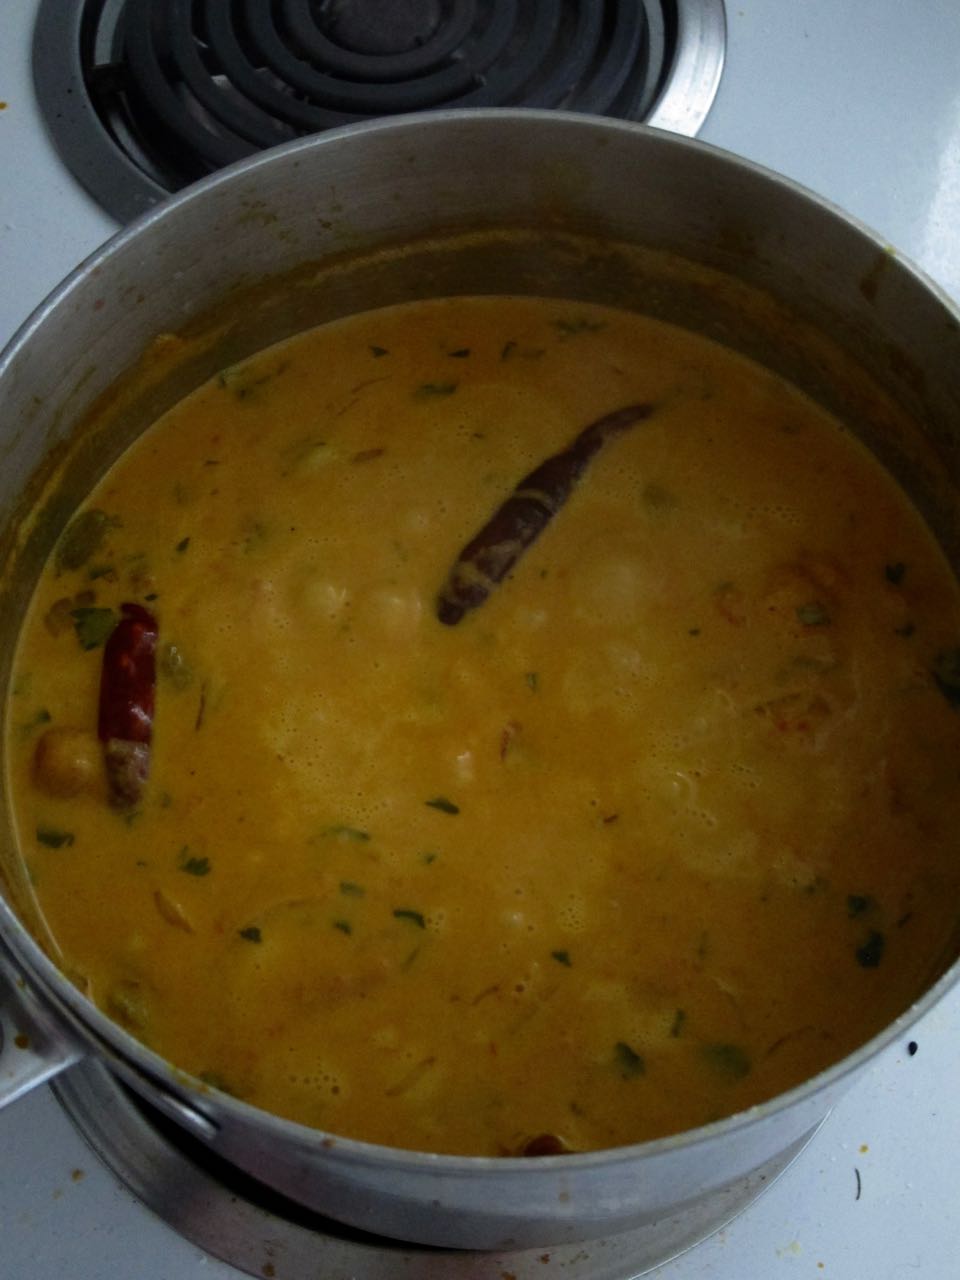
  1. Make the tikka masala sauce: heat ghee in a large pot over medium heat. Add the onion, tomato paste, cardamom pods and chiles, and cook until onions are softened a bit, about 5 minutes. Add in the spices and salt and cook another 4 minutes, until spices start to darken and turn fragrant.

  2. Add in the tomatoes and their juice and cook for 10 minutes, stirring frequently and smashing the tomatoes against the sides of the pot with your spoon to break them up as they cook.

  3. Add in the heavy cream and cilantro and stir everything together. Simmer 40 minutes, until starting to thicken.

  4. Remove sauce from heat and blend until smooth, using a blender or immersion blender. Return to the heat and simmer another 20 minutes.

  5. While the sauce is simmering, make the broccoli: heat oven to 400 degrees. Bring a large pot of well salted water to a boil, then blanch the broccoli florets, two minutes, until bright green. Drain and dry with paper towels.

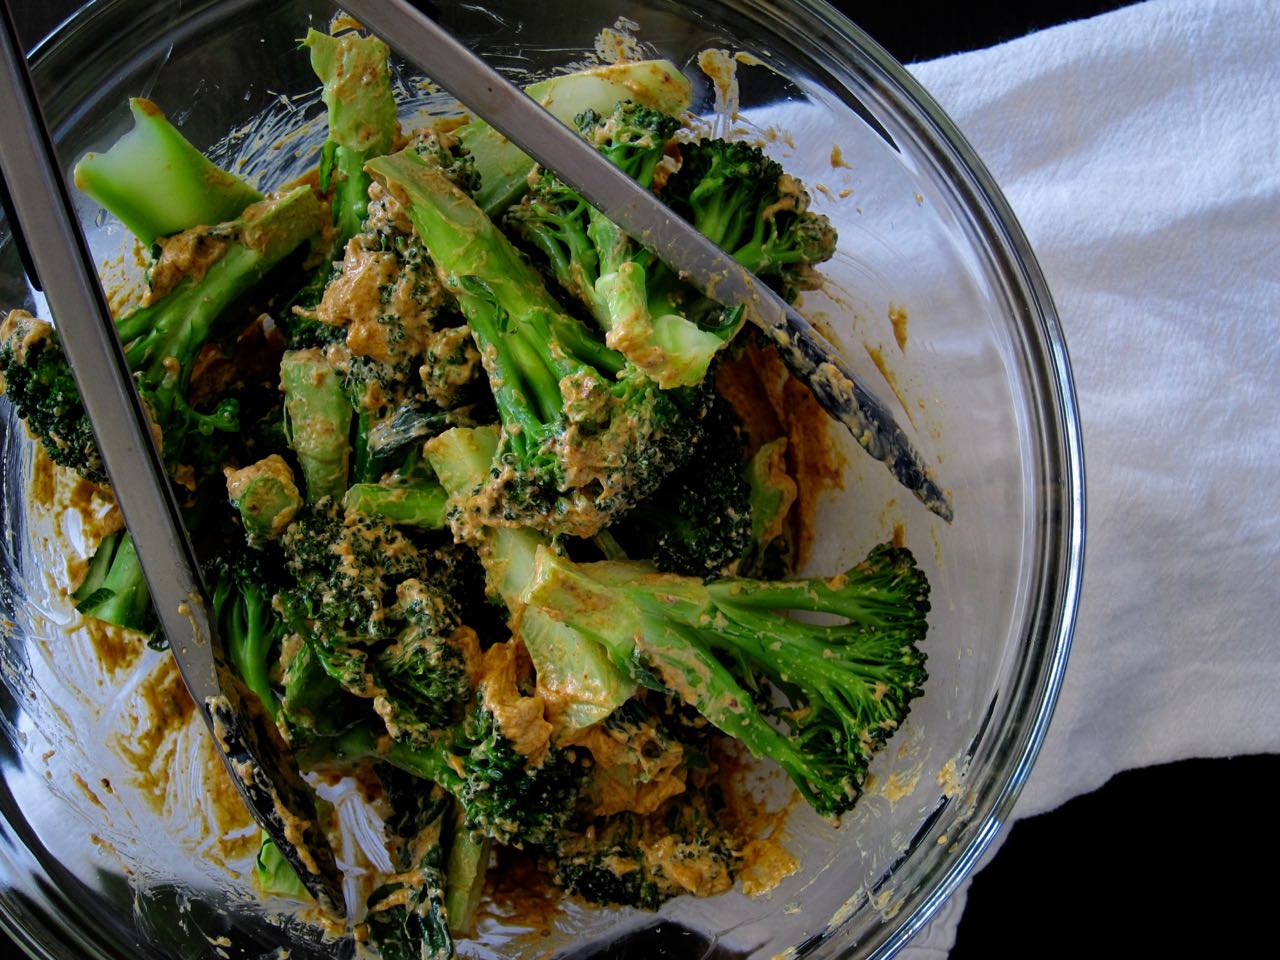
  6. In a large mixing bowl, whisk together the yogurt, mustard, paprika, amchoor, cumin and turmeric with enough olive oil to form a thick marinade, about 2 tablespoons. Add the blanched broccoli to the bowl and toss to coat everything thoroughly.

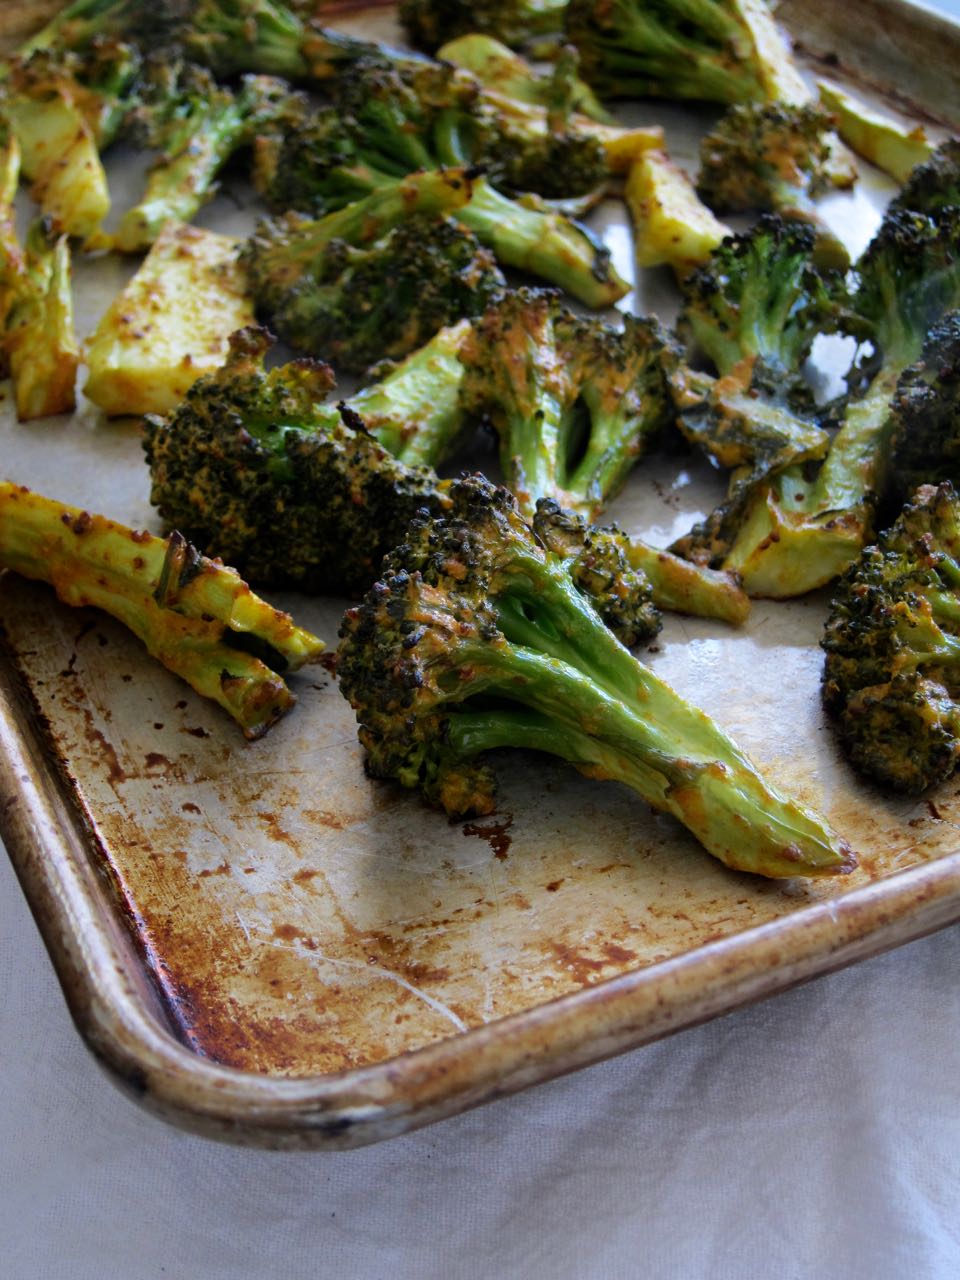
  7. Grease a rimmed baking sheet and spread the broccoli in an even layer. Roast for 15-20 minutes until crispy and starting to char at the tips (you can finish under the broiler if you want a little more char).

  8. To serve, Spoon a thick layer of the sauce in the bottom of a serving dish and arrange the broccoli on top. Garnish with cilantro and serve hot.

In Recipes Tags Sides & Appetizers, Main Dish
Comment

Black Sesame Cookie & Vanilla Ice Cream Sandwiches with Miso Caramel

April 12, 2019 Allie
Black Sesame Cookie & Vanilla Ice Cream Sandwiches with Miso Caramel

So, remember that dinner I mentioned in my London post, when, post-Prague, I relished in the veggie-forward fare at Scully St. James but then finished it off with a decadent miso caramel and black sesame dessert?

Yeah, me too! I can’t stop remembering it, actually. I knew as soon as I tried it in the restaurant that I wanted to recreate it at home in some way.

The more I thought about it though, the more I wasn’t sure how. The original dish was a bay leaf ice cream smoothed into a wide ramekin, topped with a layer of miso caramel and then lidded with a crispy black sesame cookie decoratively dusted with matcha and edible flowers.

So, yes, that’s delicious, but I don’t know, that felt like kind of a silly thing to make at home. I’d have to spend a lot of time and effort making either one of those or a lot of them, and 1) that’s a lot of work for one ice cream dessert, or 2) a big storage ask for my freezer if I were to make several.

But I realized the solution when I had a few friends over for dinner a few weeks ago. I knew I wanted to take the opportunity to make a batch of miso caramel (you know, with other people to help me eat it), and I thought I would just pair it with black sesame ice cream. But I didn’t have the time to make a batch of ice cream, and as it turns out, you can’t just walk into most grocery stores and find a commercially available option for that flavor. So, I simplified. I bought a pint of vanilla ice cream, and served that with the miso caramel drizzled on top and garnished with toasted black sesame seeds.

My friends loved it! The combo of the sweet, vanilla flavor with salty caramel and crunchy, nutty sesame really won everyone over, and it was a good reminder to me that sometimes, simple is better. I could have called that a win right there and stopped trying to recreate the original dessert, but I really, really wanted to get the cookie part in there too somehow.

So I thought about it more, and I decided on ice cream sandwiches! Who doesn’t love those? And, they are pretty easy, especially if you already have a batch of miso caramel hanging out in your fridge! If you don’t, the caramel is a dump and stir situation that takes no time at all, so that’s not really an obstacle.

The obstacle, as it turned out, was the cookies. Shockingly, considering the rise of black sesame in the last few years, I could not find a reputable recipe for black sesame cookies on the internet or in any of my cookbooks! There are a ton of recipes for black sesame ice cream, or black sesame cake, but no cookies. So I did what I had to, and mashed together my own version of an existing recipe. I mean, isn’t that the basis of food blogging anyway??

I settled on an idea of a brown sugar base cookie, and of studding the dough with as many toasted sesame seeds as I thought would be reasonable without overpowering everything. I wanted the sesame flavor to come through without compromising the texture of the final cookie. My first batch was delicious, but not suitable for the ice cream sandwiches I imagined. The cookies puffed into half domes in the oven, looking more like little buns than cookies, and all I could think was that adding ice cream would turn them into softball-sized sandwiches. I tried again with a base recipe from the master herself, Stella Parks, and nailed what I wanted on the first try.

I managed to stop myself from eating enough dough so that I ended up with 22 flat, rounded cookies with crisp edges, but centers soft enough not to mush the ice cream out the sides. And adding just enough sesame seeds meant that their nutty flavor comes through to play nicely when sandwiched around the vanilla ice cream and umami-rich caramel. A decadent but grown-up combination, for sure!

In the end I decided to embrace the simple approach and skip the matcha garnish, and you really don’t need it outside of the restaurant setting. Who wants to be getting powdered green tea all over their hands, anyway?

building black sesame cookie & miso caramel ice cream sandwiches
Black Sesame Cookies.jpg
Black Sesame Cookies spread with miso caramel.jpg
Black Sesame & Vanilla Ice Cream Sandwiches

Black Sesame Cookie & Vanilla Ice Cream Sandwiches with Miso Caramel

These cookies are not difficult to create, despite having three separate components. Do yourself a favor and buy a couple quarts of good quality vanilla ice cream, and the miso caramel and cookies can both be made ahead, though the beauty of the cookie dough is that you do not need to make it ahead of time and chill. It can be mixed up and baked ASAP.

For the Miso Caramel: Adapted from Food & Wine

  • 3/4 cup heavy cream

  • 3 tbs unsalted butter

  • 3/4 cup sugar

  • 1/6 cup light corn syrup

  • 2 tbs water

  • 1/4 cup white miso

  • splash of vanilla extract

For the Black Sesame Cookies: Dough base adapted from Bravetart

  • 2 sticks unsalted butter, softened

  • 1 cup sugar

  • 1 packed cup light brown sugar

  • 2 tsp kosher salt

  • 1 tsp baking soda

  • 1/2 tsp baking powder

  • 1 tbs vanilla extract or vanilla bean paste

  • 1 pinch grated nutmeg

  • 1 egg

  • 2 3/4 cups all purpose flour

  • 1/4 cup black sesame seeds, toasted and cooled

For the Ice Cream Sandwiches:

  • 1 recipe cookie dough

  • 12 tbs miso caramel (you’ll probably have extra, not a bad thing)

  • 2 qts vanilla ice cream

  1. Make the miso caramel. In a small pot, combine the cream and butter over medium heat and bring to a low simmer. In another medium size pot, stir together sugar, corn syrup, and water until everything is moistened. Cook over medium-high heat, without stirring, until the sugar dissolves, and then cook about 5 minutes more, until the mixture turns a deep amber color, swirling the pan every once in a while.

  2. When the caramel is the desired color, immediately remove from the heat (do not let it burn!) and carefully whisk in the hot cream and butter mixture. It will bubble up violently so be careful! When everything calms down and the caramel is whisked together, carefully pour into a heat-proof blender, and add the miso. Blend until miso is completely combined, then pour into a sealable container and let cool. Once cool, whisk in the vanilla. At this point, the caramel can be set aside until ready to assemble sandwiches or stored in the fridge for a couple weeks.

  3. Make the cookies: Heat oven to 350 and line baking sheets with parchment paper. In the bowl of a stand mixer, combine all ingredients except the egg, flour and sesame seeds. Mix on low speed until starting to combine a bit, then increase speed to medium and mix for 5 minutes, until fluffy and light. Add in the egg and mix until fully combined, then lower speed and add in the flour a bit at a time until fully combined. Lastly, stir in the sesame seeds until well-distributed.

  4. Measure out dough into 2 tbs size portions and form into balls. Place 2 inches apart on baking sheets. You will have to bake in batches depending on the size of your baking sheets; the most I could fit on one without risk of smooshing was 9 cookies. Bake until puffed up and crackled on top and deep golden around the edges, 10-12 minutes.

  5. Cool cookies on the baking sheets for 5 minutes, then transfer to a cooling rack to cool completely.

  6. Assemble the ice cream sandwiches: On a large baking sheet, pair up your cookies and transfer to the freezer to chill for 30 minutes. This will help the ice cream not immediately melt. Once chilled, separate the cookies, and spread a tablespoon of caramel on one half of the cookies, and a scoop of ice cream on the other half. Sandwich them together, then transfer back to the freezer to chill. Overnight is best to really make sure they are solid, but a couple hours should do, too. Ice cream sandwiches can be wrapped in plastic and stored in the freezer.

Notes:

  1. For soft, chewable cookies that won’t squeeze the ice cream out when you bite into them, start checking for doneness at 10 minutes. I baked the full 12 for my cookies, and they softened a bit after sitting in the freezer with the ice cream sandwiched between, but I could have baked them for less time and been happy.

  2. I got 23 cookies from the recipe, you can probably get a full two dozen if you go a little lighter on the dough snacking than I did.

In Recipes Tags Dessert
1 Comment

Drunky Bears Gingerbread Cake & Some Thoughts

December 14, 2018 Allie
Drunky Bears Gingerbread Cake

Hello! It’s the end of the year and I guess I’m feeling reflective, so pardon the long, long post! If you just want to read about drunken gummy bears on cake skip below the rest of the photos!

It’s been a bit more than a minute since my last post. I’m realizing as I write this that I dropped a cake here, took a months-long hiatus, and came back with another cake. But it’s fine! Because the seasons have changed and my mood has apparently gone from summery, festive sprinkles and fresh fruit to wintery, boozy delinquent gummy bears.

So why the break? Unlike my last hiatus, I didn’t plan it, but then I made the last cake and it took forever to motivate myself to post about it. And once I did, I just didn’t feel the urge to come back to this space. I didn’t want to take any photos or write up any recipes, and aside from a random small batch of cookies or indulging a brownie craving, I didn’t bake at all for a few months. Who even am I?

Part of that was logistical. I went to Australia again for work and then treated myself to a mini vacation (I will have to post about it because it was unreally beautiful). After almost three weeks of eating every meal out, I came home and only wanted to cook myself salad.

The other part was just mental. I was uninspired and unmotivated, and I simply needed a break. Unchecked, I have a tendency to turn this site into another full time job, and I was starting to feel like I had no time to spend with friends or just myself. Stress is so often self-induced, and I was inducing like crazy.

So, since I’m trying to remove the guilt of letting myself have a break from my 100% self-imposed schedule, I took one!

I erased my editorial calendar. I went to the beach! I went to Waco and celebrated Thanksgiving with friends and ate tacos and brisket and beer. I tried not to panic at not adding fresh content to the site, or not contributing a single recipe to the already over-filled pumpkin/turkey/stuffing ecosystem online. Absolutely no one missed anything, and I got to binge dumb holiday movies on Netflix and go outside on the weekends.

It. Was. Fantastic.

And then, well, I had to decide what to do. Out of habit, I just kept adding ideas to my list of recipes I want to post here, so I obviously hadn’t given up on the idea of the blog. But also, after years of saving spare cash here and there, I finally saved up enough to buy a real lens for the real camera I have stashed in my closet, one that could take my photos from “meh” to “just ok”! I did research, I compared prices, and I came very close to purchasing a lens. And then I paused. Which made me think.

There is a special kind of decision paralysis that comes from fear. And I think that’s what it is. I have fear that I’ll just accidentally walk away from this forever. The truth is it takes a lot of time and energy to product something that pays me $0. Fortunately, I’m not trying to rely on this blog for money, but my time is valuable too. And yet, there is a part of me that doesn’t want all this time and effort to be for nothing. Will creating this only for myself be enough? Will my crappy photos continue giving me feelings of failure? So, I worry that one day I will decide that it’s no longer worth it. And then I’m really going to wish I’d spent that camera money on something else.

See? Paralysis.

I don’t know the answer yet, but I’ll keep posting as I want, with my crappy camera for now. So below, enjoy some “meh” photos of a very not “meh” cake!

Drunky Bears close up
Drunky bears fell off the cake

This cake came from the idea of a traditional holiday fruitcake.

Let me explain.

You know the fruitcake that gets sold with the really gross looking, fluorescent bits of cherry and whatever other stuff that is super seasonally appropriate with bits of green and yellow and red? Yeah, no one wants to eat that. But what people do like to eat, that have a similar color scheme, are gummy bears.

You see where I went with this.

Unfortunately, gummy bears cannot be baked into a cake, since they are like 100% sugar and gelatin, and so have a tendency to melt. But they can be soaked in spiced rum and scattered between two layers of gingerbread cake in a pillowy drift of cream cheese frosting.

Again, you see where I went with this.

This cake is weird. I know it’s weird, you know it’s weird. I almost didn’t bring it to my friend Christiana’s house after telling her I would arrive with dessert, because I looked at the final product and I was momentarily afraid I wouldn’t have friends anymore if I showed up with this cake. But I found my nerve and I’m so glad I did. The cake was a hit!

The orange-scented frosting pairs wonderfully with the dense gingerbread cake, and the boozy gummy bears in the middle, while a bit strong and sharp on their own, meld into the cake so well they almost disappear (Seriously, we couldn’t find them! Either there was a gummy bear thief or they all got pushed into the half of the cake that wasn’t cut. But the little bits we got were fantastic). The gummy bear soaking liquid then gets mixed into a glaze and dabbed onto the cake layers before frosting, for even more rummy goodness. It’s a boozy cake, and it definitely looks a bit drunk, but you can moderate the booze as you like or leave it out entirely. Either way, I’d give the gummy bears a try!

You do not have to decorate your cake with a dystopian scene of drunk gummy bears playing spin the bottle by the fire and sneaking off into the woods to plummet to their deaths, however. I just have a dark sense of humor sometimes and I entertained myself immensely creating my little dark tableau.

Gingerbread cake decorating candy
assembling gingerbread cake.jpg
adding rummy bears to gingerbread cake.jpg
rummy bears.jpg
Sugar Paste Caution signs.jpg
Drunky bears escaping
Drunky bears cake with bonus cake

Drunky Bears Gingerbread Cake with Orange Cream Cheese Frosting

Adapted from Faith Durand. I subbed in date syrup for half of the molasses, which lends a more caramel, less bitter flavor than the blackstrap molasses originally called for, and I added orange zest to the frosting, which adds a floral, citrusy note to the tangy cream cheese.

For the cake:

  • 1 1/2 sticks unsalted butter (12 tbs), cut into a few large chunks

  • 3/4 cup blackstrap molasses (or use regular molasses)

  • 3/4 cup date syrup

  • 3/4 cup brown sugar

  • 1/3 cup white sugar

  • 3 1/4 cup all purpose flour

  • 1/2 tsp kosher salt

  • 2 1/2 tsp baking soda

  • 2 tsp ground ginger

  • 1/2 tsp cinnamon

  • 2 tsp unsweetened cocoa powder

  • 1 tsp vanilla extract

  • 2 eggs, beaten lightly to break up yolks

  • 1 1/2 cups whole milk

For the frosting:

  • 16 oz cream cheese, softened

  • 1/4 cup flour

  • 1 cup sugar

  • 1/4 tsp kosher salt

  • 1 cup whole milk

  • 1 tsp vanilla extract

  • zest of 1 orange

For the boozy gummy bears & rum glaze (very optional):

  • 1/2 cup gummy bears (I like Haribo)

  • spiced rum (or another booze of your choice)

  • powdered sugar

  1. In a small bowl, add the gummy bears and then enough rum to fully cover the gummies. Transfer to the refrigerator to soak, at least 5 hours but more if you want. The longer they soak the mushier they will get, and the boozier too.

  2. Make the cake. Heat oven to 350 degrees and butter two 8-inch cake pans (see notes). In a pot over medium heat, add the butter, molasses and date syrup, and the sugars. Whisk everything together until smooth and the sugars have dissolved. It should not look grainy and the butter should be completely melted. Remove from heat and set aside to cool.

  3. In a large bowl, whisk together the salt, flour, spices, baking soda, and cocoa. Add the vanilla, eggs, and milk to the cooled molasses mixture (it helps to add the milk first to make sure you won’t be scrambling your eggs!) and whisk to combine. Pour the liquid into the dry mixture and whisk until completely combined and smooth. The batter will start to bubble a bit as the baking soda reacts, so work quickly so you can save that action for the oven.

  4. Divide the batter between prepared cake pans, reserving some for a little mini cake or cupcakes, or discard, (or bake it all in the 8-inch pans, just allow for longer baking times). Bake for 35-40 minutes (test for doneness at 35) until a toothpick inserted in the center comes out clean. Cool for 30 minutes in the pans and then run a knife around the edges of the cakes and invert to cool completely on a wire rack.

  5. While the cakes are cooling, make the frosting. Using a mixer, whip the cream cheese until smooth and fluffy on high speed for several minutes, then scrape into another bowl and set aside.

  6. In a pot over medium heat, add the flour, sugar, salt and milk and whisk until smooth. Keep whisking as you bring the mixture to a simmer. It will thicken up once it reaches a simmer, and keep it bubbling for another minute, then pour into the mixer bowl. Beat the mixture on high speed for 10 minutes, until cool and lightened up a bit.

  7. While the mixer is running on medium speed, slowly beat in the cream cheese until everything is smooth and combined. Add the vanilla and orange zest and beat until smooth. Transfer to the fridge to chill and firm up a bit. When ready to use, beat it with the mixer again or give it a few vigorous turns with a rubber spatula or wooden spoon.

  8. Assemble the cake: when layers are cool, level them if needed. Drain the gummy bears and reserve the soaking liquid. To the liquid, add enough powdered sugar to create a thin glaze, then apply as liberally as you want to the leveled cake layers. If you want it super boozy skip this step and just add the rum. It’s the holidays!

  9. On top of one of the glaze layers, spread half of the frosting. It will seem like a lot but the cake demands it. Scatter your boozy gummy bears on top of the frosting. I chopped them up a little to help with this, but you can leave them whole too. Top with the second layer, and spread the remaining cream cheese frosting on top.

  10. Decorate if you wish with more gummy bears or other candy. Follow those gingerbread house vibes!

Notes:

  • The original recipe calls for using two 9-inch cake pans, but 9-inch is huge, and I only have 8-inch pans anyway. I originally tried to reduce the recipe to yield less batter for the 8-inch rounds, but that resulted in wonky measurements, so I left the original amounts called for in the recipe and just baked off a little mini cake with leftover batter. Based on the thickness of the cake layers, I probably could have just halved the recipe and baked two thinner layers in the 8-inch pans, so there are options. Just make sure you adjust oven times if you are baking thinner or thicker layers. I’d start checking around 25-30 minutes for doneness with thin layers and be prepared to bake longer than 40 minutes for thicker layers.

In Recipes, Allie Dreams of Cake Tags Dessert
Comment
← Newer Posts Older Posts →

For those who plan their next meal while eating the last.


INSTAGRAM

🎶When pizza’s on a bagel*, you can have pizza anytime**!🎶

*donut
** after you fry some donuts
FINALLY perfected these Burnt Honey Butter Biscuits & what good timing! It’s carb season & we are all hibernating! 🐻
Final thoughts on Small Thanksgiving: take your sweet potato + marshmallow combo firmly into dessert or even breakfast, and consider a cozy mashed potato soup with stuffing croutons to use up those leftovers. Stay safe & Happy Thanksgiving! 😷🦃
Part 2 of Small Thanksgiving: all the stuff to stuff yourself with! An Italian sausage pasta-inspired stuffing and a vegetarian, spiced wild rice stuffed squash. Everything serves 4-6, gather safely this year! 😷🦃 #thanksgiving #smallthanksgiving #v
Now that we (and the world?) can let out that collective sigh of relief, I can  finally think about my favorite holiday! Everyone is probably (hopefully 😷)looking at smaller gatherings this year, so I’m sending some Small Thanksgiving ideas ou
So happy Disney keeps justifying my dumb baking purchases! This matcha shortbread is delicious, but make a good sandwich cookie it does not. I hid all the broken pieces 🙈
Subscribe to Tea and Fog!

RECENT RECIPES

Featured
polenta with rosemary and goat cheese.jpeg
Salmon Wellington and Warm Rice Salad.jpeg
Pizza Donut Hero.jpeg
Burnt Honey Butter Biscuits.jpeg
Mashed Potato Soup with Stuffing croutons.jpeg
sweet potato donuts with marshmallow frosting.jpeg