• Home
    • Recipes
    • The Roast Chicken Project
    • Allie Dreams of Cake
    • Sunday Suppers
  • Travel
  • About
Menu

Tea and Fog

Street Address
City, State, Zip
Phone Number

Your Custom Text Here

Tea and Fog

  • Home
  • Recipes
    • Recipes
    • The Roast Chicken Project
    • Allie Dreams of Cake
    • Sunday Suppers
  • Travel
  • About

A Simpler Cake for the Fourth

June 28, 2019 Allie
red white blue funfetti cake

Hi!

We’ve got America’s most red, white & blue day coming up next week, and probably also some socializing or outdoor BBQ-ing and celebrating, so let’s make some cake, shall we?

Don’t worry, though, I realized last year the limits of my capacity for digesting blue food dye and for my patience levels, so I won’t be revisiting the flag cake. I think that’s a once-every-five-years kind of project for me. No, this year, I wanted something a little simpler.

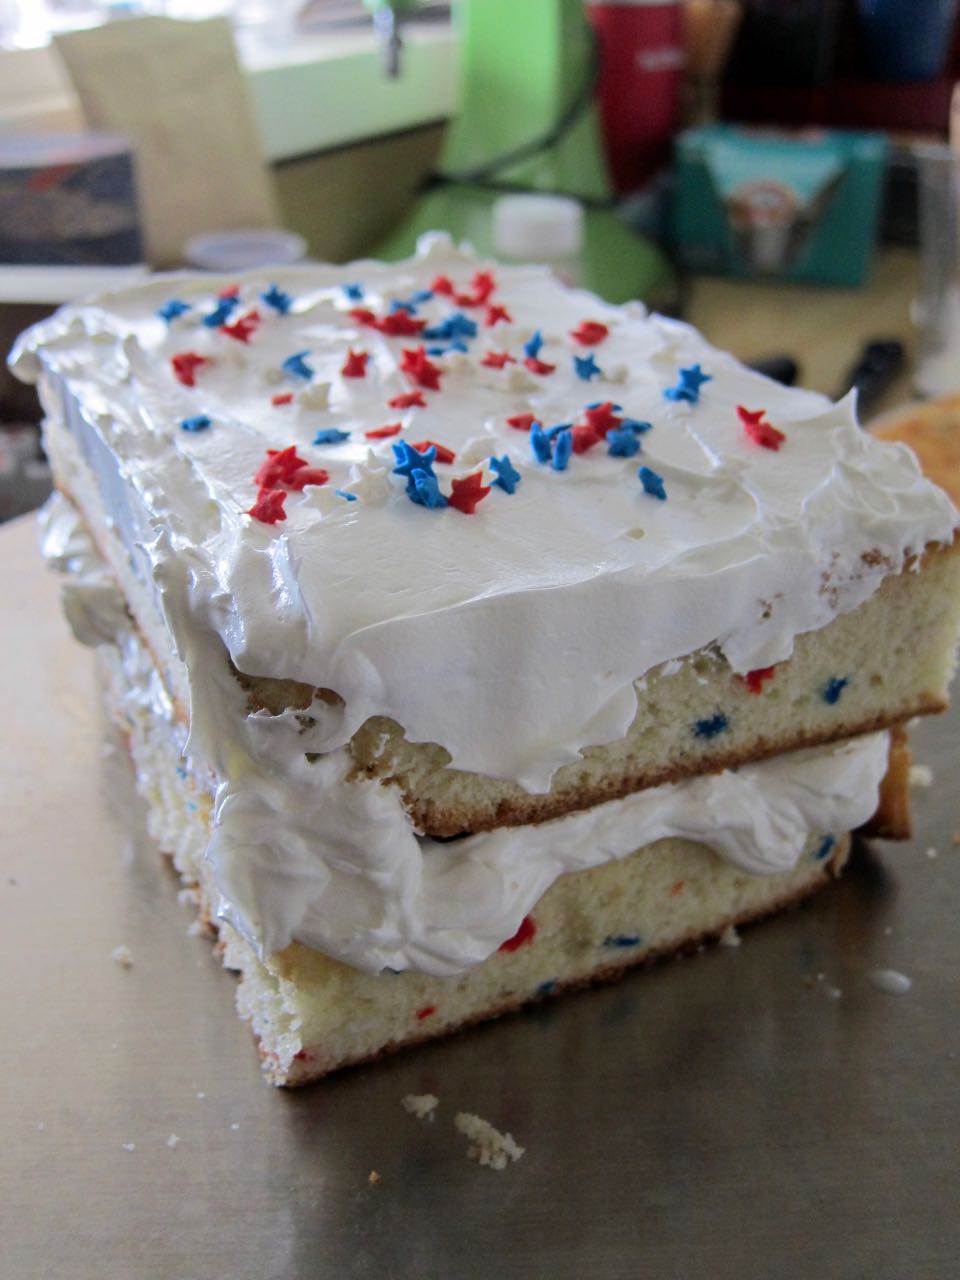
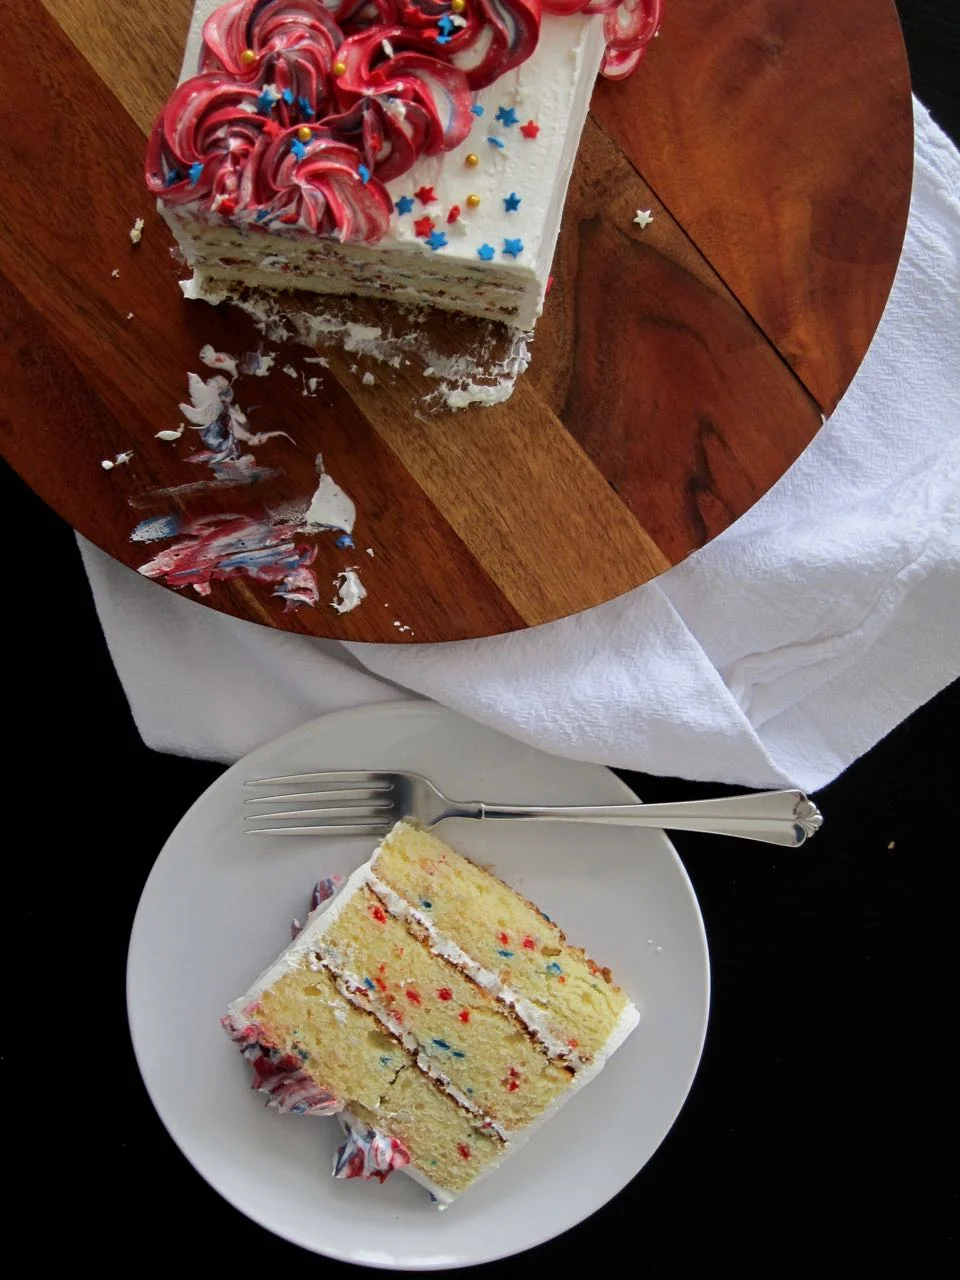
For that, I dove back into my archives, and updated the easiest funfetti cake ever with a patriotic twist! Red, white, and blue star-shaped sprinkles exist, and they went into and atop this cake, along with swirls of red and blue tinted frosting, all tied together in an easy to cut (and assemble), rectangular package. Gotta sneak that flag shape in there somehow!

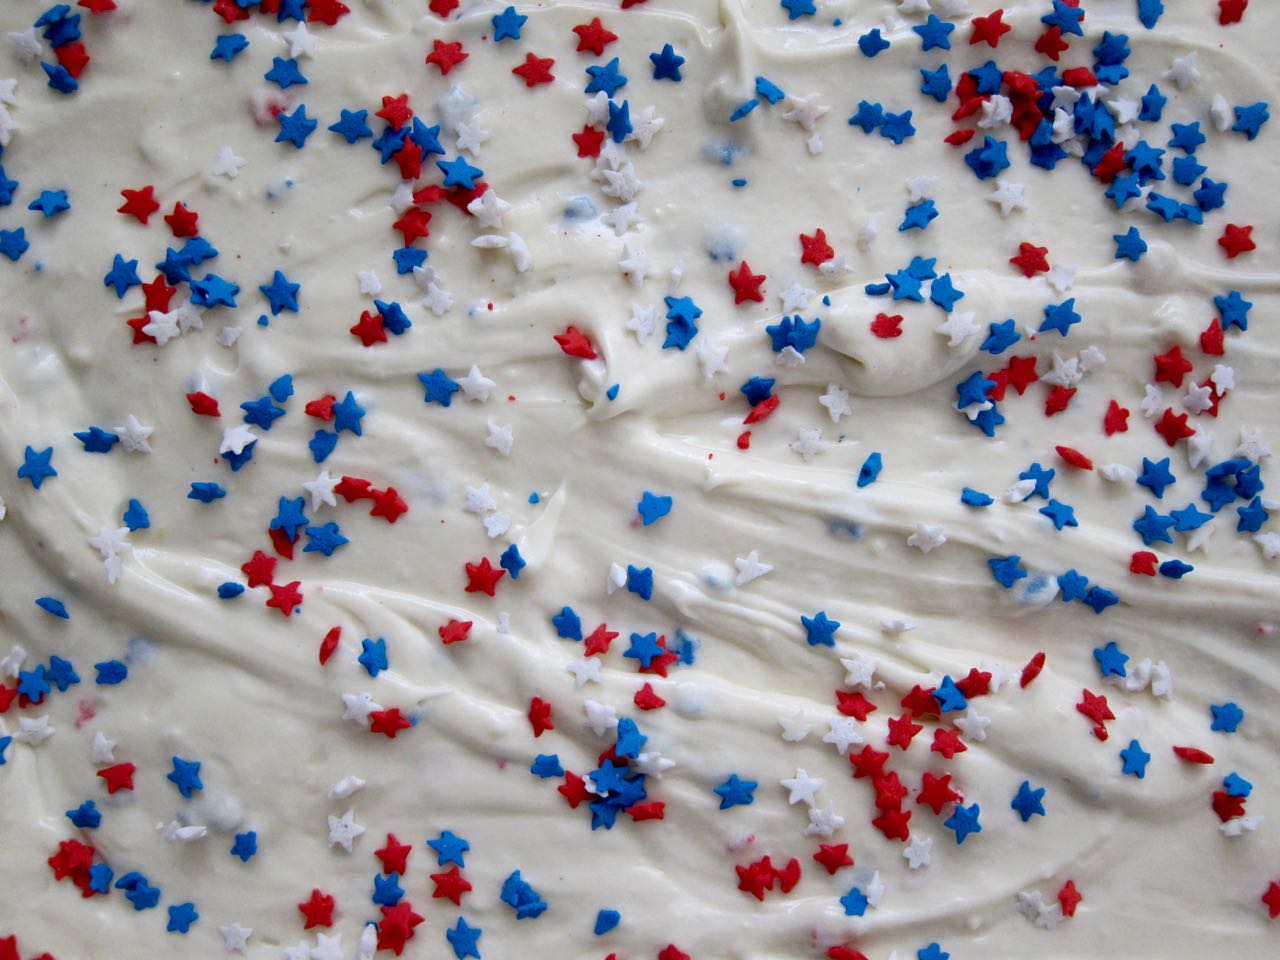
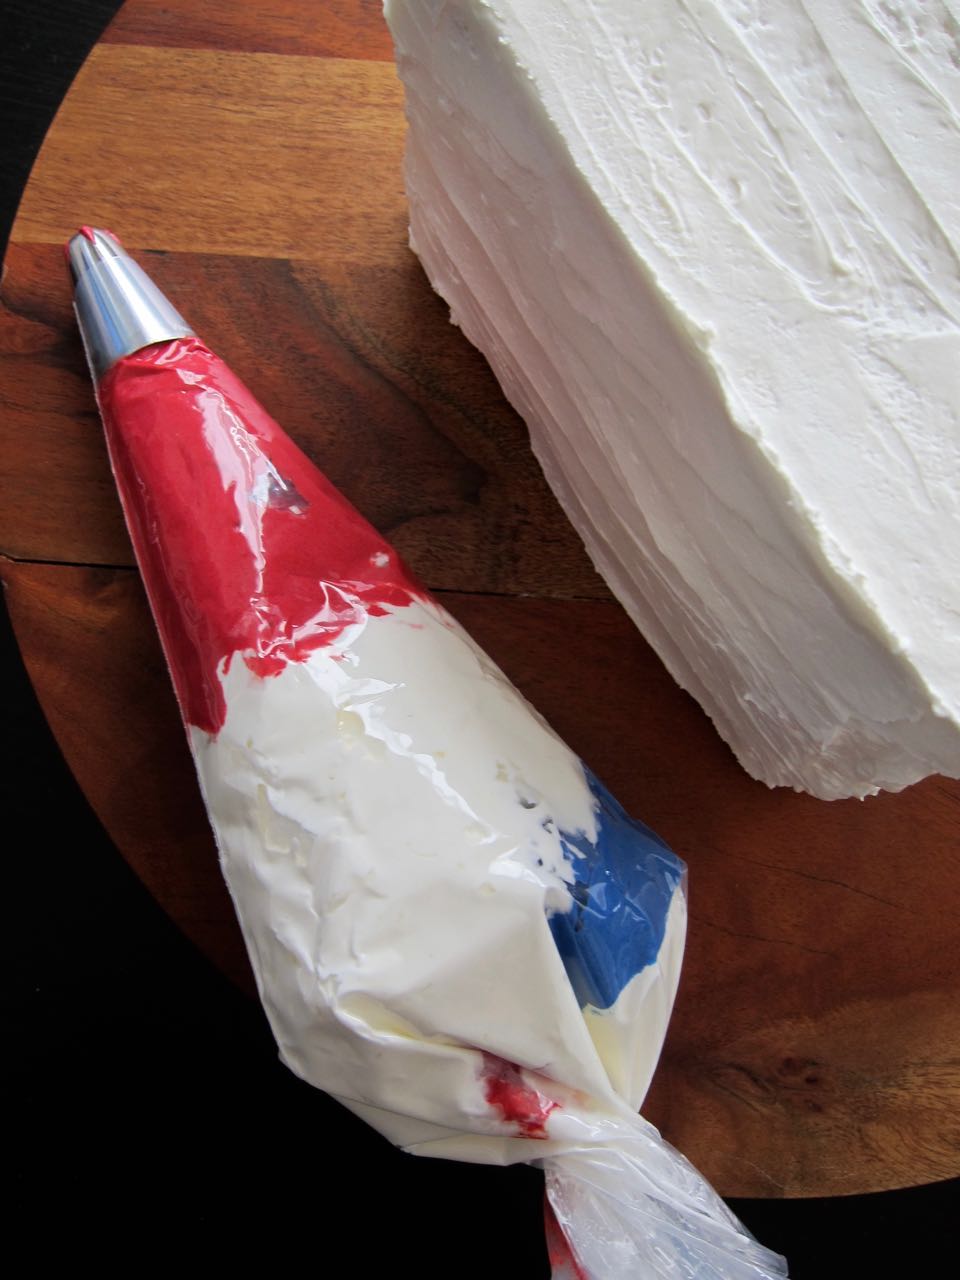
As for the frosting, I was going for a sort of ombre effect of red to white to blue, but I layered the red into the piping bag first. As you can see from the photos, the red really makes itself known! But I promise it still tasted delicious, and that’s the point of cake, right? So, since this cake is so dead simple to make, have fun, play a little, and if it doesn’t come out perfectly the way you planned, well, neither did America, so eat it anyway!

red white blue cake
building red white blue funfetti cake.jpg
patriotic funfetti batter.jpg
red white blue frosting.jpg
Red white blue sprinkles.jpg
patriotic funfetti cake
Sliced red white blue funfetti cake

Red, White & Blue Sprinkle Cake

Cake layers adapted from Christina Tosi.

For the cake:

  • 1/2 stick unsalted butter, softened to room temp

  • 1/3 cup vegetable shortening

  • 1 1/4 cup granulated sugar

  • 3 tbs, tightly packed, light brown sugar

  • 3 eggs

  • 1/2 cup buttermilk

  • 1/3 cup grapeseed oil

  • 2 tsp clear imitation vanilla

  • 2 cups cake flour

  • 1 1/2 tsp baking powder

  • 3/4 tsp kosher salt

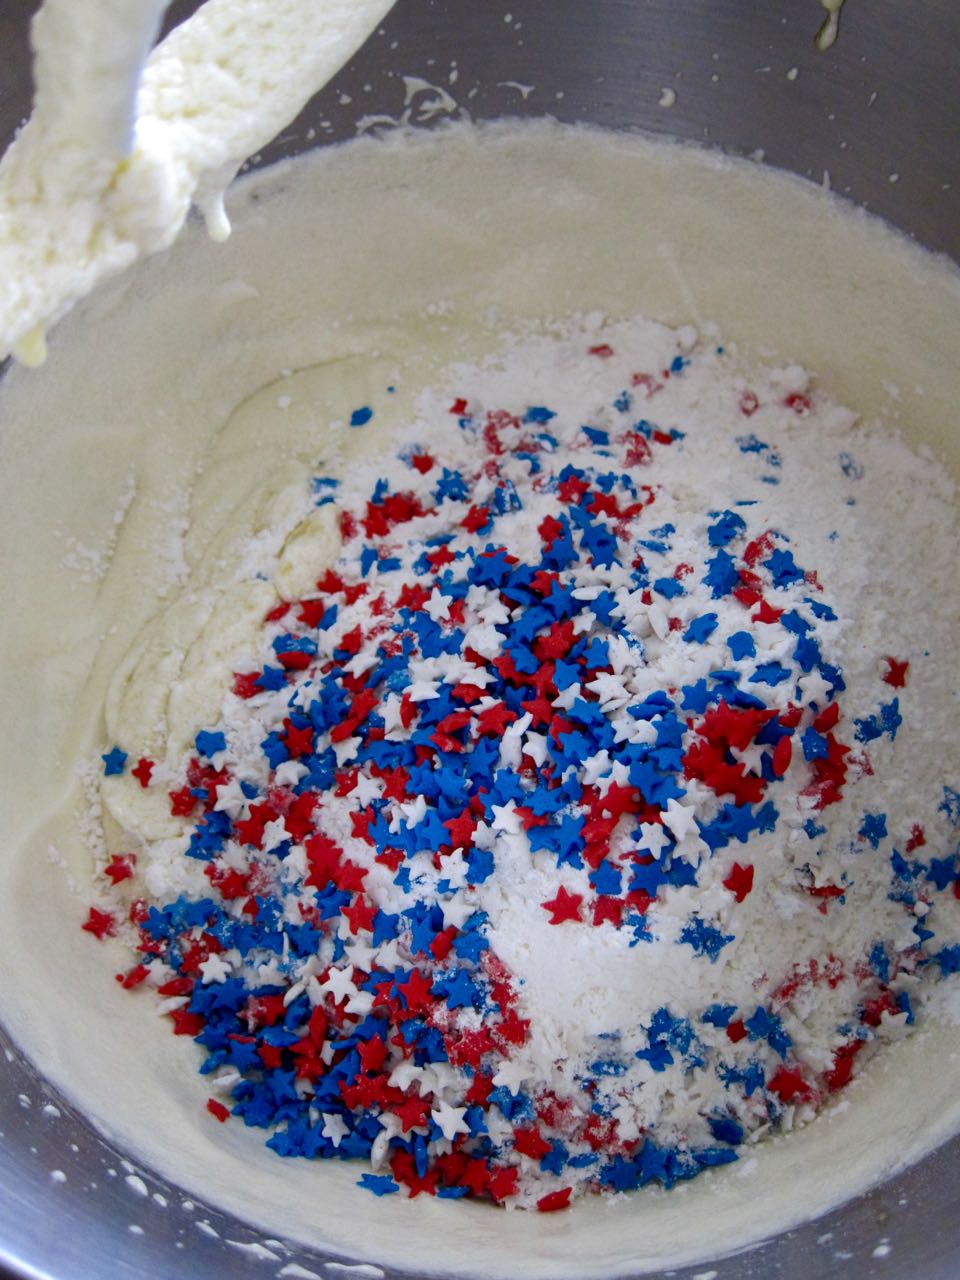
  • 1/4 cup plus 2 tbs red, white & blue sprinkles (see note)

For the swiss meringue buttercream:

  • 4 egg whites

  • 1 1/4 cup sugar

  • 3 sticks butter, unsalted, room temp

  • 1 tsp clear imitation vanilla

For assembly:

  • 1/4 cup milk

  • 1 tsp clear imitation vanilla

  • more sprinkles, for decorating

  1. Bake the cake: Heat oven to 350 degrees. Spray a quarter sheet pan with cooking spray and line with parchment. Set aside.

  2. In the bowl of a stand mixer, combine the butter, shortening, and sugars and beat on medium-high for 2-3 minutes, scraping down as needed, and then add the eggs and beat another 2-3 minutes on medium-high.

  3. Turn the mixer to low and pour in buttermilk, oil and vanilla extract. With speed on medium-high, beat for 4-6 minutes, until the mixture is very, very pale, almost white, and almost doubled in size. When you see no more streaks of fat or liquid in the batter, it is ready for the dry ingredients. Add the cake flour, baking powder and salt, as well as the 1/4 cup of sprinkles, and mix for no more than a minute, just until everything comes together.

  4. Spread the batter evenly into the prepared cake pan and then sprinkle with remaining sprinkles. Bake 30-35 minutes, until puffed and no longer jiggling in the middle. Cool cake completely in the pan, on a wire rack.

  5. Make the frosting: Set bowl of mixer over a pot of simmering water, and add the egg whites and sugar and whisk to combine. Continue whisking until sugar dissolves and mixture is very warm to the touch, or reached 160 degrees on an instant read thermometer.

  6. Transfer bowl to stand mixer and beat egg white mixture with the whisk attachment on high speed to stiff but not dry peaks. Continue beating until fluffy and cooled, 6 minutes.

  7. Switch to the paddle attachment and beat on medium-low speed, adding the butter a bit at a time, beating well after each addition. Beat in the vanilla and then beat on low speed for about 2 minutes more, to reduce any air bubbles.

  8. To assemble: using a ruler or other straightedge as a guide, cut the cooled cake into quarters (you can stack all four layers or freeze one for later use or snacking, as I did). Place your first quarter onto a cake plate or decorating stand.

  9. In a small bowl, mix together the milk and vanilla, then brush 1/3 of the mixture onto the cake layer. Spoon a layer of frosting over the soaked cake, then sprinkle with a few more sprinkles. Top with the next cake layer and repeat. Top with remaining cake layer, brush on remaining milk soak, and then frost the cake as desired. You should have enough frosting to fully cover and do some fun piping if you want. Top with more sprinkles and enjoy!

Notes:

  • I used these sprinkles

  • For the ombre or multi-colored piping effect, dye some of your frosting to desired hues of red and blue, about 1/4-1/2 cup for each color. Layer with remaining white frosting into a piping bag fitted with a star tip, and pipe swirls to your heart’s content.

In Recipes, Allie Dreams of Cake Tags Dessert
1 Comment

Pici Pasta with Spicy Tomato Sauce

June 21, 2019 Allie
Pici pasta with spicy tomato sauce

Oh man, this pasta.

I’m going to warn you right off the bat today that yes, I am telling you to make your own pasta. And yes, I know that conjures horrific ideas in some minds about time commitments and needing special equipment and eating gluten.

I can’t do anything about the gluten, sorry, but I can promise you that I’m not asking for anything here that requires special equipment beyond a knife, or an excessive time investment. All this recipe really requires is some prior planning, but even then, not so much prior planning that it’s easier to just not do it at all.

But, anything you need to do here is totally and completely worth it, if you like chewy, almost dumpling-like pasta and spicy, flavorful sauces. Hopefully we are all in agreement that both of those things sound fantastic?

Great!

Now, a little backstory. Up until a few months ago I had never heard of pici pasta. I’d never seen it on a menu or sold in stores. Well, I am now angry at the powers that control my micro-universe, because I was missing out!

When I went to London’s Padella, I hadn’t really considered what I would order, because I was mostly concerned with achieving the crucial goal of being seated in the tiny restaurant at all, and in any event, I was sure there couldn’t be anything bad on the menu, if the line was any indication. Once I sat down, the cacio e pepe was calling to me, so I ordered it, not really paying much attention to the pasta shape. When a plate of thick, almost wormy-looking noodles was set in front of me, I hesitated slightly. I had been expecting spaghetti or something similar. What was this? But I took a bite and forgot my expectations instantly. Turns out, cacio e pepe, a rich preparation of mostly cheese and butter, works so well with thick, chewy noodles! Bucatini move over!

But the truth was I became so enamored of the noodles themselves. Yes, they were slightly alarming, visually, but they were perfectly al dente, almost still-doughy, which gave them a pleasant, chewy, texture. Was it closer to noodles or dumplings? Kind of somewhere in between, really.

When I got home, I immediately set about trying to find a recipe, and luckily, I’m not the only person out there who fell in love with Padella’s pici. But by this point, it wasn’t winter anymore, and cacio e pepe sounded too heavy to me. I could lighten it up with veggies, but that wasn’t what I was after this time. I just wanted pasta! But then, because I was obviously still living in London mode, I cracked open my copy of the Ottolenghi cookbook, and tried out the kosheri recipe. It was good kosheri, but the tomato sauce that went on top blew me away. It was spicy and cuminy and just the right level of acidic, yet still rich. I took one bite and decided to make it just to toss with my future pici pasta.

The combo is fantastic! The sauce is like a perfect spicy tomato sauce, like arrabiata, but with a slight flair from the cumin and the cilantro that takes it out of the ordinary. And it just coats those thick, chewy noodles in the best way. You have to give it a try.

Pici pasta
spicy tomato sauce with cilantro.jpg
spicy tomato sauce.jpg
Pici pasta & spicy tomato sauce

Pici Pasta with Spicy Tomato Sauce

Pasta adapted from Food52 and tomato sauce adapted from Ottolenghi.

For pasta:

  • 1 1/4 cup semolina flour

  • 1 3/4 cup all purpose flour

  • 2 tbs olive oil

  • 1 cup water

For the spicy tomato sauce:

  • 4 tablespoons olive oil

  • 2 large cloves garlic, crushed

  • 2 jalapenos, seeded and finely diced

  • one, 28 oz can whole peeled tomatoes, drained and chopped

  • 1 1/2 cups water

  • 1/4 cup apple cider vinegar

  • 1 tbs kosher salt

  • 2 tsp ground cumin

  • packed 1/2 cup cilantro leaves, chopped

  • salt and pepper, to taste

  1. Make the pasta dough: Whisk together the flours in a mixing bowl, then add the oil and water and stir everything together. Knead the mixture together with your hands, then turn out onto a flat surface and continue kneading until the dough is smooth and elastic, about 10 minutes. Wrap dough tightly in plastic and let rest for 1 hour or chill overnight.

  2. Make the spicy tomato sauce: Heat the olive oil in a sauce pan over medium-high heat. Add garlic and jalapeno and cook for two minutes, until fragrant. Add the tomatoes, water, cider vinegar, salt and cumin and bring to a simmer. Cook until thickened a bit, about 20 minutes.

  3. Add cilantro and remove from heat, let cool a bit, then blend with an immersion blender or regular blender until smooth (a few remaining chunks are ok). Taste and adjust for salt and pepper.

  4. Bring the mixture back over medium-high heat and continue to simmer, keeping warm until ready to add to the pasta.

  5. While the tomato sauce is simmering, shape and cook your pasta. Heat a large pot of salted water to a boil. Form dough into a rectangle and using a bench scraper or a knife, cut the short end into thin slices. Roll each slice out as evenly as possible into long ropes, about as thick around as a pencil. Store on a baking sheet dusted with semolina while shaping remaining dough.

  6. Add the pasta to the boiling water and cook, about 5 minutes, until al dente and nicely chewy. Drain, then add back to the pot and add as much of the sauce as you like (you may have extra sauce). Toss to coat and serve immediately.

In Recipes Tags Main Dish
Comment

Bacon Naan Roll

May 24, 2019 Allie
Bacon Naan Roll

Are you ready for a fun twist on a familiar breakfast idea?

I think for most of us, bacon is a breakfast staple. If not, well, I won’t tell you to change your life, because you are probably healthier than I am. Keep it up!

For the rest of us, this sandwich is heaven! Bacon is already MVP of breakfast sandwiches and even tacos, but at least in my experience, it’s rarely billed as the star, except in that one Harry Potter book where Mrs. Weasly made a stack of bacon sandwiches for Harry and Ron, and then I spent probably too much time wondering what plain bread and bacon taste like together. Probably delicious, but I still want something more to go with the bacon, you know?

And here, we get something more! I’ve learned that plain bacon sandwiches are kind of a British thing (I think) and in London, I tried a variation on that classic updated with cream cheese, scallions, and tomato sauce and wrapped in soft, griddled naan instead of smashed between two pieces of bread. This wrap, the bacon naan roll, is the signature breakfast dish at Dishoom, and if you go to London and land in the morning, seriously, Dishoom should be your first stop. Run, don’t walk there immediately, even with your luggage still in tow. They have multiple locations so chances are there will be one near your hotel.

I’m not going back to London anytime soon, but lucky for me, this could not be simpler to recreate at home. I whipped up a batch of scallion cream cheese, fried up some bacon, and added hot sauce to the sauciest gourmet ketchup I could find. All of that got rolled up in soft, homemade yogurt naans, which I would highly recommend. However, store-bought will do if you don’t want to bother with making naan first thing in the morning (but honestly the level of effort is less than french toast so I say go for it)!

bacon naan roll ingredients
bacon & cream cheese naan wrap.jpg
scallion cream cheese.jpg
scallion cream cheese and spicy tomato relish.jpg
bacon naan rolls.jpg

Bacon Naan Roll

Inspired by Dishoom’s famous breakfast roll.

  • 8 oz cream cheese, softened

  • 3 scallions, thinly sliced

  • 12 strips of bacon

  • 1/4 cup spicy tomato relish (see notes)

  • 4 naan (homemade recipe below)

  1. In the bowl of a stand mixer or in a mixing bowl, add the cream cheese. Whip on medium-high speed with a whisk attachment until lightened and fluffy. Add in the scallions and fold to combine with the cream cheese.

  2. In a large, heavy skillet, cook the bacon until just crispy. You don’t want it over-crisp for these sandwiches so the bacon can easily fold up in the naan. Drain bacon on paper towels and set aside.

  3. Wipe out your skillet and place a naan in the skillet. Cook for about 30 seconds on each side to warm the naan. Transfer to a plate and wrap in a clean dishcloth. Repeat with remaining naan.

  4. Assemble the naan rolls: Spread a layer of scallion cream cheese onto each naan, as much or as little as you like, though indulging here is not a bad idea! On top of the cream cheese, spoon a bit of the tomato relish and spread around. Place 3 strips of bacon on top and fold the naan up into a roll, either in a cylinder like a closed taco or like a burrito with one end open, if your naan is big enough. Enjoy warm!

Notes:

  • The tomato sauce on the bacon roll I had in the restaurant reminded me a lot of the “house-made ketchup” a lot of restaurants insist on serving. So, to approximate it, try buying the fanciest ketchup you can, or if you can find it, I found a sauce called “tomato Irish relish” that had the exact consistency I wanted, and mixed with a tablespoon of hot sauce, the perfect sweet-spicy flavor I was looking for.

If you want to make your own naan (recipe adapted from Power Vegetables):

  • 1 1/3 cup all purpose flour, plus more for dusting

  • 1/2 tsp kosher salt

  • 1/4 tsp baking powder

  • 2/3 cups plain, whole milk yogurt

  • olive oil, for cooking

  1. Whisk together dry ingredients in a mixing bowl, then stir in the yogurt. Knead the mixture with your hands to fully combine into a ball. Cover with plastic wrap and chill at least one hour.

  2. Heat a cast iron or other heavy bottomed skillet over medium-high heat. Divide your dough into 4 balls, and roll each into 8-inch disks.

  3. Cook one at a time in the pan. Drizzle the pan with a little olive oil, then place a dough disk in the pan. Cook for about 1 minute on each side, until bubbles start to form and the dough looks a little puffy. Transfer to a plate and repeat with remaining dough. Keep warm covered with a clean dish towel if using right away.

In Recipes Tags Breakfast
Comment
← Newer Posts Older Posts →

For those who plan their next meal while eating the last.


INSTAGRAM

🎶When pizza’s on a bagel*, you can have pizza anytime**!🎶

*donut
** after you fry some donuts
FINALLY perfected these Burnt Honey Butter Biscuits & what good timing! It’s carb season & we are all hibernating! 🐻
Final thoughts on Small Thanksgiving: take your sweet potato + marshmallow combo firmly into dessert or even breakfast, and consider a cozy mashed potato soup with stuffing croutons to use up those leftovers. Stay safe & Happy Thanksgiving! 😷🦃
Part 2 of Small Thanksgiving: all the stuff to stuff yourself with! An Italian sausage pasta-inspired stuffing and a vegetarian, spiced wild rice stuffed squash. Everything serves 4-6, gather safely this year! 😷🦃 #thanksgiving #smallthanksgiving #v
Now that we (and the world?) can let out that collective sigh of relief, I can  finally think about my favorite holiday! Everyone is probably (hopefully 😷)looking at smaller gatherings this year, so I’m sending some Small Thanksgiving ideas ou
So happy Disney keeps justifying my dumb baking purchases! This matcha shortbread is delicious, but make a good sandwich cookie it does not. I hid all the broken pieces 🙈
Subscribe to Tea and Fog!

RECENT RECIPES

Featured
polenta with rosemary and goat cheese.jpeg
Salmon Wellington and Warm Rice Salad.jpeg
Pizza Donut Hero.jpeg
Burnt Honey Butter Biscuits.jpeg
Mashed Potato Soup with Stuffing croutons.jpeg
sweet potato donuts with marshmallow frosting.jpeg