• Home
    • Recipes
    • The Roast Chicken Project
    • Allie Dreams of Cake
    • Sunday Suppers
  • Travel
  • About
Menu

Tea and Fog

Street Address
City, State, Zip
Phone Number

Your Custom Text Here

Tea and Fog

  • Home
  • Recipes
    • Recipes
    • The Roast Chicken Project
    • Allie Dreams of Cake
    • Sunday Suppers
  • Travel
  • About

Banana Pudding Cream Tart Cake

August 2, 2019 Allie
Banana Pudding Cream Tart Cake
Banana Pudding Cream Tart top

Yes, I’m jumping on the cream tart bandwagon!

I’ve seen these cute cakes all over Instagram and Pinterest, often large, letter-shaped creations topped with fruit, meringues, macarons, and flowers. A quick internet search tells me they started with Israeli baker Adi Klinghofer, and they pretty much exploded from there. Once I saw these as a challenge on The Great British Bake-Off I knew they had gone mainstream. I’m definitely a year late to this trend, but since no one I know had any idea what I was talking about when I tried to describe these cakes, I’ll pretend to be a trendsetter at least in my own life. These cakes are stunning to look at but most importantly to me, they didn’t seem all that difficult to make!

One thing that I realized though, in my search for some specifics of how exactly people were making these cakes, is that there isn’t a ton of variety to the recipes. The most variation seems to come in the cookie part, usually a sable base, but sometimes a sugar cookie, sometimes flavored with almond, sometimes vanilla. The filling seems to be a choice between cheesecake, pastry cream, or a stabilized whipped cream, sometimes with a curd added between the layers. And then you can top with whatever you want, but otherwise, that’s pretty much it.

There seemed to be, at least to me, a glaring omission here.

You have vanilla cookie. You have creamy filling. You can top with fruit and more cookies.

HELLO???

No one has thought to turn this into banana pudding?? I couldn’t believe it!

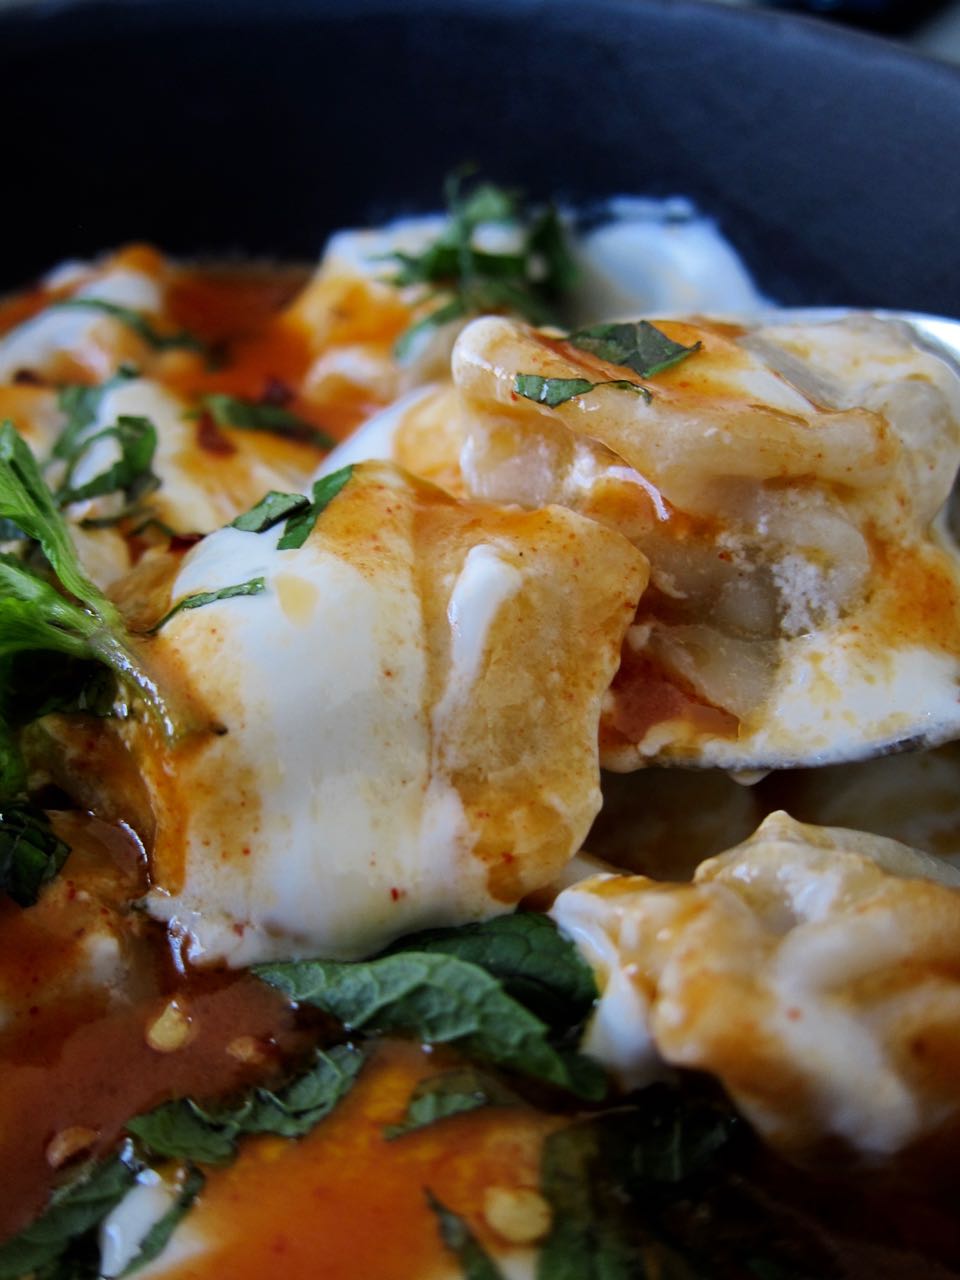
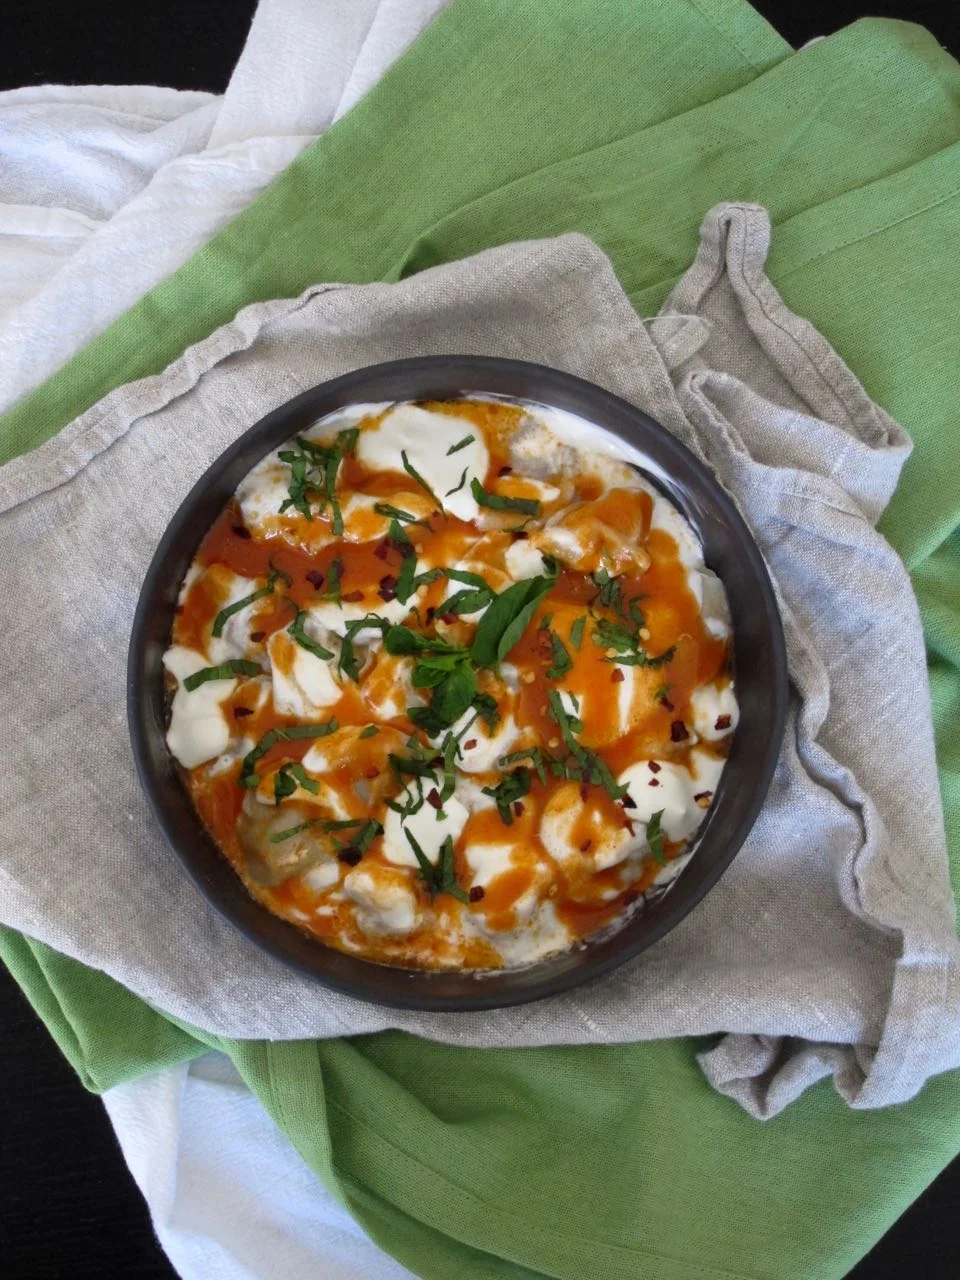
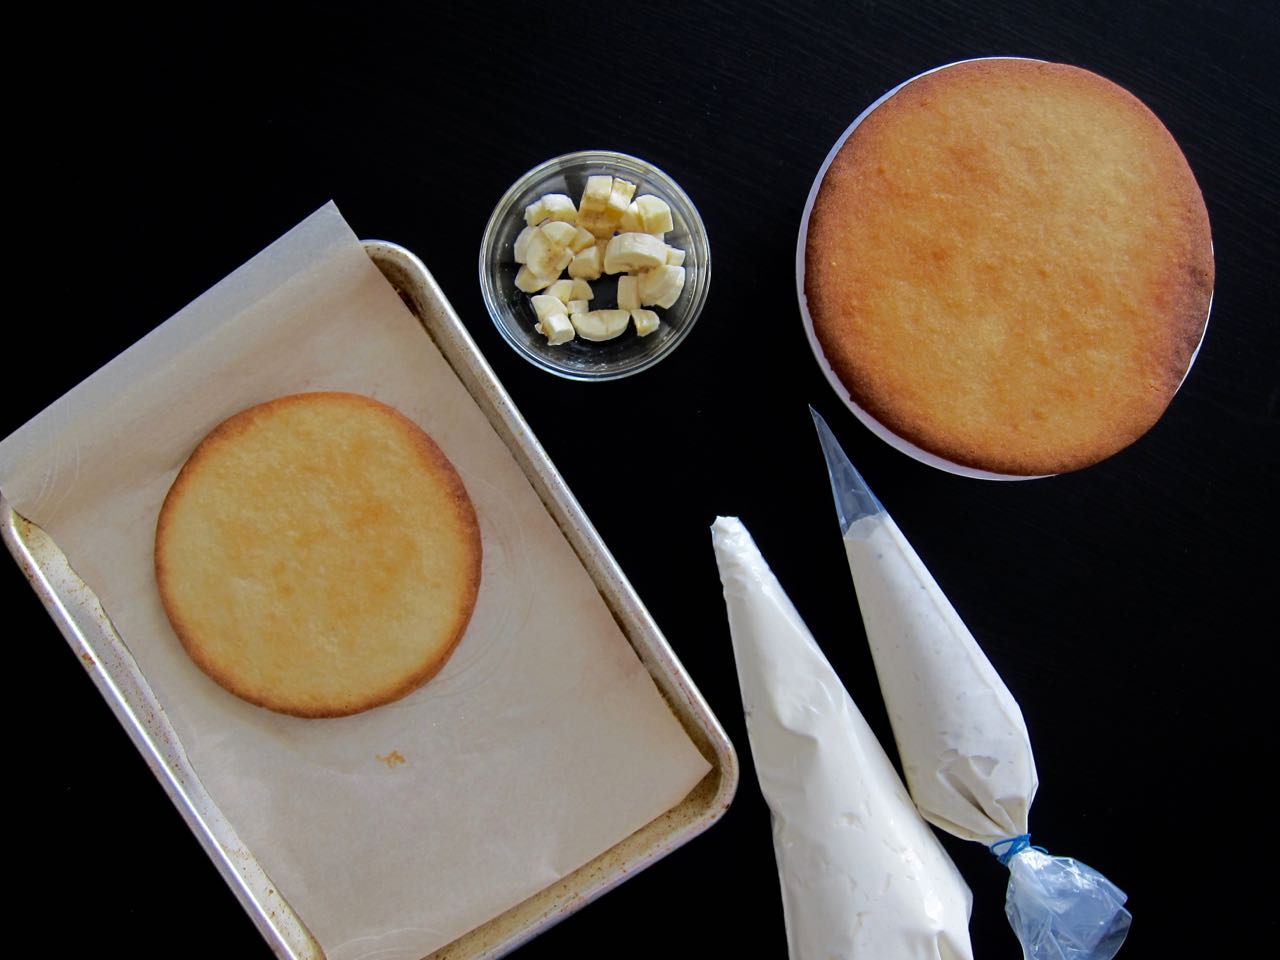
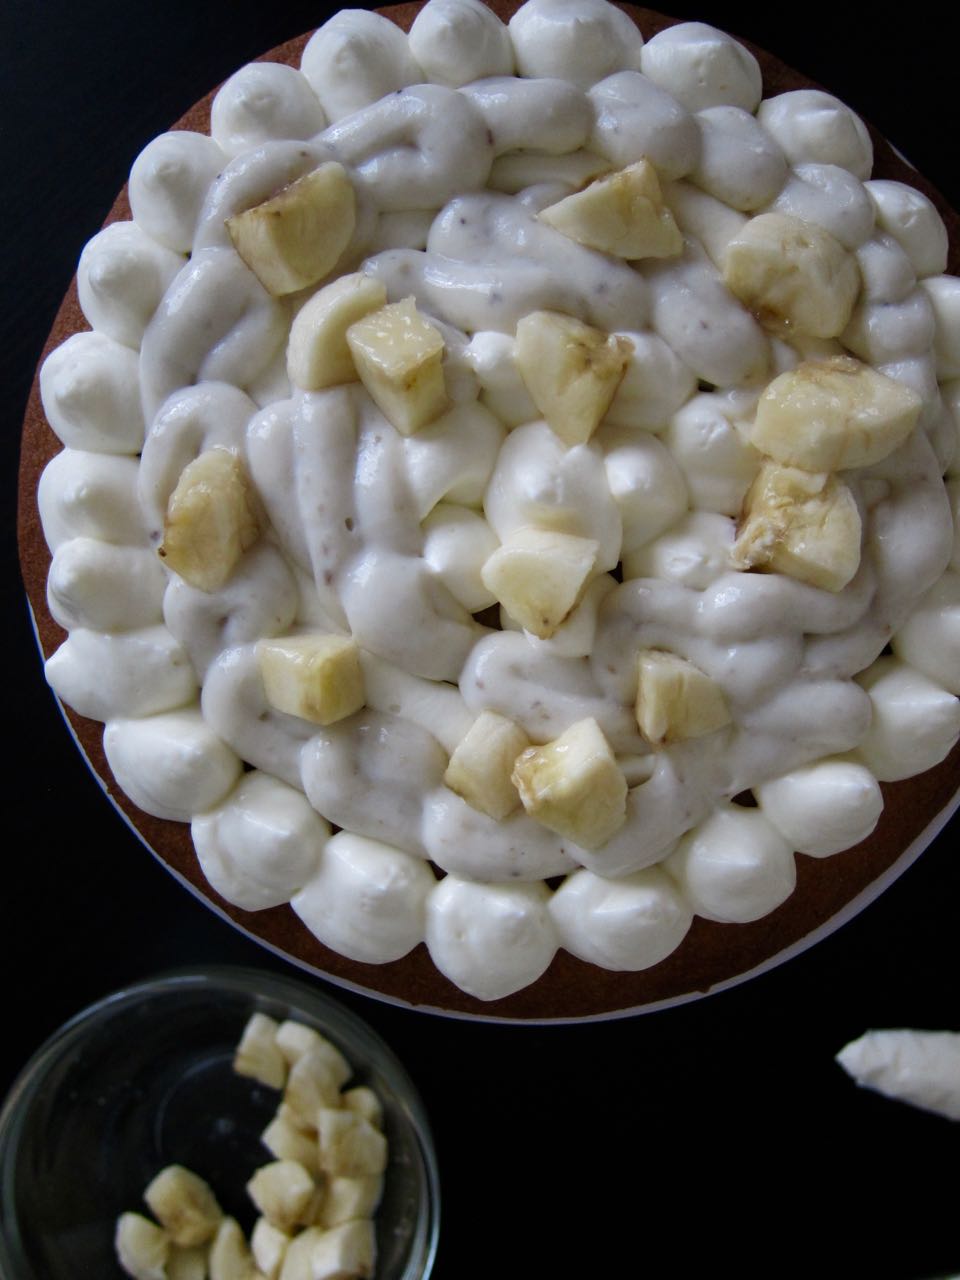
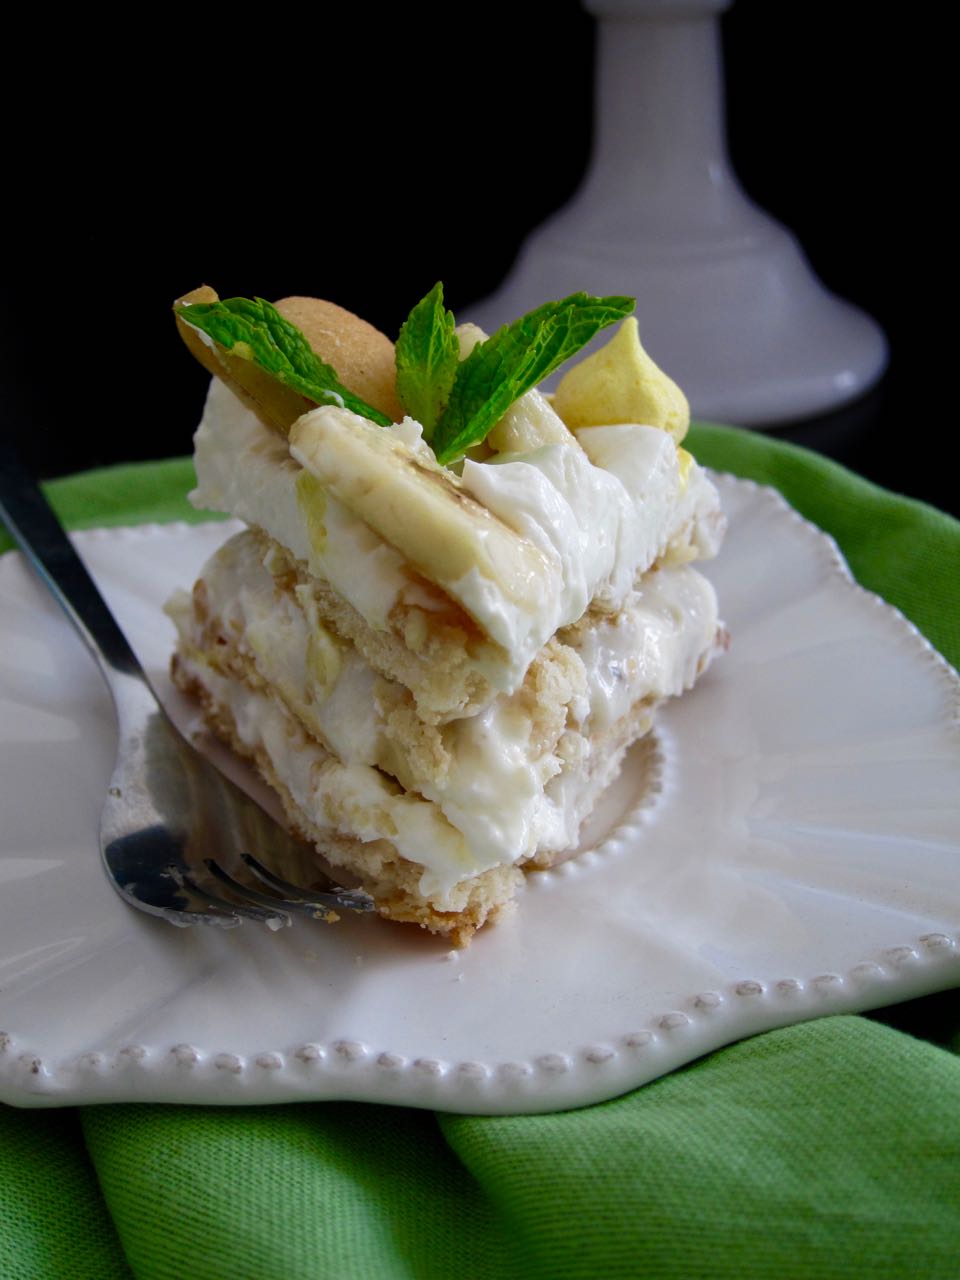
I set out to fix this egregious error, and it.was.fabulous. I baked off 6-inch rounds of vanilla sable dough, piped layers of a creamy, cheese stabilized whipped cream, filled the gaps with banana pudding and chunks of banana, and topped the whole thing with more whipped cream, sliced bananas, and mini nilla wafers (along with some quick mini meringues I made from the leftover egg whites from the pudding recipe, very very optional).

Once everything chilled and softened, I sliced into it, and yes, it was banana pudding! Just a bit neater than the version you might find at your family barbecue.

Or…would you? Turns out, there might be a reason why no one had made this type of cake into a banana pudding version. Banana pudding is kind of divisive! I discovered this when trying to give away some of the cake so that I didn’t eat the whole 6 inches myself. Out of three people, one told me she hates banana pudding, one hates bananas, and finally it turned out one looooved banana pudding. So that’s a roughly 33.3% occurance rate for banana pudding lovers. Who knew?

But for those of you out there who do like bananas and you like them in pudding, trust me, this is a cake for you!

Slice of Banana Pudding cream tart cake
Decorated Banana Pudding Cream Tart
Ready to assemble cream tart.jpg
interior layer of banana cream tart.jpg
top layer of cream tart before decorating.jpg
sliced banana pudding cream tart layers.jpg
Banana Pudding Cream Tart
Sliced Banana Pudding Cream Tart

Banana Pudding Cream Tart

Pudding recipe adapted from Cook’s Country, pate sablee from Martha Stewart.

For the pate sablee:

  • 6 oz unsalted butter, softened

  • 1/2 cup + 1 tbs powdered sugar

  • 3 1/2 tsp vanilla

  • 1 1/2 cup all purpose flour

  • 3/4 tsp salt

For the Banana Pudding:

  • 2 slightly underripe bananas

  • 3/8 cup sugar

  • 2 large egg yolks

  • 1 1/2 tbs corn starch

  • 1 1/2 cup half and half

  • 1/8 tsp salt

  • 3/4 tbs unsalted butter

  • 1 tsp vanilla extract

  • 1 tbs lemon juice

For the whipped mascarpone cream:

  • 8 oz. mascarpone (or cream cheese)

  • 1/4 to 1/2 cup powdered sugar, sifted (to taste)

  • 1 tsp vanilla

  • 1 cup heavy cream, chilled

For Topping (some optional ideas):

  • sliced banana

  • mini nilla wafers (or crumbled sablee)

  • mini meringues

  • mini macarons

  • edible flowers

  • fresh mint sprigs

  • sprinkles

  • banana chips

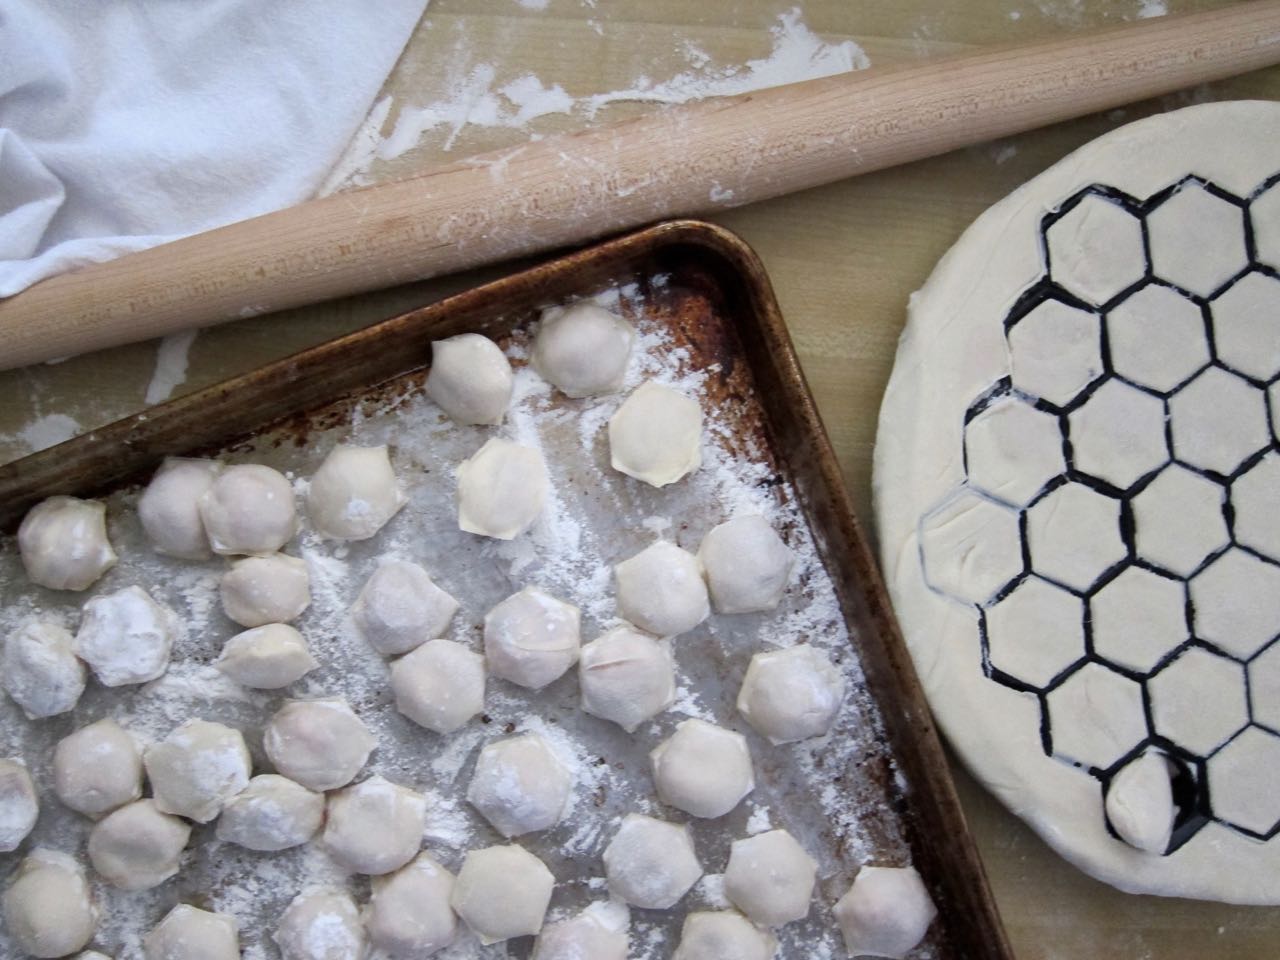
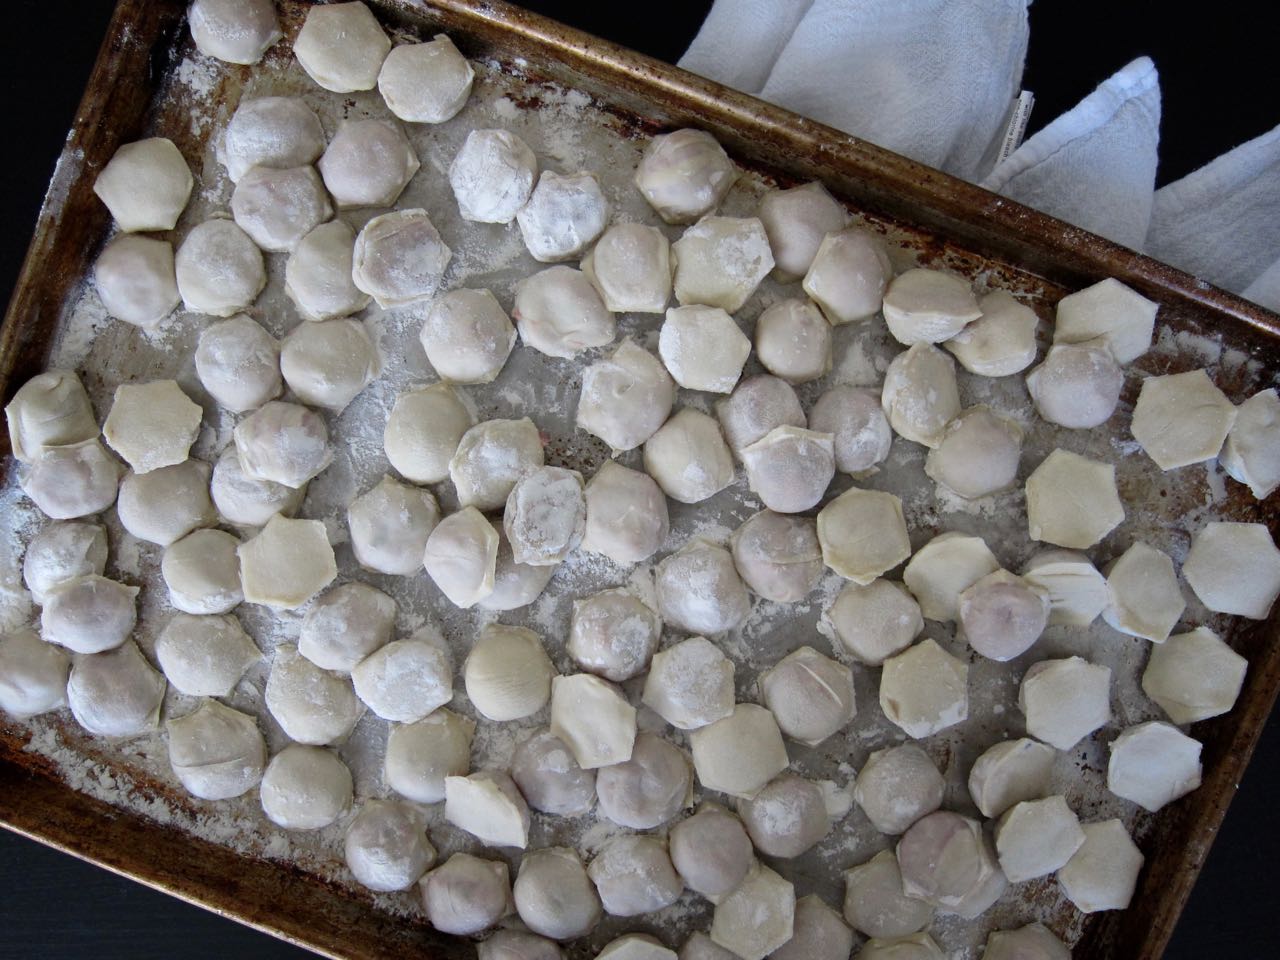
  1. Make the sablee dough: In the bowl of an electric mixer, add the butter and sugar and combine on medium speed until the butter is pale and fluffy and fully combined with the sugar, then add the vanilla and mix to combine. Add in the flour and salt, and stir on low until everything just comes together, about 15-20 seconds. Turn the dough out onto plastic wrap and fully wrap in the plastic. Chill for at least one hour.

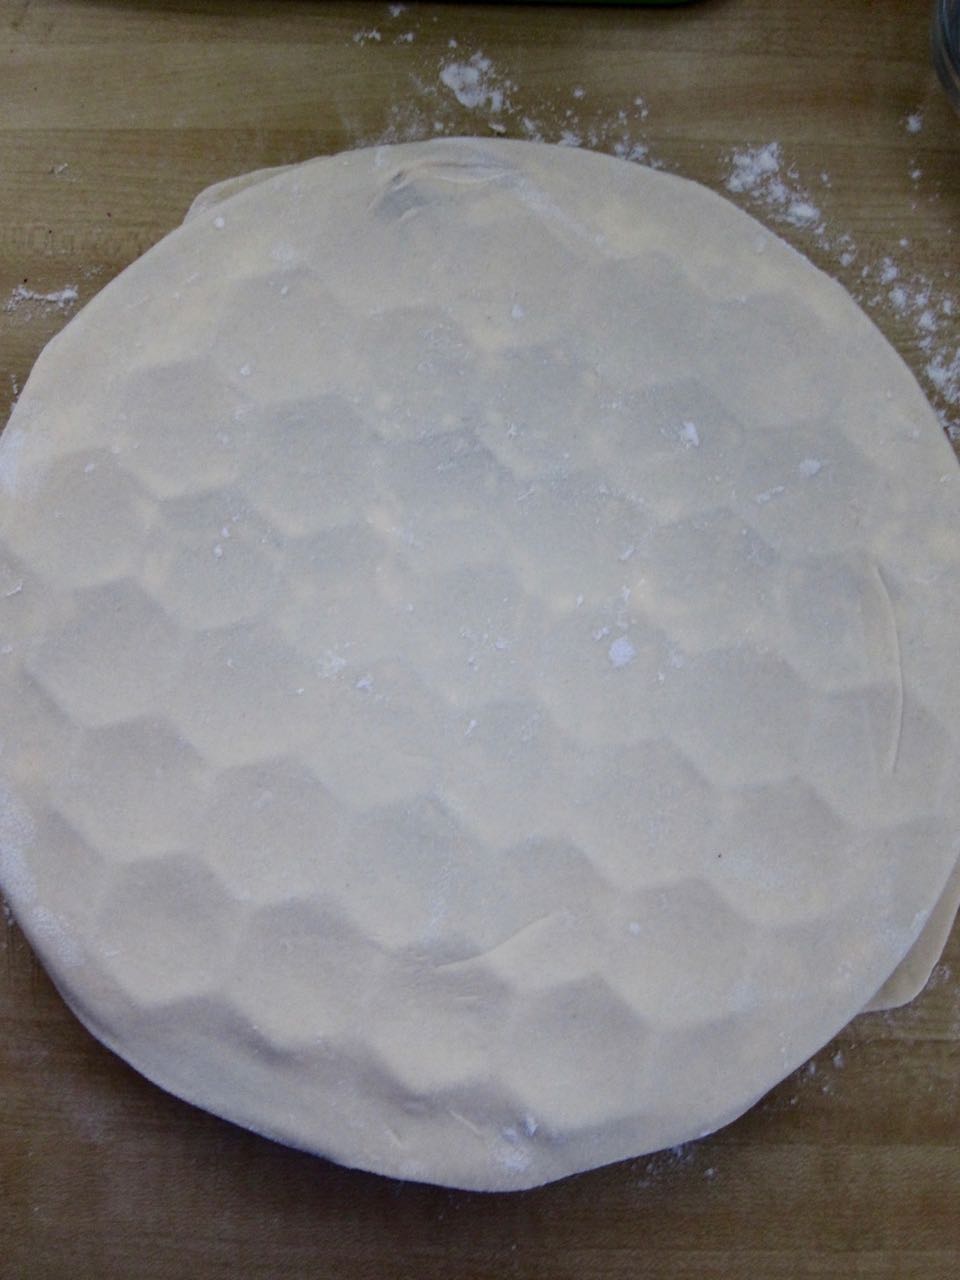
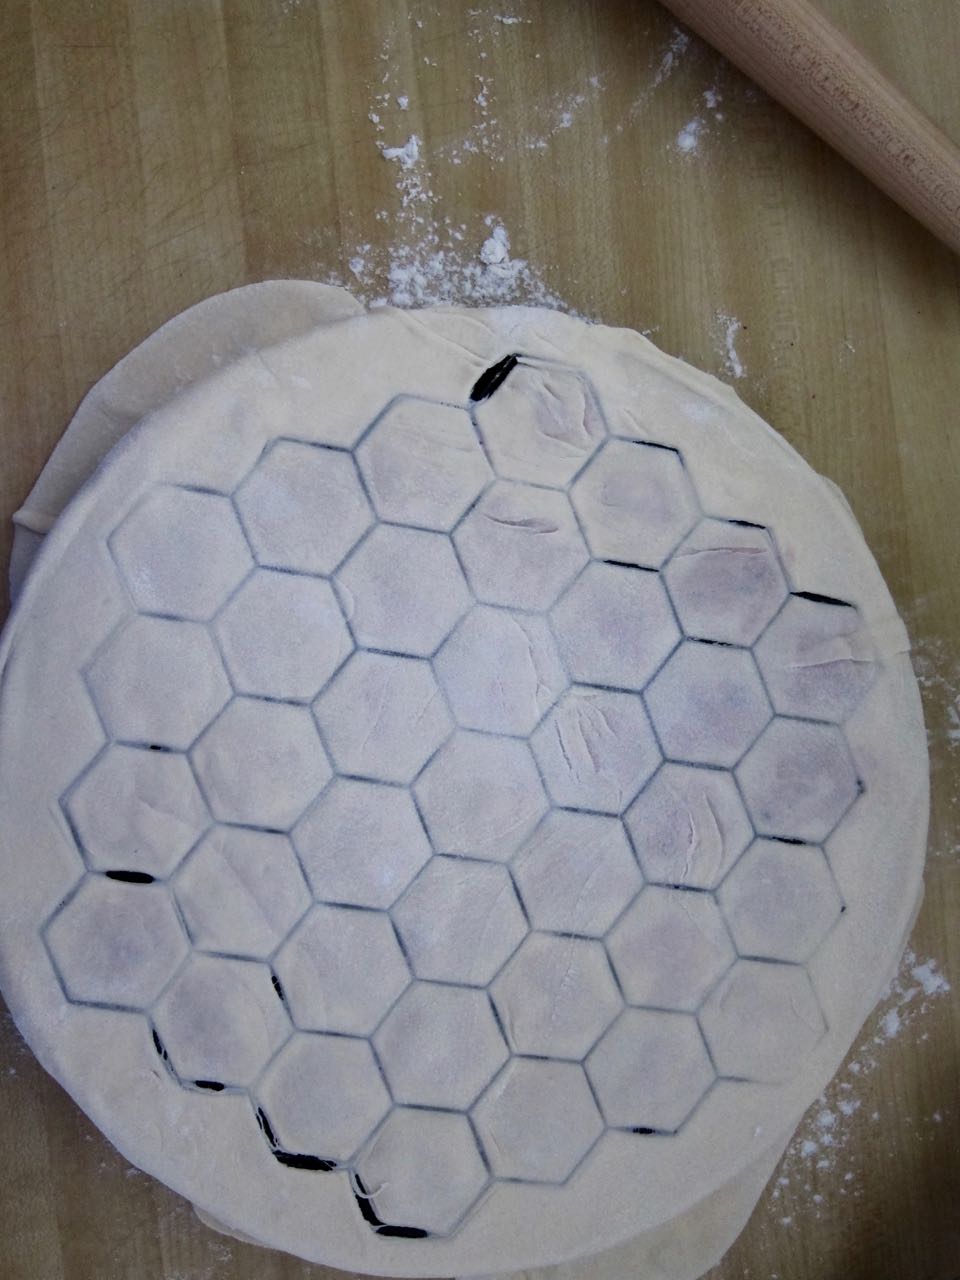
  2. When ready to bake, heat oven to 350 degrees, and divide your dough into 4 equal portions. Roll and cut each portion into 6-inch rounds (I found this easier to do between sheets of plastic wrap), chill for 15 minutes, then bake for 12-15 minutes, rotating as needed, until set and lightly golden around the edges. Set aside to cool completely.

  3. Make the pudding: Heat oven to 325 degrees, and place one unpeeled banana onto a baking sheet. Roast for about 20 minutes, until the peel is blackened, then let cool. Meanwhile, in a bowl, whisk together the egg yolks, cornstarch and 1/8 cup sugar until smooth. In a pot, combine half and half, remaining sugar, and salt to a simmer over medium heat. Once this mixture is heated, slowly whisk in a bit of it into the yolk mixture, then pour that into the pot with the remaining half and half mixture and cook, whisking the whole time, until everything thickens and bubbles appear on the surface. This will be quick, about 1-2 minutes! Remove the pot from the heat and stir in the vanilla.

  4. Transfer the pudding mixture to a food processor and add the roasted banana and 2 tsp lemon juice and run the machine until the mixture is completely smooth. Transfer to a bowl and cover with plastic wrap pressed directly onto the surface of the pudding and chill at least 45 minutes.

  5. Cut remaining banana into small chunks and then toss with remaining lemon juice and set aside.

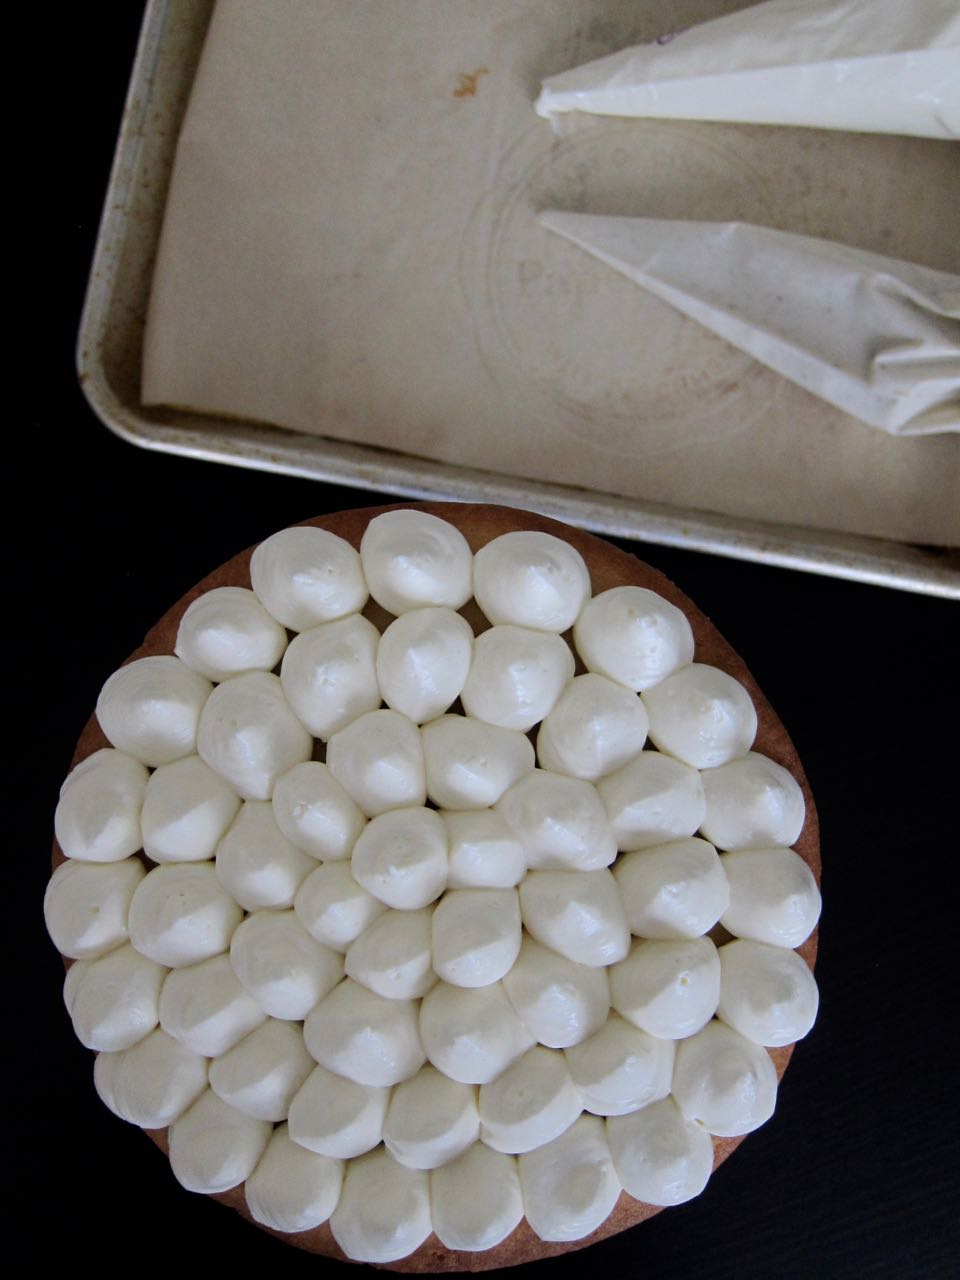
  6. Make the whipped cream filling: in the bowl of a stand mixer fitted with the whisk attachment, whip the mascarpone or cream cheese on medium speed with the sugar and vanilla until loosened up and fluffy, then add the heavy cream and whip on high just until stiff peaks form, being careful not to overmix (the mixture can curdle if you whisk it too far). You want a firm mixture that can hold its shape when piped. Transfer the cream mixture into a piping bag and set aside.

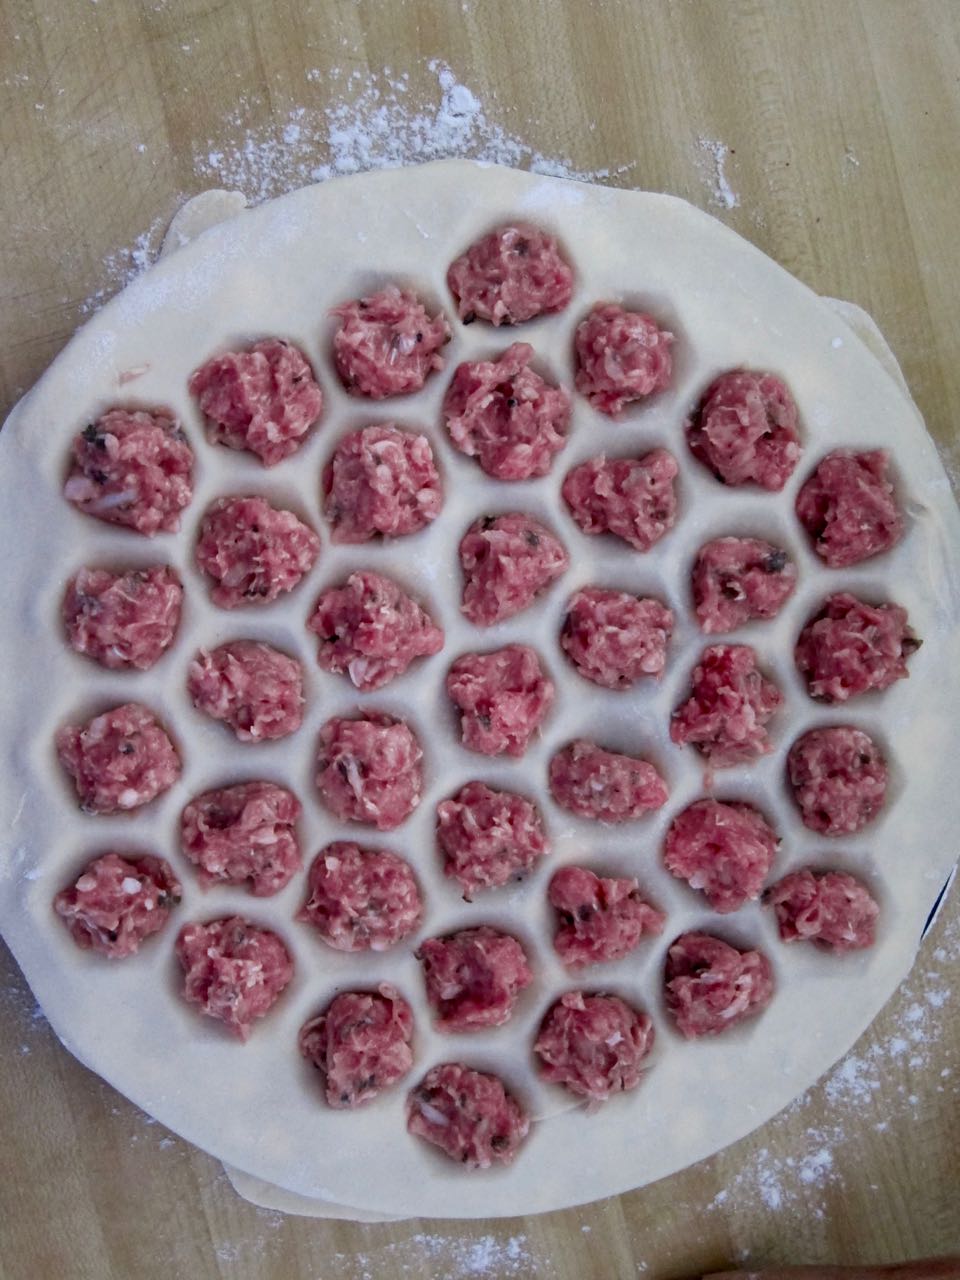
  7. Assemble the cake: once you have all your components prepared and baked off, you are ready to assemble. Take one of your cookie rounds and place on a cake board or a plate, and pipe a border of the cream filling around the outside. Then pipe about five blobs in the center and a few in between your outside border and the center. Fill the gaps between the cream filling with the pudding, and top with a few scattered pieces of banana. Top with another cookie round and repeat, until you have your final cookie round resting on top. Pipe an even layer of the cream filling atop your final cookie round, and then arrange your toppings as you like. Chill the whole cake for at least 4 hours to soften the cookie, then slice and serve. The longer you chill it the easier it will be to slice, but the pudding is best the day it’s made, so tread that line carefully!

Notes:

  • If you want to go the more traditional route and use a vanilla pudding here, you can definitely do that! I really like banana though, and since the cake itself didn’t have as many bananas as a traditional banana pudding might, I decided to blend them into the pudding as well.

In Recipes Tags Dessert
Comment

Sunday Supper: Pelmeni with Lamb, Yogurt, and Tomato Butter

July 14, 2019 Allie
Lamb Pelmeni with Tomato Butter and Garlic Yogurt

I’ve got a fun Sunday project!

You could do this on any day of the week really, but these dumplings are a multi-step process that to me, sounds like an ideal way to spend a lazy Sunday, making each component in an unhurried way, slowly working your way to a pre-Monday supper.

What we’ve got here are pelmeni, those little Russian dumplings that can be filled with either meat or vegetables, or even sweet cheese for a dessert. The surprising information I have to admit is that before I made these, I’d never actually eaten pelmeni! I’ve only read about them, my mouth watering at the very idea of them, and imagining taking my dumpling obsession beyond dim sum to Siberia.

Thanks to that obsession, I put the Kachka cookbook on my wish list last year, and my friend Ginny bought it for my birthday. I immediately bought myself a pelmenista, or pelmeni shaper, but then both sat unused for over a year. That’s the way it tends to go in my kitchen. I’m always meaning to get to a certain project, but it can take time, as I balance my desire to cook everything with the limitations of only having to feed one person. But then I realized, um, these are perfectly freezable, so what was I waiting for? I wouldn’t have to eat over 100 dumplings in one go!

You might be wondering why I can’t just feed these to my friends? I would, but unfortunately the two friends who live closest to me, and are therefore available for a last-minute dumpling party, both have an aversion to lamb dumplings brought on by a truly horrific encounter with lamb dim sum a few years ago. I haven’t been able to convince them to give ground lamb another try since.

And I really, really wanted to make lamb for these! Because the other dumpling obsession I’ve been nurturing is Turkish manti, teeny, tiny meat-filled dumplings served in a tomato sauce with tons of flavor. I had a version in Sydney that may have been filled with short rib if I’m remembering correctly, but I knew they are traditionally made with lamb, and so in my head, if I was going to make manti, I was going to make them with lamb.

But have I mentioned how tiny manti are? I mean, I’m here trying to convince you to make these already small-ish dumplings, but I’m not sure I can even convince myself to make manti, they are so intricate and baby sized. So I started thinking about a sort of cheater’s version, and I remembered that pelmeni mold collecting dust in my closet.

And ta da! I have the manti flavors I wanted, brought to me by way of Russian innovation and inspiration. The final result is delicious! Rich, lamb-filled dumplings swimming in flavorful butter and yogurt, and topped with a shower of mint to lighten everything up and add a bit of freshness. These dumplings are indulgent, but worth it, in my opinion, and I have a stash in my freezer that will keep giving until I’m ready to try my hand at real, doll-sized manti.

Pelmeni with Lamb
Pelmeni in Mold
floured pelmeni mold.jpg
Garlic yogurt.jpg
Pelmeni step 1.jpg
Pelmeni step 2.jpg
Pelmeni step 3.jpg
Pelmeni step 4.jpg
Lamb Pelmeni
Manti style Pelmeni.jpg

Manti-Style Dumplings

Dumpling dough and filling adapted from Kachka. Tomato butter and yogurt recipes adapted from Food & Wine.

For the dumpling dough:

  • 3 1/2 cups all purpose flour

  • 1 tbs kosher salt

  • 1 egg

  • 3/4 cup plus 2 tbs cold water

For the Garlic Yogurt:

  • 1 cup plain yogurt

  • 1 /2 tsp grated garlic

  • kosher salt, to taste

  • milk or water, if needed, for thinning

For the Tomato Butter:

  • 4 tbs salted butter

  • 2 tbs tomato sauce

  • 1 tsp smoked paprika

For the lamb filling:

  • 1 lb ground lamb

  • 1/2 large or 1 small onion, grated

  • slightly less than 1/2 cup cold water (100 ml)

  • 2 tsp kosher salt

  • 1/4 tsp pepper

  • 1 tbs dried parsley

For serving:

  • Crushed red pepper

  • fresh mint

  1. Make the dumpling dough: In the bowl of a mixer, add the flour and salt. Using a dough hook, stir the flour and salt together on low speed. Add the egg, and while the mixer is running, slowly add in the water. Stir on low speed until the dough starts to come together, then knead on medium speed for 10 minutes, until the dough consistency is smooth and elastic (if kneading by hand, this will take about double the time). Turn out dough and wrap in plastic, then let rest for at least 1 hour at room temperature.

  2. While dough is resting, prepare everything else. Make the garlic yogurt: combine all the ingredients in a small bowl and stir to combine. Taste and adjust salt as needed, and thin out with a little milk or water if the yogurt seems especially thick. You don’t want it too thin but you want to be able to drizzle it onto the dumplings instead of plop it.

  3. Make the tomato butter by adding all the ingredients in a small sauce pan over medium-low heat, and whisk while the butter melts, until a smooth sauce forms. Set aside, keeping warm on low heat, or transfer to a small bowl and refrigerate until needed. The heat from the cooked dumplings will help warm it.

  4. Make the lamb filling: Place all the filling ingredients in the bowl of a stand mixer, this time fitted with the paddle attachment. Stir everything together until it’s all incorporated and the fat from the lamb coats everything. The mixture should feel very sticky. This should only take up to a couple minutes, or slightly longer if mixing by hand.

  5. Form the dumplings: when the dough has rested and everything else is prepared, you are ready to assemble! I used a pelmeni mold, but I’ve included instructions below for forming by hand if you don’t want to buy one. Divide the dough into 8 equal parts and roll into balls. Cover with a dish towel, and take one ball of dough. Dust your countertop and the pelmeni mold with flour, and roll out the first dough ball into a thin round that is slightly larger than the mold. Drape it over the mold and lightly press so you can see the outline of the mold underneath.

  6. Using a teaspoon measure, scoop a teaspoon of filling into each little dimple. Once all are filled, roll out a second sheet of dough. Lightly brush the dough around the filling with a little water, and drape the second sheet of dough over top. With your rolling pin, roll across the top, firmly pressing down on the mold. This will push the filling down into the bottom dough sheet and cut out the little hexagonal dumpling shapes, sealing them in the process. It’s kind of actual magic. Transfer the dumplings to a floured baking sheet and toss a bit to coat in flour and stop them from sticking to each other. Repeat with remaining filling and dough. I was able to get about 112 dumplings, and you will have a bit of dough left over.

  7. Once dumplings are formed, you can freeze them in a single layer on the baking sheet and then transfer to a plastic bag for storage when they are frozen. If you are ready to eat them now, bring a large pot of salted water to a boil and add the dumplings. For the molded dumplings, a generous portion is about 20. Lower the heat a bit to keep everything at a steady but gentle boil and cook for about 5 minutes. If cooking from frozen, add a couple minutes to the cooking time.

  8. For serving, remove the boiled dumplings from the pot with a slotted spoon and transfer to a bowl. Add a generous amount of garlic yogurt and tomato butter, and toss everything to combine a bit. Sprinkle with chili flakes and some fresh, torn or chopped mint, and serve while piping hot.

Notes:

  • If you want to make the dumplings by hand without the mold, it’s no more difficult but a little more time consuming, but similar to forming ravioli or potstickers. Divide dough into 4 pieces instead of 8, and roll out the first piece on a floured surface until very, very thin (think pasta). Cut into rounds with a 2-inch cutter, and fill each circle with about 2 teaspoons of filling. Brush the edges with water, and fold the edges together to form a half circle shape. Pull the edges together and press to seal into a tortellini-like shape. Follow the same instructions for freezing and serving, though you may need to cook a bit longer due to the larger size.

In Sunday Suppers, Recipes Tags Main Dish
1 Comment

Red & Blue Velvet Cake Ice Cream

July 5, 2019 Allie
Red & Blue Velvet Cake Ice Cream

So did you make cake for the Fourth? Did you eat it all?

I hope you did, or at least shared with friends, but what about those cake scraps? You know, the trimmings from leveling the cake, or that extra layer I told you to save for snacks, or, if you decided to be ambitious after all and try your hand at rendering the American Flag in dessert form, you probably have a pile of blue and red velvet cake pieces that you don’t know what do you with.

Based on the levels of food dye you’ve likely consumed while living your best red, white and blue life, I should probably tell you to just toss those. But, really, they are delicious and what a waste of sugar and butter, right? And anyway, isn’t it so fun to have to remember what you ate every time you go to the bathroom, to reassure yourself that those strange colors don’t mean you are dying?

(If you’ve ever eaten blue food dye, you know what I’m talking about. Also, sorry I brought the bathroom into this.)

If you want to keep living on that knife edge of red and blue dye, I have a solution for you! Take some of those scraps and toss them into a freshly made batch of cream cheese ice cream!!!

Ta daaaaa!

It’s genius. You get the flavors of that red and blue velvet cake and cream cheese frosting, but in ice cream form, and you are minimizing food waste at the same time. What good citizens we are! You can even sub in the scraps from that simpler cake I told you about last week, and I promise it will be equally delicious with cream cheese flavor. There is no losing here.

And, should you be wondering what red, white and blue occasion you could have coming up to pull this out for? Whip up a batch and serve it up on Sunday for the World Cup final! I think it would make an excellent celebration for those American ladies kicking ass in France right now.

scooping red & blue velvet ice cream
red & blue velvet ice cream and cake

Red & Blue Velvet Cake Ice Cream

Cream cheese ice cream base adapted from Bravetart

For the ice cream:

  • 8 oz cream cheese

  • 5 large egg yolks

  • 1/2 cup sugar

  • 1/8 tsp kosher salt

  • 1 cup whole milk

  • 1/2 cup heavy cream

  • 1 tbs vanilla

  • 1 tbs fresh lemon juice

  • leftover cake red & blue velvet cake scraps or any bits of cake or cookie you prefer

  1. Place the cream cheese in the bowl of a mixer and beat with the paddle attachment on medium speed until soft and fluffy. In a medium-sized pot over medium-low heat, whisk the egg yolks with the sugar and salt, then the milk and the cream. Cook, stirring constantly, until the custard is steaming and hot. This should take about 8 minutes. Pour the custard through a mesh sieve over the cream cheese , add the vanilla and lemon juice and mix on low speed to combine.

  2. Cool the custard and cream cheese mixture to room temperature, chill in the refrigerator for at least 4 hours.

  3. When ready to churn, pour the custard into your ice cream maker and churn according to the machine instructions. While ice cream is churning, chill whatever container you plan to store the ice cream in the freezer (I use a loaf pan).

  4. When the ice cream is churned up, add crumbled pieces of cake to the mixture and churn for a few seconds to combine. Layer into the chilled container with more crumbled pieces of cake and chill until firm. Serve and enjoy!

In Recipes Tags Dessert
Comment
← Newer Posts Older Posts →

For those who plan their next meal while eating the last.


INSTAGRAM

🎶When pizza’s on a bagel*, you can have pizza anytime**!🎶

*donut
** after you fry some donuts
FINALLY perfected these Burnt Honey Butter Biscuits & what good timing! It’s carb season & we are all hibernating! 🐻
Final thoughts on Small Thanksgiving: take your sweet potato + marshmallow combo firmly into dessert or even breakfast, and consider a cozy mashed potato soup with stuffing croutons to use up those leftovers. Stay safe & Happy Thanksgiving! 😷🦃
Part 2 of Small Thanksgiving: all the stuff to stuff yourself with! An Italian sausage pasta-inspired stuffing and a vegetarian, spiced wild rice stuffed squash. Everything serves 4-6, gather safely this year! 😷🦃 #thanksgiving #smallthanksgiving #v
Now that we (and the world?) can let out that collective sigh of relief, I can  finally think about my favorite holiday! Everyone is probably (hopefully 😷)looking at smaller gatherings this year, so I’m sending some Small Thanksgiving ideas ou
So happy Disney keeps justifying my dumb baking purchases! This matcha shortbread is delicious, but make a good sandwich cookie it does not. I hid all the broken pieces 🙈
Subscribe to Tea and Fog!

RECENT RECIPES

Featured
polenta with rosemary and goat cheese.jpeg
Salmon Wellington and Warm Rice Salad.jpeg
Pizza Donut Hero.jpeg
Burnt Honey Butter Biscuits.jpeg
Mashed Potato Soup with Stuffing croutons.jpeg
sweet potato donuts with marshmallow frosting.jpeg