In which I go buy more food so as not to waste one ingredient.

It may seem counterintuitive for someone who cooks most of her meals at home and operates a food blog, but I frequently get comments from friends who have seen inside my fridge that I never have any food in there. My response is usually the most obvious answer of “Well, I ate it.” It is equally shocking to me to see friends’ refrigerators bursting with food, because I can’t fathom keeping that much food around, knowing I could never possibly eat it all before it went bad. As anyone who watches John Oliver could tell you, food waste is not a new topic nor does it seem to be an especially urgent problem to most people, but for me, I try really hard to only buy food I have a plan for or to frequently take stock of my freezer and pantry and make meals out of what is available. It’s why I make a ton of frittatas and frequently find myself suffering through foods I’m sick of, like a recent posole I did not enjoy even before I froze a gallon of it. But, every time I’m forced to throw away a moldy nub of ginger root or a slimy bag of cilantro, I’m reminded that wasting food is even less enjoyable to me than the most disappointing leftovers.
All of the above is really just a very long winded explanation of why, when I found myself with some unspoken for figs in my refrigerator this week, I quickly panicked that I had absolutely no idea what to do with them. I’m fairly new to figs, having never tried them until last summer, and so I don’t necessarily find myself craving them and I have no repertoire of recipes to make use of them when I find myself with extras. Day after day, watching them shrivel and wrinkle in the refrigerator, I first cursed myself for buying them, then decided I had to take action.
My number one rule for not letting food go to waste is that your freezer is your friend. Take a peek in mine and you will find vegetable scraps, heels of bread, rolls of tomato paste and parmesan cheese rinds, all waiting for the day when I have use for them. The freezer is also the wonderful invention that allows me to keep on hand one of the most amazing substances on this earth, ice cream. And, since I currently was out of stock after consuming a quart of Trader Joe’s Cookie Butter Ice Cream in record time,* I had a void waiting to be filled.
*Look, sometimes you just need a little comfort when all of your vacation days are gone and you are staring down a dark, endless tunnel devoid of Federal holidays until November.


One thing I do know about figs from ordering my fair share of cheese plates is that they very frequently seem to be paired with goat cheeses and honey. I saw no reason to break the pattern so I decided on a goat cheese ice cream with a balsamic fig swirl and salted honey to cut through the sweetness. I also had yet to try my hand at this no-churn ice cream trend I’ve been reading about all summer, so I kept my ice cream maker in the cabinet and went the way of whipped cream and condensed milk instead. As it turns out, the bonus to making ice cream this way meant that I had minimal new ingredients to buy to go along with the figs. I didn’t have any cream or egg whites left over, and since I had been out of regular honey anyway, having a new jar of that in the cabinet was just another bonus.
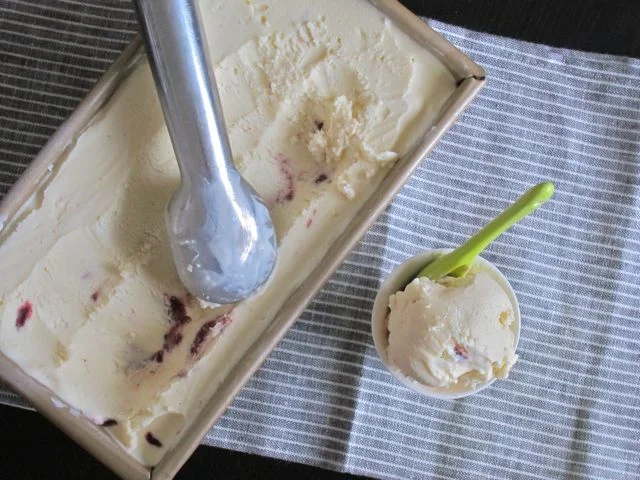
This came out phenomenally well, so well that it's fortunate no one else was around to witness my dorky happy dance upon first bite. Even with the two flavor swirls, this is possibly the easiest ice cream I have ever made, and among the tastiest. The goat cheese is tart, the figs are sweet, and the honey is salty. There are still a few days of summer left, so if you've got a stand mixer, a hand beater or a sturdy arm in your possession, I suggest you go make this immediately!
No Churn Goat Cheese Ice Cream with Figs and Salted Honey
Makes 1 quart, method adapted from Martha and The Kitchn.
Ice Cream Base
14 oz sweetened condensed milk
2 cups heavy cream
8 oz goat cheese
Sea Salt Honey Swirl
1/4 cup honey
1/2 tsp flaky sea salt
Fig Swirl
1/2 lb mission figs, stems removed
1 tbs honey
1 tbs balsamic vinegar
- Heat oven to 400 degrees. Quarter the figs and toss with honey and vinegar. Roast, covered for 15-20 minutes until soft. Let cool and puree. Set aside until completely cool.
- While figs are cooling, stir together honey and sea salt and set aside. In the bowl of an electric mixer (or using a hand mixer), whip together goat cheese and heavy cream until stiff peaks form (it might be helpful to smooth out the goat cheese with a little cream first). Gently fold the whipped cream mixture into the condensed milk until all ingredients are incorporated. There may be a few lumps in the mixture but that's ok, they will turn into nuggets of goat cheese goodness in the final product!
- Pour the ice cream mixture into a freezer safe container and swirl in the honey and fig mixtures. Cover and freeze until hard.