• Home
    • Recipes
    • The Roast Chicken Project
    • Allie Dreams of Cake
    • Sunday Suppers
  • Travel
  • About
Menu

Tea and Fog

Street Address
City, State, Zip
Phone Number

Your Custom Text Here

Tea and Fog

  • Home
  • Recipes
    • Recipes
    • The Roast Chicken Project
    • Allie Dreams of Cake
    • Sunday Suppers
  • Travel
  • About

Sunday Supper: Bulgogi & Kimchi Burritos

November 12, 2017 Allie
Bulgogi Kimchi Burritos

I've got another Sunday Supper idea for you! But I have to confess right at the start that this particular meal may be more of a project than even one Sunday can handle. However, it's completely easy to adapt it to a less time-consuming version, provided you decide not to make your own kimchi. 

That's it! All you have to do is buy the jar from the store instead of getting a 2-week head start on your burritos. I'm pretty sure 99.9% of home cooks would be down with that.

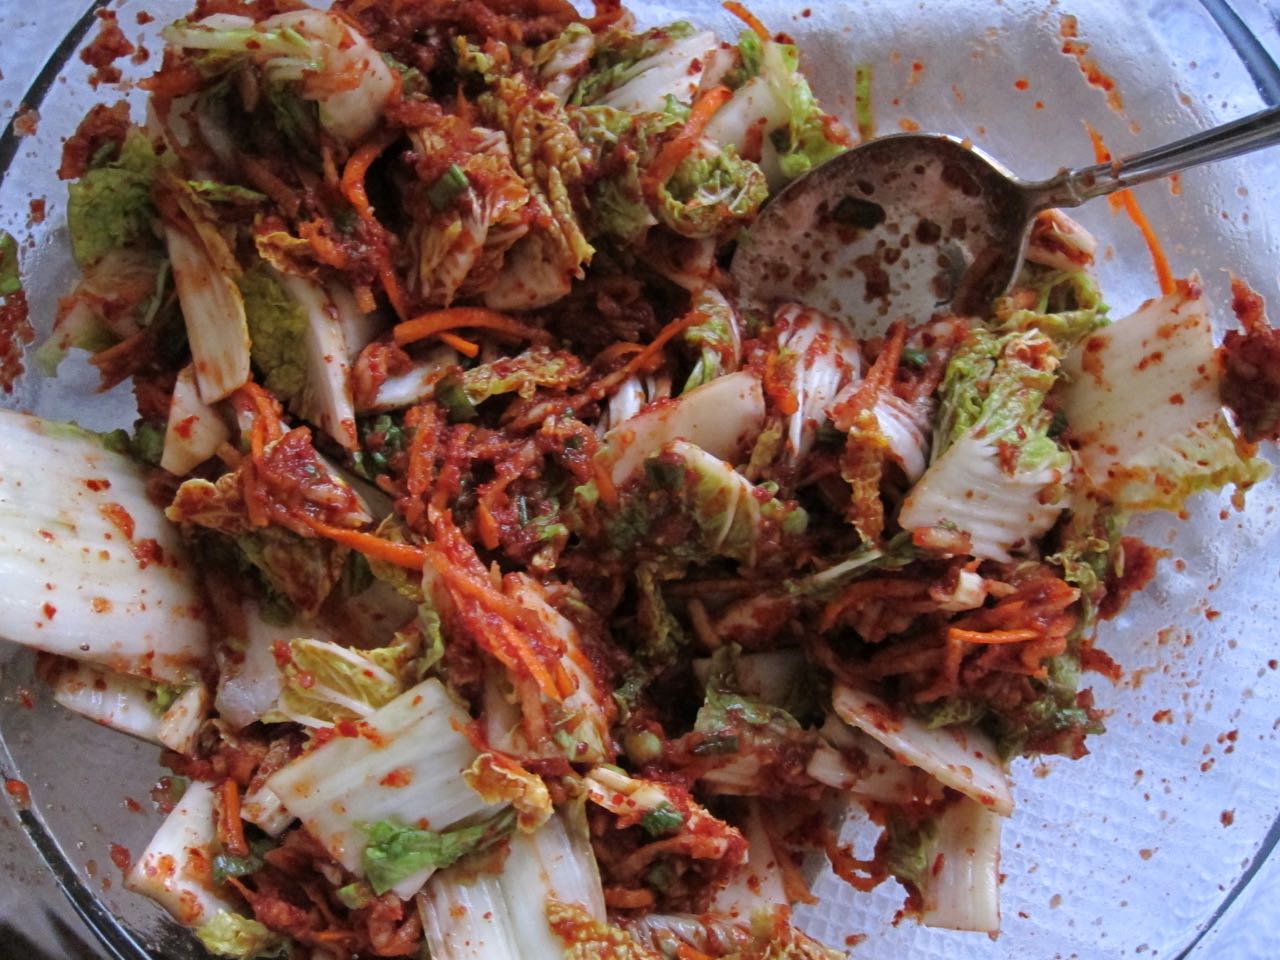
I am too, in fact, but I also was dying to try making my own kimchi after my sister did it and reported back that it actually wasn't all that complicated or terrifying. And she was right! The hardest part, I found, was remembering not to leave my kimchi to rot away in my hall closet. It may have had an extra couple of days for that initial ferment, but the kimchi came out delicious and I'm still alive after eating it, so I'll just pretend I meant to leave it there an extra 72 hours. 

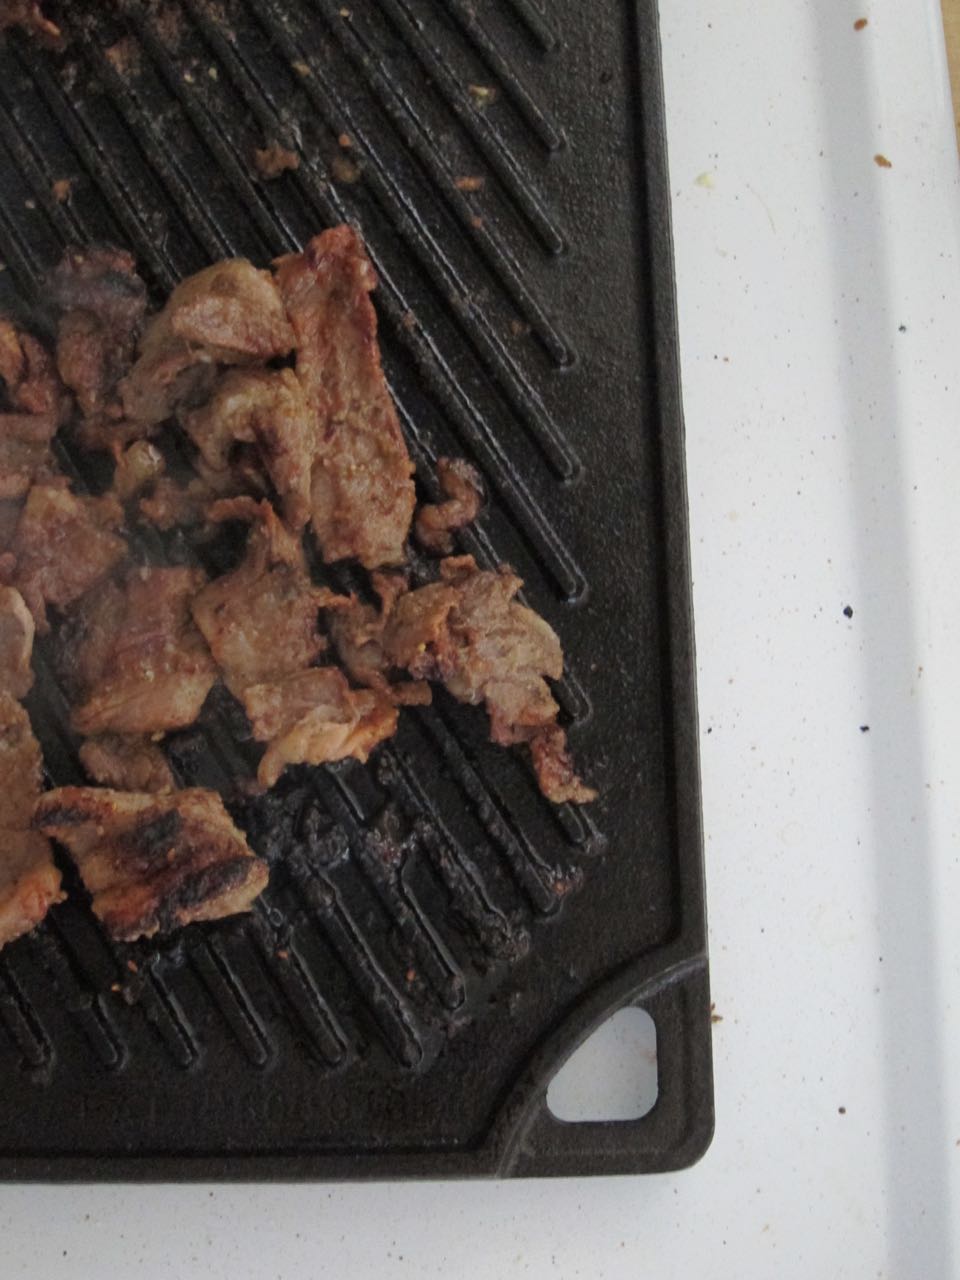
Aside from obtaining your kimchi by whatever means you prefer, the only other really time consuming part of these burritos is the bulgogi. It takes some time to marinate and that does require some pre-planning, and if you can't find thinly sliced beef, you may also find yourself shaving a partially-frozen ribeye yourself. I did, and it was so worth it, as that particular cut of meat has just the right amount of fat to come play with the sugars and acids in the marinade.

Beyond that, I've suggested a few toppings here, but I feel burrito fillings are very personal, so you do you, whatever that means. Hopefully you land in a place with kimchi, bulgogi, rice, something crunchy, something extra spicy, and something cooling. Wrap it all up in the biggest tortillas you can find and chow down. 

Kimchi bulgogi burrito ingredients
Brining cabbage for kimchi.jpg
kimchi ingredients.jpg
mixing kimchi sauce.jpg
mixing kimchi.jpg
kimchi bulgogi burrito filling
grilling bulgogi.jpg
kimchi and bulgogi.jpg
kimchi bulgogi burrito

Bulgogi & Kimchi Burritos

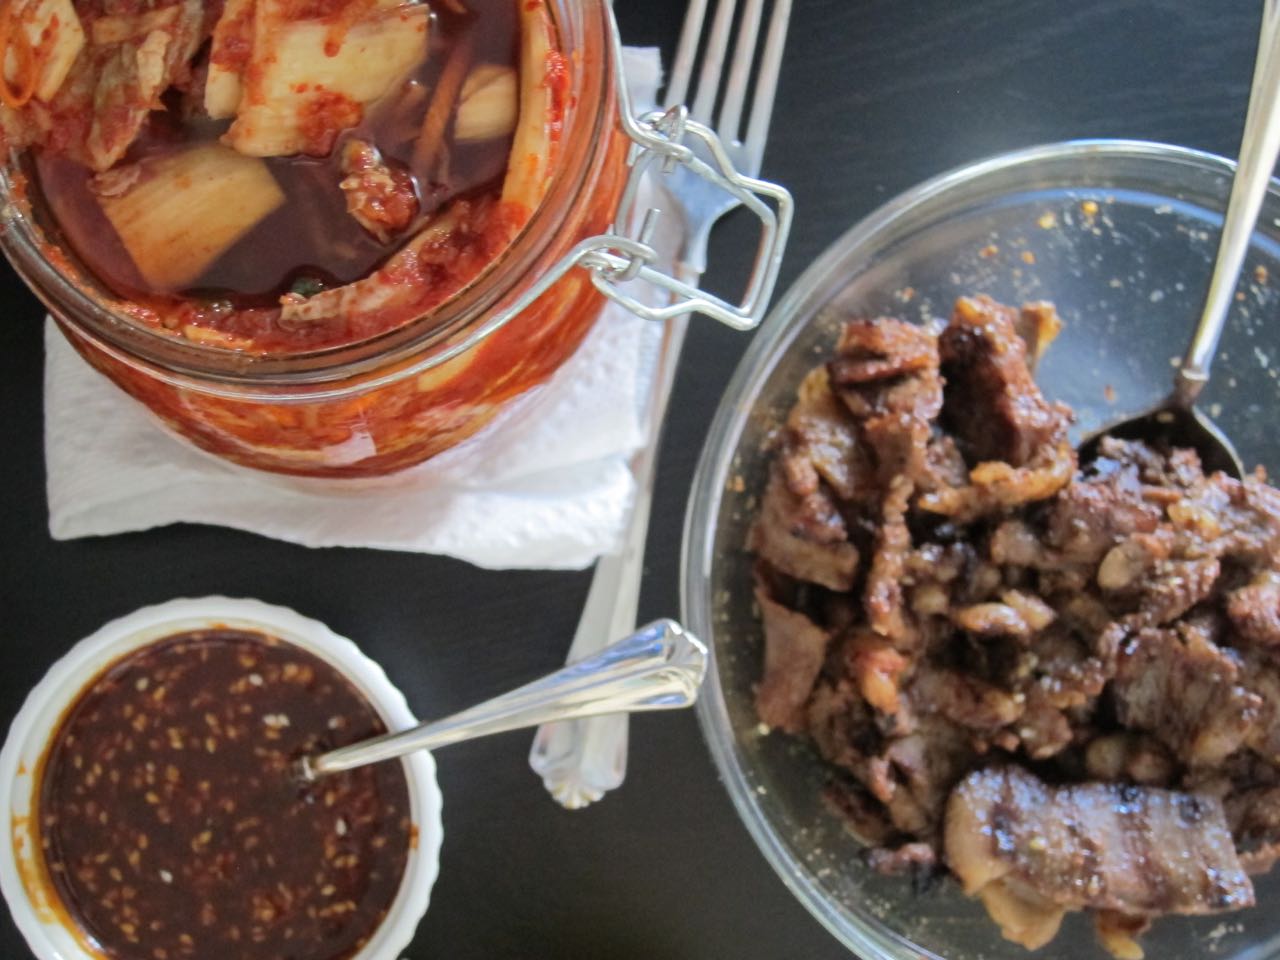
Kimchi & Bulgogi recipes adapted from Koreatown, pickled daikon adapted from Serious Eats.

You absolutely do not need to make your own kimchi for this, but I'm including the recipe here. Just know if you do choose to make it you need to allow a couple weeks for it to ferment before it will be ready to eat.

I've included recipes here for suggested main fillings and additional fillers. This is all obviously a bit of a project but basically everything can be made ahead. I've also put in some links below for some of the harder to find ingredients.

Main fillings:

For the kimchi:

  • 1/2 cup coarse sea salt
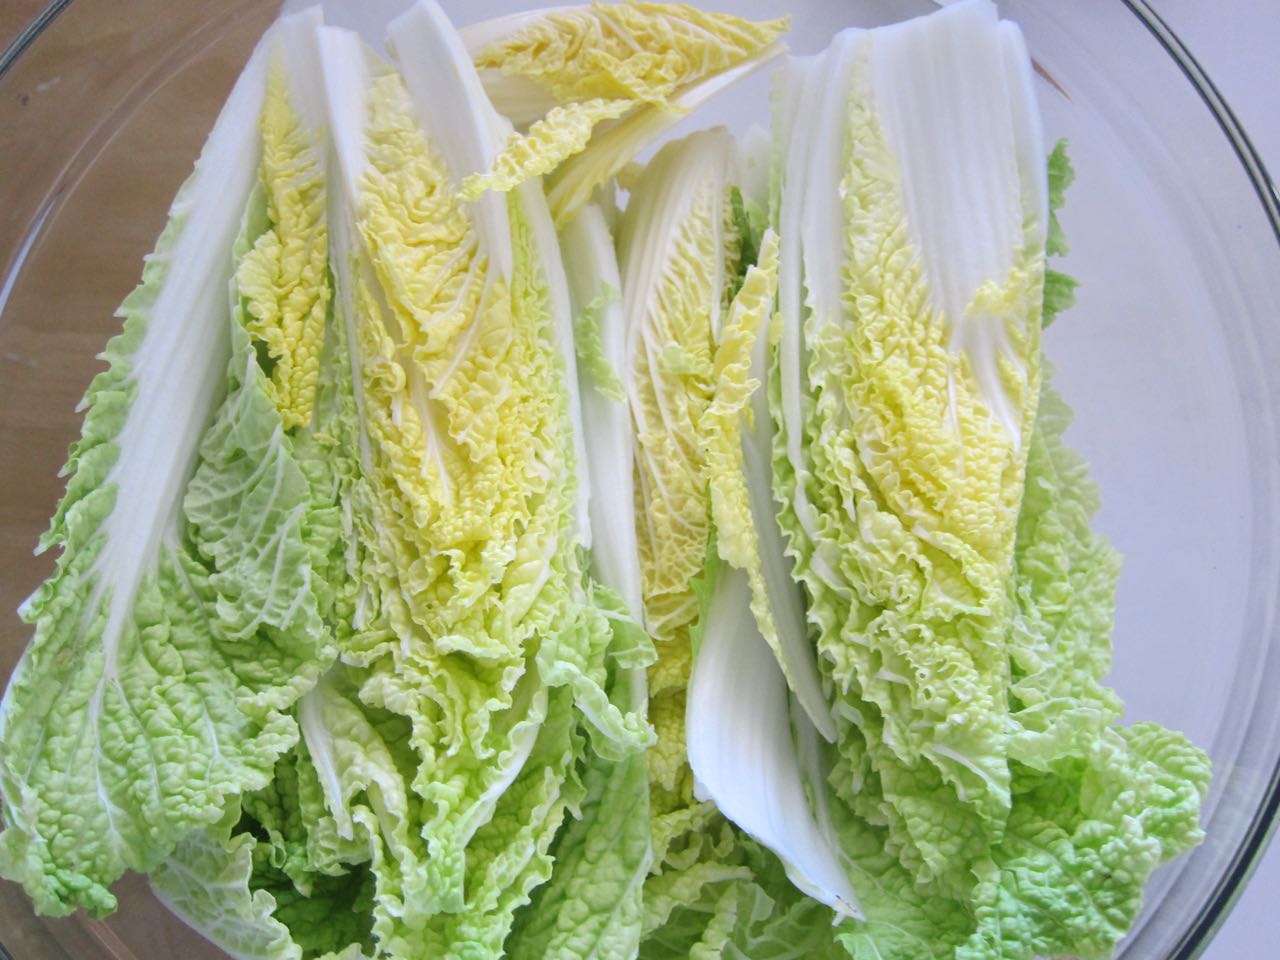
  • 1 lb napa cabbage
  • 1 tbs sweet rice flour
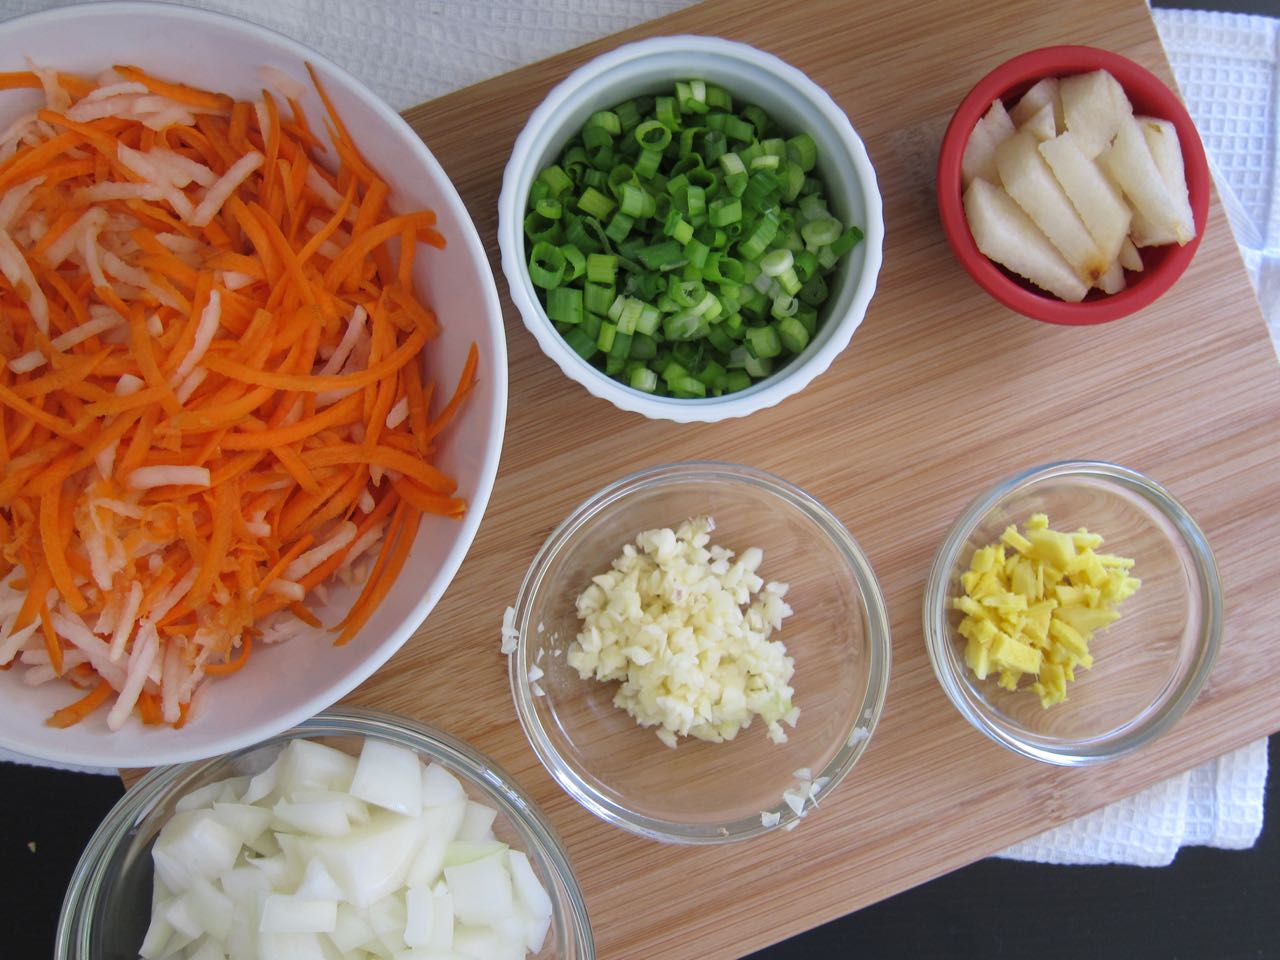
  • 1/2 small onion, chopped
  • 1/4 cup roughly chopped, peeled asian pear
  • 1 inch ginger, roughly chopped
  • 3 garlic cloves, minced
  • 1/8 cup sugar
  • 1/4 cup fish sauce
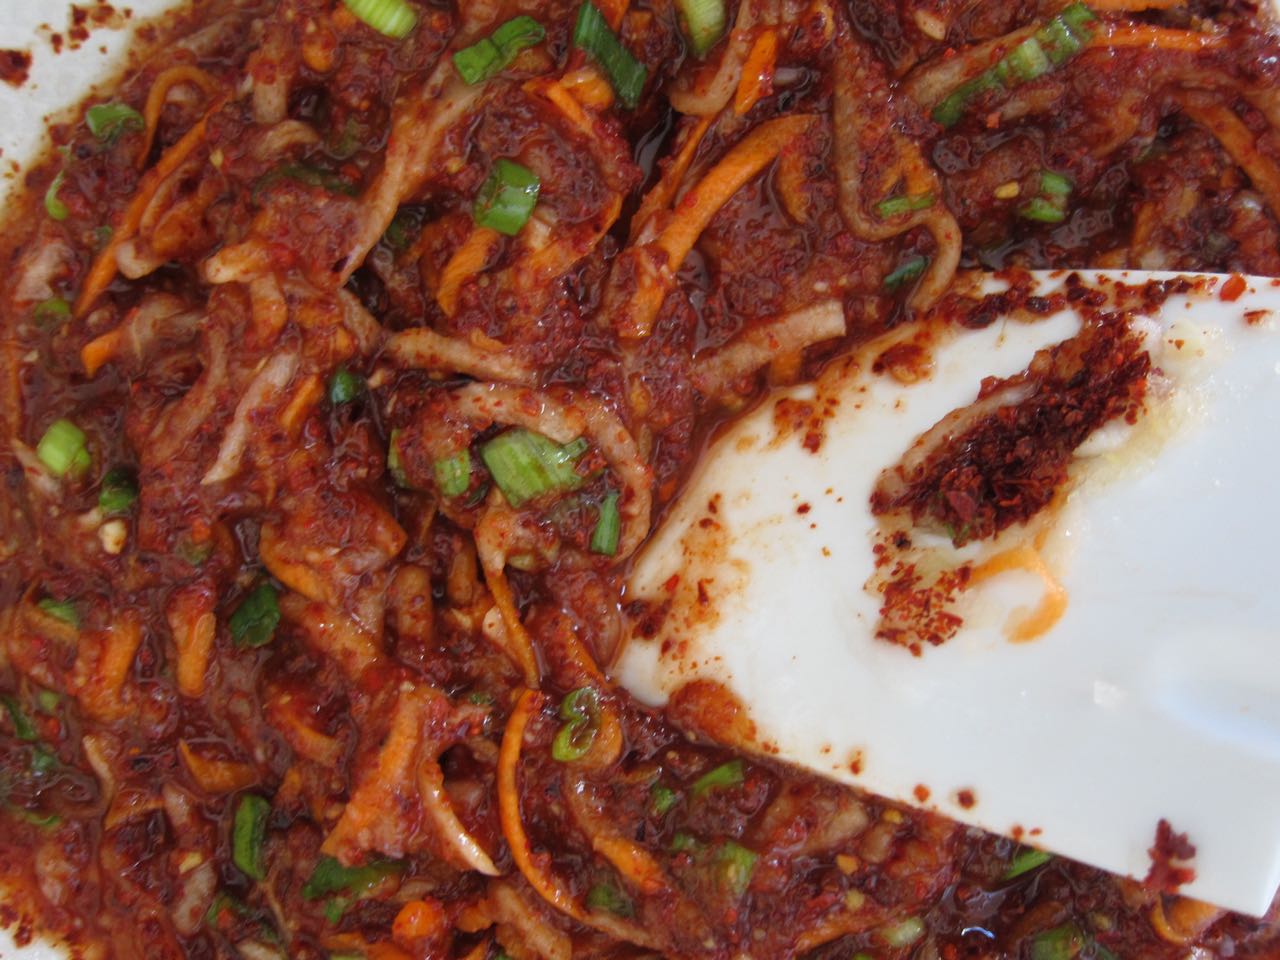
  • 1/2 cup gogucharu (korean red pepper flakes)
  • 1/2 bunch scallions, green parts only, thinly sliced
  • 1 small carrot, grated
  • 1/4 cup peeled and grated daikon
  1. Brine the cabbage: Cut cabbage lengthwise in half and then in half crosswise into quarters. In a large bowl, combine sea salt with 6 cups water and add the cabbage. Soak in the salt water for 6 hours at least.
  2. Bring rice flour and 1/2 cup water to a boil, and whisk two minutes to a pudding-like consistency. Remove to a bowl to cool and chill until needed.
  3. In the bowl of a food processor, combine the onion, asian pear, ginger, garlic, 1/8 cup water, fish sauce and sugar. Pulse to puree, then transfer to a large bowl and mix with the chilled rice flour paste, the gogucharu, scallions, carrot and daikon. Toss this mixture with the cabbage and then pack it all into a large glass jar. Seal and place the jar in a plastic bag (this is in case of leaks as the mixture ferments and bubbles), then place it in a dark, cool space, like a closet, for 1-2 days. After this initial fermentation, transfer to the refrigerator and let sit for at least a week before eating.

For the Bulgogi:

  • 1 cup soy sauce
  • 1 large white onion, diced
  • 1/4 cup sugar
  • 2 tbs mirin
  • 8 garlic cloves, peeled
  • 1 tbs sesame oil
  • 2 tbs fresh ground black pepper
  • 2 lbs boneless ribeye
  • 4 scallions, cut into 1-inch pieces
  • 1 tbs sesame seeds
  • vegetable oil, for grilling
  1. Make the marinade: in a food processor or blender, add soy sauce, onion, sugar, mirin, garlic, sesame oil, and black pepper and blend to combine. Transfer to a container and refrigerate, covered, up to 24 hours. 
  2. Thinly slice the ribeye: freeze for 20 minutes, then, using a very sharp knife, slice into thin strips. Add to the marinade with the scallions and sesame seeds and chill up to 24 hours, at least 8 hours. 
  3. When ready to grill, heat a heavy skillet or grill pan over high heat. Blot meat dry and add vegetable oil to the hot pan. Cook meat, flipping frequently, until dark browned and cooked through, about 2-3 minutes.

For the Nori Rice:

  • 2 cups white sushi rice
  • 2 cups water
  • 2 tbs rice vinegar
  • 2 tbs sugar
  • 1 tbs salt
  • 1 sheet nori, toasted
  1. Rinse the rice until water runs clear, then soak for 30 minutes. Drain and add to a pot with 2 cups water and bring to a boil. Reduce to low and cook for 15 minutes. Remove from heat and let stand 10 minutes.
  2. Combine the rice vinegar, sugar and salt in a small bowl and microwave 30-45 seconds, and stir to dissolve sugar and salt. Stir mixture into the rice, then crumble in the nori and stir to combine. Keep warm until ready to use.

Additional fillings:

For the Pickled Daikon:

  • 3/4 cup water
  • 3/4 cup rice vinegar
  • 1/4 cup sugar
  • 1 tbs kosher salt
  • 1 clove garlic, halved
  • 1/2 tsp turmeric
  • 8 whole peppercorns
  • 1 bay leaf
  • 1/2 lb daikon, peeled and cut into 1/4 inch strips
  1. In a saucepan, stir together water, vinegar, sugar, salt, garlic, turmeric, pepper, and bay leaf and bring to a boil. Stir until the sugar is dissolved, then remove mixture from heat and add daikon. Let cool to room temperature, then transfer to an airtight glass container. Store in the refrigerator.

For the hot sauce:

  • 4 tbs goguchang (Korean chili paste)
  • 1 tbs sesame oil
  • 2 tsp rice vinegar
  • 1 tbs sweet soy sauce (or 1 tbs soy sauce + 1 tsp brown sugar)
  • 2 cloves garlic, grated
  • 1 tbs sesame seeds
  • water, to thin if needed
  1. Mix all ingredients together in a bowl and stir to combine.

For the Avocado Sour Cream:

  • 1 avocado, removed from peel and pitted
  • juice of 1/2 lime
  • 1/4 cup sour cream
  1. Mash/stir all together in a small bowl. Keep refrigerated until needed.

Assembly:

  1. Find the largest wheat tortillas you can, and roll up your desired fillings. Enjoy and nap as needed.

Hard to find ingredients:

Tae-kyung Korean Red Chili Pepper Flakes Powder Gochugaru, 1 Pound
Gochujang Hot Pepper Paste 1.1lbs
Kecap Manis (Sweet Soy Sauce) - 600 ml(20.2-Ounce)by ABC.
In Sunday Suppers, Recipes Tags Main Dish
Comment

Pecan Pie Cookies

November 10, 2017 Allie
Pecan Pie Cookies

if you were to present me with the entire lineup of Thanksgiving desserts and ask me to rank them, or pick out my favorites, or otherwise subject them to some sort of popularity contest, pecan pie would not make the cut. Pumpkin and apple desserts win the election; they get the extra 3 million popular votes over pecan pie’s also ran (don’t let the orange hue fool you).

Sure, there is always the attempt to dress those pecans up with chocolate, but I don’t know anyone clamoring for rich chocolate after the feast, and so otherwise you have this pie trying to make its case with just pecans and sugar. I like pecans and I like sugar. In fact, I like like them both, but put them together and, I don’t care what fancy mosaic you’ve created with those nuts, my brain just goes, “meh.”

Which is why, over the last few years, it’s been interesting to see what happens to me when I come across recipes for pecan pie-adjacent things. Mini pecan pies with an earl grey crust? I have to make that. Caramel pecan fried hand pies? Where’s the oil? Apparently, as long as you don’t try to present me with a pecan pie in an actual, full-sized pie dish, then I’m all about it.

So, this year, when I began to map out and schedule my holiday baking plans (uh, you also have a calendar for this, right?) I wasn’t very surprised to realize I wanted to make something in the pecan pie family. As it also turns out I knew exactly what I wanted to do. 

A few years ago, Deb over at Smitten Kitchen came up with a recipe for Apple Pie Cookies, which are basically just tiny pies with a slice of apple tucked in between two slightly crispier crusts. They elegantly solve the problem of a too-small crust to filling ratio, while also looking adorable in the process. I happened to make these for my father once, and now he strongly hints every year that Christmas might be ruined if I were to forget to send him a box. 

I’m not the Grinch, so every year I comply, and now I’ve gotten both really good at making these cookies but also to the point of wondering what other pie filling could go in them. I thought maybe pumpkin, because it is the best and also then I could pretend I made the Pumpkin Pasties from the Hogwarts Express (side note: what is a pasty?), and then I decided I should definitely turn them into little pecan pie cookies, which you see here.  

I stole the caramel pecan filling from the hand pies I mentioned above, and spooned it in between the crusts, and baked up a perfect batch of tiny, crispy, caramel and pecan filled little treats that you hold and eat like a cookie but spiritually experience as pie. In my mind, if you are going to serve pecan pie this year at Thanksgiving, this should probably be the way you do it. 

Baked pecan pie cookies
roasted pecans
Baked Pecan Pie Filling.jpg
Filling Pecan Pie Cookies.jpg
Pecan Hand Pie Cookies

Pecan Pie Cookies

Cookie Crust adapted from Smitten Kitchen, pecan filling from Food & Wine

  • 4 oz pecans
  • 2 1/2 cups all purpose flour, plus more for dusting 
  • 1 1/3 cup plus 2 tbs sugar
  • 1 tsp salt plus more for caramel
  • 2 sticks unsalted butter, very cold, plus 4 tbs for caramel
  • 1/2 cup buttermilk, very cold
  • 1/3 cup heavy cream
  • 2/3 tsp vanilla
  • 2/3 cup corn syrup
  • 2 large eggs
  • 1 egg, beaten, for egg wash
  • turbinado sugar, for sprinkling
  1. Heat oven to 375 degrees, and toast pecans on a baking sheet for about 8 minutes until they brown and smell amazing. Let cool. Leave oven on.
  2. Make the crust: Whisk together flour, 2 tbs sugar and 1 tsp salt in a large bowl, and crumble 2 sticks of the butter into the flour using a pastry cutter or your fingers, until the butter pieces are roughly the size of peas. Stir in the buttermilk until a rough, craggy dough forms, then press it together with your hands. Divide dough in half and chill, wrapped in plastic, for at least an hour.
  3. While the dough is chilling, make your filling: Coarsely chop your pecans. In a medium pot, combine half of the remaining sugar with 1/4 cup water over moderate heat. Swirl the pan a bit, gently, once Swirl the pan a bit, gently, once sugar begins to color and bubbles form around the sides of the pan. Cook until caramel is a medium amber color, about 9 minutes. Remove from heat and whisk in the 4 tbs butter, heavy cream, 1/3 tsp vanilla, and a pinch of salt.
  4. Transfer 1/2 cup of the caramel to a large bowl and let cool a bit (any remaining caramel can be saved for another use). Whisk the remaining sugar and vanilla along with the corn syrup into the slightly cooled caramel, then whisk in the 2 eggs. Add the pecans and another pinch of salt.
  5. Spray a small baking sheet with cooking spray and pour the filling into the pan. Bake for about 25-30 minutes, until set, then remove from oven and let cool a bit. Scrape filling into a bowl and stir to fully combine. Refrigerate 1 hour.
  6. Assemble the pies: Heat oven to 350 degrees. Lay out a small bowl of water and one with a bit of flour. Dust a counter well with flour, then roll out cookie crust dough to about 1/8 inch thick, or slightly thinner. Using at least a 2-inch round cookie cutter, cut dough into as many rounds as you are able and lay the rounds on a parchment lined baking sheet. Once the baking sheet is full, transfer to refrigerator and repeat rolling and cutting with remaining dough.
  7. To assemble cookies: Dampen the edges of a disc of dough with water, and scoop 1 tbs of filling into the center of the circle (you make need to heat up the filling a bit if it has hardened too much while chilling). Lay another round of dough over the first round and press gently to seal. Dip a fork in the bowl of flour and use the tines to crimp the edges to further seal them, or you can use a fluted round cutter to do this. Repeat with all remaining rounds of dough and filling, laying pies on parchment lined baking sheets with about an inch in between. Keep full baking sheets in the fridge to chill while you finish assembling.
  8. When ready to bake, brush tops of cookies with the beaten egg and cut a few decorative slits in the top of each. Sprinkle with turbinado sugar and bake 20-25 minutes, until puffed and golden.


In Recipes Tags Dessert
Comment

Pumpkin Butter Tart Soleil

November 7, 2017 Allie
Pumpkin Butter Tart Soleil

One week into November and approximately a million internet years behind every one else, I’ve got something with pumpkin! 

I couldn’t join the pumpkin everything rush just because it turned October and suddenly even the weird, modernist cube mansions up the hill had artisanal gourds crowding the front steps. I had to wait until I was ready, until it was pumpkin season in my heart. 

And finally, this past weekend, the weather turned on a dime from Summer to glorious Fall. And I mean real, crisp-aired, East Coast-style Fall, with brilliant blue skies and temperatures hovering just below comfortable and just above too-cold-for-my-trendy-velvet-bomber-jacket. It was beautiful, and will be short-lived, I’m sure. 

However, I can keep that feeling going today, with this flaky, pumpkin-filled tart. It only requires two(!) ingredients, three if you want to do an egg wash, and could really not be simpler to do. You take your puff pastry, fill it with some pumpkin butter, top with more puff pastry, cut and twist it into strips, and bake it up until it puffs into a golden sun. It’s cozy and buttery and just the thing for lazy mornings on the couch or around a table. Just make sure you wear your comfy pants and show up with a giant mug of something hot.

Tearing Pumpkin Butter Tart soleil
Cutting Puff pastry.jpg
Spreading Pumpkin butter on puff pastry.jpg
twisting puff pastry.jpg
brushing tart soleil with egg wash.jpg
baked tart soleil
Pumpkin Tart Soleil Flaky Layers

Pumpkin Butter Tart Soleil

Adapted from all over the internet.

  • 1 full recipe puff pastry (or 2 packages store bought)
  • pumpkin butter (up to 1/2 cup)
  • 1 egg yolk + 1 tbs water
  1. Heat oven to 425 degrees. Roll out puff pastry to two, 10-12 inch circles (make sure the circles are the same size). Slide one circle onto a parchment lined baking sheet and spread with pumpkin butter in a thin layer, then top with the second circle of puff pastry. Use as much as you like, but remember the more you fill your pastry with the messier it will be to twist.
  2. Place a champagne flute or small glass upside down in the center of the pastry and cut lines away from the glass, so you end up with 32 equal wedges. This is easy to do by cutting the circle into quarters, then dividing each quarter in half, then again, etc, until you get to 32 (4,8,16,32).
  3. Twist each wedge very gently so it spirals out from the center. You may need to put the pastry back in the freezer to firm up a bit first if it has softened too much while cutting.
  4. Mix the egg yolk and water together in a small bowl and brush over top of the pastry. Bake at 425 for 10 minutes, then lower the heat to 375 and bake another 20 minutes, until puffed and crispy. Serve warm or at room temperature, dusted with powdered sugar if you want to get extra fun (I didn't).


In Recipes Tags Dessert, Breakfast
Comment
← Newer Posts Older Posts →

For those who plan their next meal while eating the last.


INSTAGRAM

🎶When pizza’s on a bagel*, you can have pizza anytime**!🎶

*donut
** after you fry some donuts
FINALLY perfected these Burnt Honey Butter Biscuits & what good timing! It’s carb season & we are all hibernating! 🐻
Final thoughts on Small Thanksgiving: take your sweet potato + marshmallow combo firmly into dessert or even breakfast, and consider a cozy mashed potato soup with stuffing croutons to use up those leftovers. Stay safe & Happy Thanksgiving! 😷🦃
Part 2 of Small Thanksgiving: all the stuff to stuff yourself with! An Italian sausage pasta-inspired stuffing and a vegetarian, spiced wild rice stuffed squash. Everything serves 4-6, gather safely this year! 😷🦃 #thanksgiving #smallthanksgiving #v
Now that we (and the world?) can let out that collective sigh of relief, I can  finally think about my favorite holiday! Everyone is probably (hopefully 😷)looking at smaller gatherings this year, so I’m sending some Small Thanksgiving ideas ou
So happy Disney keeps justifying my dumb baking purchases! This matcha shortbread is delicious, but make a good sandwich cookie it does not. I hid all the broken pieces 🙈
Subscribe to Tea and Fog!

RECENT RECIPES

Featured
polenta with rosemary and goat cheese.jpeg
Salmon Wellington and Warm Rice Salad.jpeg
Pizza Donut Hero.jpeg
Burnt Honey Butter Biscuits.jpeg
Mashed Potato Soup with Stuffing croutons.jpeg
sweet potato donuts with marshmallow frosting.jpeg