• Home
    • Recipes
    • The Roast Chicken Project
    • Allie Dreams of Cake
    • Sunday Suppers
  • Travel
  • About
Menu

Tea and Fog

Street Address
City, State, Zip
Phone Number

Your Custom Text Here

Tea and Fog

  • Home
  • Recipes
    • Recipes
    • The Roast Chicken Project
    • Allie Dreams of Cake
    • Sunday Suppers
  • Travel
  • About

Sunday Supper: Veggie & Chicken Lasagna with Pumpkin Seed Pesto

May 6, 2018 Allie
veggie & chicken lasagna with Pumpkin seed pesto

I don't think I've ever posted a lasagna here! For someone who loves to eat pasta, I don't actually cook it very often. But there is a specialty foods store in my neighborhood that I sometimes wander into when I want to get my wallet in trouble, and one day, I walked out with an $11 pint of ice cream and some beautiful, rainbow striped lasagna noodles. Neither were things that I needed, but both made me very, very happy in that moment.

The ice cream was consumed pretty much immediately, but the lasagna noodles sat in my pantry for almost a year, as I tried to figure out something to do with them. I had no immediate plans to make lasagna when I bought them, but the bigger problem was that I wanted whatever recipe I made to live up to the gorgeous noodles. You can't just bury rainbow stripes in meat sauce and call it a day. At least, not in my house.

After the noodles had been sitting for a few months, I happened to stumble my way into a crazy delicious pesto while trying to use up some pumpkin seeds and a bunch of basil (pretty much the source of all the pesto in my house). It occurred to me that I could freeze the pesto and then, when Spring arrived, pair it with a spinach ricotta and some colorful veggies to match the pasta. So, fast forward a few months later and here we are!  

But I couldn't stop with just the veggies. I started to really crave that traditional lasagna flavor of cheese, red sauce, and meat, so I decided to add a meat sauce, but with chicken to keep it light for spring. I took a cue from Marcella Hazan and made a buttery, rich tomato sauce for the base, added some ground chicken and my favorite umami booster, and the resulting sauce was something very special, deserving of my special noodles. It's also a wonder I managed to put any in the lasagna, as I couldn't stop eating the stuff with a spoon. I'm definitely making another batch to just pour over a bowl of polenta!

There is a lot going on in this lasagna, but it's worth it when you pull it hot from the oven, with pesto seeping through the cheese and meat sauce bubbling up the sides. You may just burn your mouth trying to shove this in way before the cheese has cooled from molten to edible. I warned you.

slice of veggie & chicken lasagna
Assembly Lasagna step 1.jpg
Assembly lasagna step 2.jpg
assembly lasagna step 3.jpg
assembly lasagna step 4.jpg
baked veggie & chicken lasagna
serving veggie & chicken lasagna

Veggie & Chicken Lasagna with Pumpkin Seed Pesto

I've laid out all the ingredients here in their separate lists for each component, because all individual layering components can be made ahead, though the directions below are for one lasagna-making session. You can make almost everything while the tomato sauce cooks, as long as you have all your ingredients ready to go. A good mise en place can really help here.

For the Meat Sauce:

  • One 28 oz can whole peeled tomatoes (San Marzanos preferably)
  • 5 tbs unsalted butter
  • 1 onion, peeled and cut in half
  • 1 lb ground chicken thighs
  • 1 tbs shiitake powder (optional)
  • 1 tsp dried oregano
  • salt and pepper, to taste

For the veggies:

  • 1 zucchini
  • 1 yellow squash
  • 1 carrot
  • 2 tsp salt
  • 1 clove garlic, minced
  • extra virgin olive oil

For the Pesto:

  • 1/3 cup pumpkin seeds
  • 2 cloves garlic
  • a big bunch of basil
  • extra virgin olive oil
  • salt, to taste

For the spinach ricotta:

  • 15 oz whole milk ricotta
  • 2/3 cup parmesan, grated
  • salt and pepper, to taste
  • 1 tsp dried oregano
  • 1/2 lb frozen, chopped spinach, thawed

For Assembly:

  • 12 Lasagna noodles
  • butter, for the pan
  • 8 oz fresh mozzarella, sliced into rounds or shredded
  1. Start the tomato sauce: Add tomatoes and their juice to a medium pot with the butter and the onion, the oregano, and a pinch or two of salt. Bring to a simmer and cook about 45 minutes, crushing the tomatoes against the sides of the pot with a wooden spoon as they begin to break down.
  2. While the sauce is simmering, prep the veggies. Grate the zucchini, squash, and carrot (this is easy to do all at once with the shredding attachment of a food processor). Add all grated veggies to a collander and sprinkle with 2 tsp of salt. Toss to distribute the salt. Let veggies sit and drain for 10 minutes. Then squeeze as much of the water out of the veggies as possible and transfer to a small bowl. Set aside.
  3. While the veggies are draining, make the pesto. Toast the pumpkin seeds in a skillet until fragrant and beginning to pop a bit. Cool for a minute or two, then add to a food processor with the garlic and basil. With the processor running, add enough olive oil to make a thick sauce/paste. Add salt to taste. 
  4. Brown the chicken. Heat a little olive oil in a skillet and add the chicken, shiitake powder if using, and 1 tsp of salt. Cook until browned and just starting to cook through. Add the chicken to the simmering tomato sauce and continue to simmer to the 45-50 minute mark, then lower the heat to keep warm.  
  5. Cook the veggies. Add a little more olive oil to the pan, then add the clove of minced garlic and cook until fragrant, about 1 minute. Add the wrung-out veggies and saute for 1-2 minutes more, just to incorporate with the garlic and cook out any extra water. Set aside to cool. 
  6. In a large bowl, stir together ricotta, parmesan and dried oregano. Wrap the spinach is a towel or press in a mesh strainer, and squeeze as much water out of the spinach as you can, then stir into the ricotta mixture. Season with salt and pepper to taste.
  7. Once you have all your components ready, you can cook your noodles! You can also do this while making everything else, but if you don't want one more thing to keep track of, you can make them at the end. Bring a large pot of well-salted water to a boil, and cook the noodles in a couple batches until very al dente, about 6 minutes. Lay out on a plastic lined baking sheet so they don't stick. 
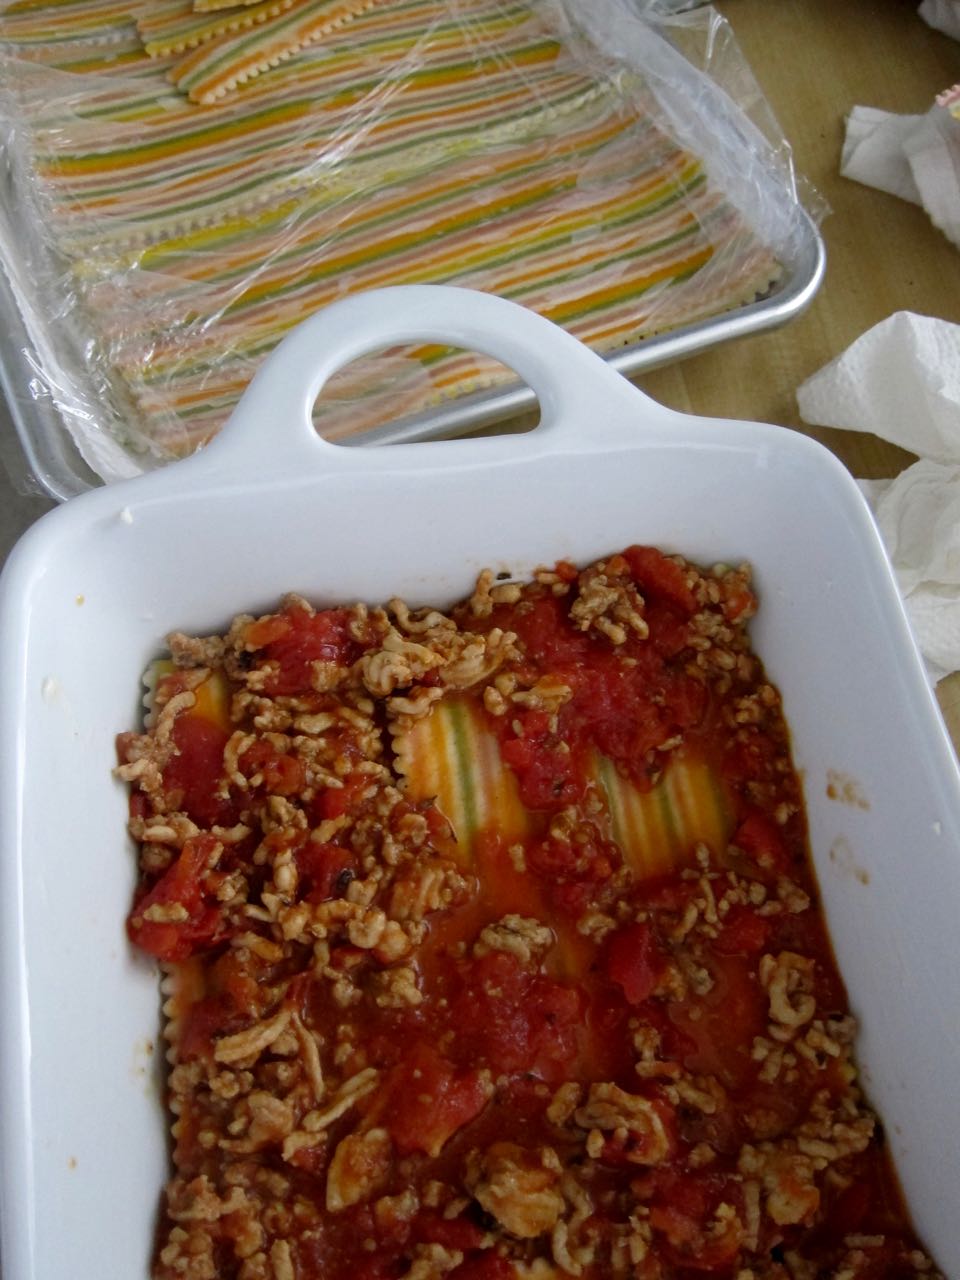
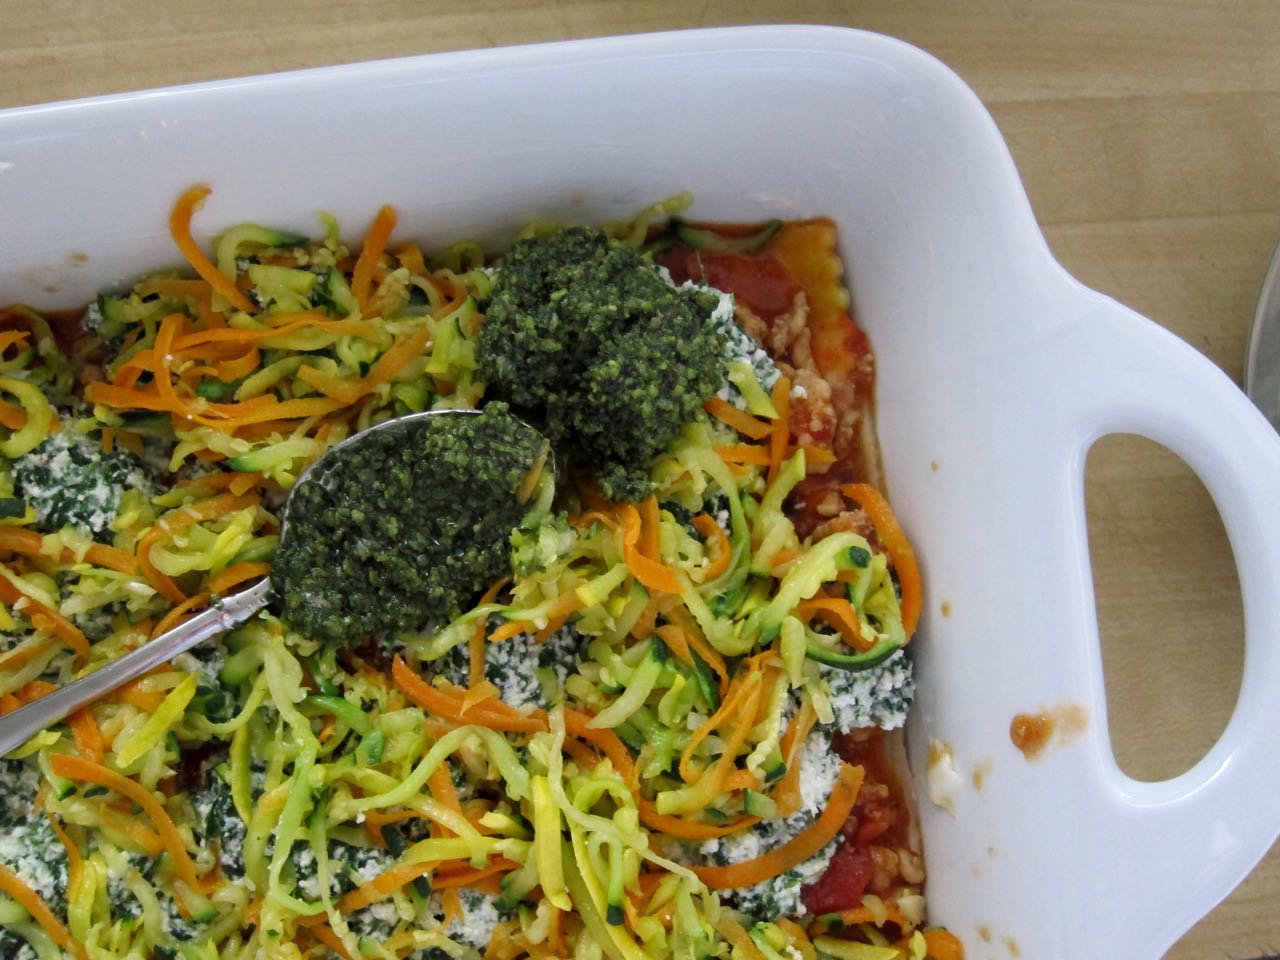
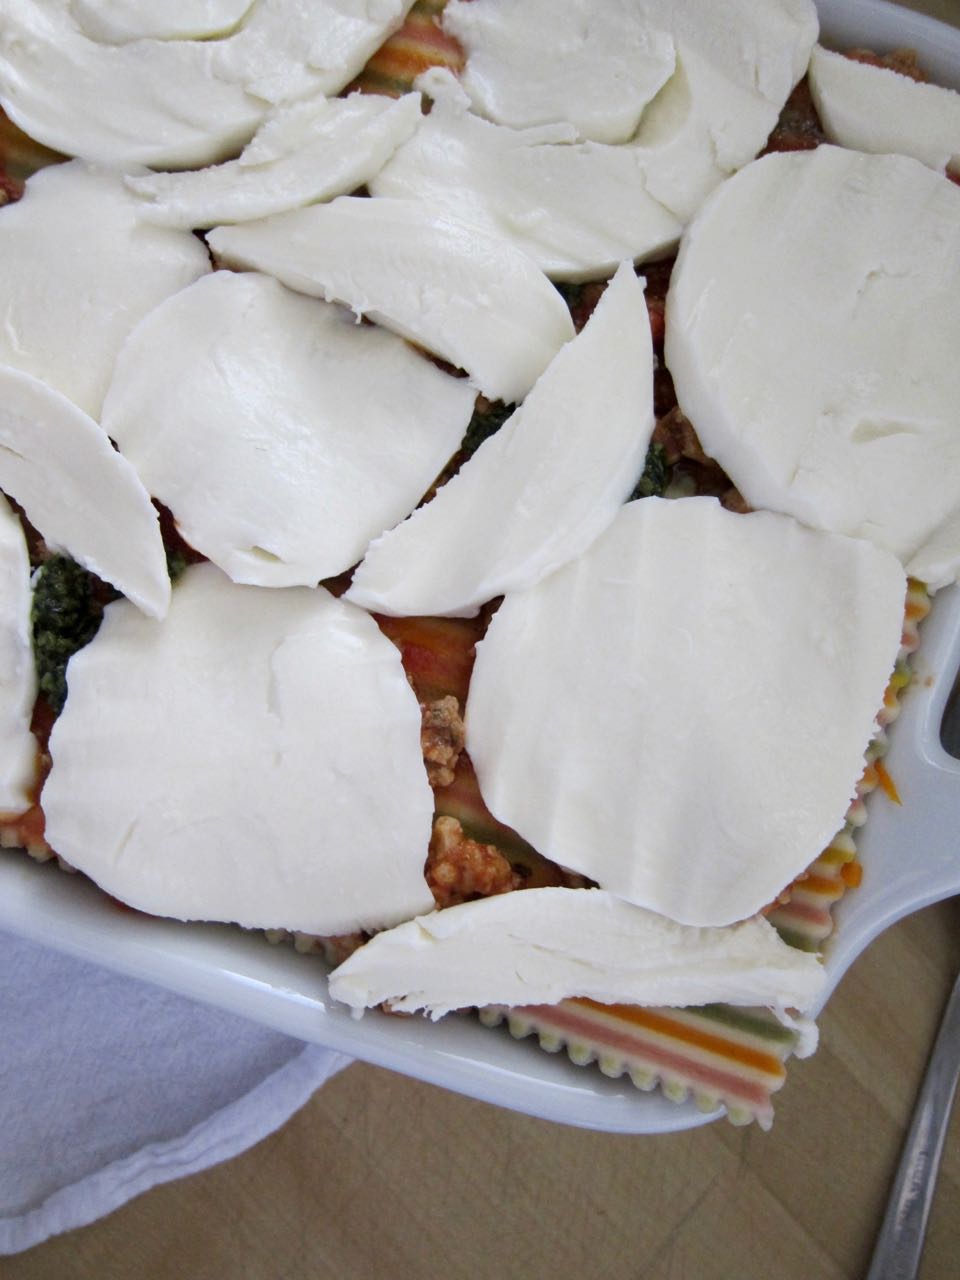
  8. Heat oven to 400 degrees. Butter a baking dish and spoon a thin layer of the meat sauce on the bottom. Divid the noodles in whatever way they fit in your dish so that you will end up with three layers of noodles, then layer and repeat: noodles, 1/3 meat sauce, 1/3 ricotta spinach mixture, 1/3 veggies, 1/3 pesto, noodles, until you end with your final layer of pesto. Top the layers with the mozzarella. 
  9. Bake for 30-35 minutes, until bubbling and cheese is melted and browned at the edges. Let cool for 5-10 minutes, then dig in.

Notes:

  • Lasagna can be prepared a day or so ahead of baking, and then wrapped in plastic and stored in the fridge. When ready to bake, just unwrap and pop in the oven. I would add about 5 minutes to the cooking time.
  • I made my lasagna in a smaller pan, and layered the extra ingredients into a loaf pan. If you have a more traditionally sized lasagna pan, everything should fit nicely into one.
  • Now, about the veggies. You might look at the directions and think, "what the hell Allie, can't I just saute them to remove all that water?" To which I'll say, sure, you can do that, but with the method I used, you can minimize the active cooking time while still removing a ton of water, allowing you to make the other components more quickly, and you won't end up with either mushy vegetables or watery lasagna. High fives all around! You could even skip the step of sautΓ©ing them after salting them, but I like giving them a toss in the garlic-infused oil.
In Recipes Tags Main Dish
Comment

Candied Strawberries (Tanghulu)

May 1, 2018 Allie
Candied Strawberries

(What I'm about to describe may sound like a depressing trip, but I promise I had fun! And I still consider Disney to be magical, just consider the below a brutal reconciling of dreams vs. reality.)

You know when you plan a vacation in such minute detail, that you begin to feel as if you’ve already lived it before it happens? And in your mind, it will be just the most epic, fantastic, most financially worth-it travel experience of your life? Then, when you are actually experiencing the blessed event, and you are having fun, and making memories, and overall succeeding at living that imagined fabulousness, but it was so built up in your mind that reality just seems, well, disappointing? I think we’ve all been there.

That pretty much describes the trip I took with Claire for our 30th birthday a couple years ago. We planned for months exactly what we were going to do to make this trip the most epic, fun, and indulgent trip to Disney World and Harry Potter World that two adults embarking on their 4th decade ever took! We planned out everything. It probably didn't help that we were both in depressing jobs at the time, and the Disney trip was fast becoming that little sliver of light at the end of the tunnel, as we picked out restaurants and rides, and wondered how many giraffes we would see from our hotel window. 

I woke up early a few months before the trip to plan out our Fast Passes (Disney is hardcore, yo). We were going to drink around the world at Epcot and ride everything we wanted, be chosen by our wands and experience Hogwarts. And while we did do a lot of that, it was just, somehow less than expected. Service at Ollivander's was terrible, and the locker system at Universal Studios is laughably inefficient in a way that can really make you hate life. In Epcot, Claire remembered that she gets motion sickness and had a harrowing trip to Mars. And that was all before you consider the food.

We abandoned our plans of drinking around the world when we discovered that most drinks at Disney are shockingly sweet, and those places that might be good have long lines (as tends to happen when word gets out you can drink good tequila without a cup of sugary lime water added to it). The quaint French bakery I imagined where we would be starting our day at Epcot with hot chocolate and croissants turned out to be a grubby cafeteria with terrible pastries. The photo op was admittedly great, but still, bubble burst. 

The shave ice I bought in Japan was refreshingly cold, but otherwise flavorless and somehow frozen solid, so that I couldn’t even chip away at icy bites of relief with my fragile, plastic spoon. The curry in the nearby restaurant was serviceable, but marred by the fact that Claire didn’t want to stop for it at all, and I felt rushed eating it. I repaid the impatience favor in Germany, when she stopped for a pretzel and I stood fuming in the gift shop while she ate it outside, because there was no shade to be found.

Because, did I mention the heat? My god. I thought I could handle the Florida heat and humidity in May. I was so, so wrong. I, spoiled by my California climate, sweltered in the unshaded lines, sticky and uncomfortably sweaty, while Claire stood seemingly unaffected by the wet blanket of air around us that not even a cup of Dole Whip could cut through. Claire’s long-planned-for Mickey ice cream bar melted faster than she could eat it, and we drank vats of iced tea to cope. I was crabby and thirsty, and the line for Splash Mountain was an unacceptable 2-hour trade for 5 seconds of relief. We bickered, then fought, then recovered enough to head to the next planned stop, where our tempers again rose with the heat.

Which is all to say, that by day two of this trip, I was pretty much despairing of the heat and resigned to disappointment, at least where the food was concerned. So, when we realized we were visiting Epcot during the flower show, and saw they were serving something called Beijing Street Style Strawberries, we both figured at that point that they couldn’t really mess up fruit too badly. We bought an order, and I was handed a little cardboard boat filled with three strawberries on a skewer, coated in a hard candy shell and topped with sesame seeds. That part had been advertised, but what I had not known before I bought them was that they would be cold. They had been chilled thoroughly, and somehow through Disney magic the strawberries hadn’t melted the candy shell. I crunched into one, sweet and nutty with sesame, and so refreshing. And, well. My day improved so much in that moment I literally felt myself unwilting. Claire wasn’t that into them, but I sat on a bench and happily polished them off, dreading adding to my sugar high but so grateful for the cold fruit in that moment I thought I might cry.

Fast forward two years, and when I saw these street treats featured in Ugly Delicious, it confirmed for me that these were a real thing, and I knew it was time to recreate them. A quick Google search proves I was not the only Epcot visitor to be charmed by these candied strawberries, and there were several recipes out there. I mashed several together, figuring that at its most basic I was dealing with sugar boiled to the hard-crack stage, and poured over fruit. I didn't remember any other flavors other than strawberry, sugar, and sesame, so I kept it simple. And in the end, I came pretty close to what I remember. I'm still not sure how Disney keeps their candied strawberries cold without melting the sugar, but I'm very sure I probably don't want to know. 

These candied strawberries, or Tanghulu, are perfect if you want a little trip to Disney without leaving your kitchen or climate control. But you know, it's been a couple years now since I've been to a Disney park, I think I really want to go...

candied strawberry skewer
boiling sugar.jpg
skewered strawberries.jpg
Tanghulu

Tanghulu Candied Strawberries

Adapted from all over the internet.

  • 1/4 cup corn syrup
  • 2 cups granulated sugar
  • 3/4 water
  • at least 12 strawberries, just under fully ripe or even a little less.
  • 1 tbs sesame seeds (optional)
  1. Clip a candy thermometer to the side of a pot and add the corn syrup, granulated sugar, and water over medium-medium high heat. Do not stir the mixture, and cook until boiling and reaches 290 degrees, or the hard-crack stage. 
  2. While the sugar boils, prepare remaining ingredients. Hull strawberries and skewer strawberries onto wooden skewers, three stacked at the end of each skewer and set aside. Pat dry with paper towels.
  3. Toast sesame seeds, if using. Heat a skillet over medium heat and add sesame seeds. Heat until fragrant and golden, then set aside to cool.
  4. When sugar has reached the right stage, remove pot from heat and immediately begin dipping strawberries. This is easiest to do by carefully tilting the pot and swirling in the strawberries to coat. Set on wax-paper lined baking sheet and immediately sprinkle with some of the sesame seeds. Repeat with remaining skewers. The candy should set pretty quickly. 

Notes:

  • BE CAREFUL. I hope this goes without saying, but you are boiling sugar here, and if you spill it on yourself it isn't fun. 
  • Use slightly underripe strawberries, as the hot candy with start to cook the fruit a bit, and the mess can be contained if your strawberries aren't as juicy. The sugar in the candy coating will more than make up for any loss of sweetness from riper berries. 
  • The candy coating sets quickly, so if you are using the sesame seeds, make sure you sprinkle them on right away.
  • You can store skewers in the fridge, but these are best eaten right away. After a few hours the juice from the strawberries will start to dissolve the sugar, leaving soft strawberries sitting in a puddle of sweetened strawberry juice. Delicious, actually, but maybe not what you are going for.

Β 

In Recipes Tags Dessert
Comment

Basic Sprinkles & Frosting Cake

April 24, 2018 Allie
sprinkles and frosting cake

Maybe this cake is basic as in basic, with it's millennial pink coloring and rainbow sprinkles that suggest I've been paying attention to Pinterest's obsession with all things "unicorn", but it's also basic in that I made a pretty standard cake of fluffy vanilla, sweet frosting, and sprinkles. That's it! Simple and pretty. It's up to you how aggressive you want to be with the sprinkles, but otherwise, basic. 

Though I will full admit credit for everything, from the frosting, to the cake, to the sprinkles, belongs to the original inspiration and the source of the recipe, Butter & Scotch. This bar and bakery spot in Brooklyn serves up this cake by the slice, along with an extensive list of boozy drinks to wash it down. At the bar, they call this beauty a birthday cake, but I don't see any reason that this can't be a "just because" cake, especially if you reduce the recipe down to a more manageable, mini 4-inch version. 

Or try to, anyway.

Let me tell you about my adventures with this cake! I read a recipe meant for three, 9-inch layers and decided I could reduce it by half and get myself three, 4-inch layers. I still maintain this sounds like reasonable math, but oh my was I wrong. Even after noting to myself the number of eggs and amount of butter and cups of flour involved, I still proceeded as planned and found myself drowning in cake batter. Like, a how am I ever going to use this up amount of it. I can only assume the original recipe would have given me cupcakes for life.

In the end, I baked up two, 4-inch layers, one 6-inch layer and a dozen cupcakes. I froze the cupcakes (then, uh, treated myself for breakfast for a few days) and the 6-inch layer and decided to just go ahead with the rest. But, this cake is a finicky one, and I didn't really like the way one of my 4-inch layers had shrunk during cooling, so I ended up scrapping it (read: stress-eating with my bare hands) and cutting a 4-inch circle out of the 6-inch layer. So, I can really only thank the recipe for ultimately yielding exactly what I wanted, plus extra scraps and a dozen frozen breakfast cupcakes. Yay?

After all that bad math and creative cake-cutting, it was a relief that the frosting was a very straight-forward mix of butter, cream cheese and powdered sugar. That mixed up easily, and I then I just plastered the sides of the cake in sprinkles. So. many. sprinkles. I finally got to use my Amy Sedaris sprinkles and I really felt she would approve. Plus, it really was very validating after all that effort for my cake to say "I like you."

Thank you, cake. I like you too.

I lIke you cake
Amy Sedaris Sprinkle cake
Butter & Cream Cheese Frosting.jpg
Coating a cake in sprinkles.jpg
sprinkle explosion.jpg
piping sprinkle cake.jpg
slice of sprinkle cake

Sprinkles & Frosting Cake

Adapted from Butter & Scotch, original recipe reduced by 1/4 for a 4-inch cake. You may have extra batter.

For the cake:

  • 1/2 cup unsalted butter (1 stick), cold, plus more for greasing pans
  • 1 cup all purpose flour, plus more for dusting pans
  • 1/2 cups plus 3 tbs whole milk
  • 1/2 tbs vanilla extract
  • 1 cup sugar
  • 1 tbs baking powder
  • 1/2 tsp kosher salt
  • 3 egg whites

For the frosting:

  • 1 cup (2 sticks) unsalted butter, room temperature
  • 1/2 pound (1 package) cream cheese, room temperature
  • 1 tbs vanilla extract
  • 1 lb confectioners sugar
  • food coloring, if desired (I used 2 drops each of fuschia and light pink)
  • sprinkles, for decorating
  1. Heat oven to 350 degrees and prepare cake pans. Butter two, 4-inch round cake pans. Dust with a little flour and tap out the extra.
  2. Dice butter into small pieces, about pea-sized, and chill until needed. Warm milk up to room temperature for a few seconds in the microwave, then stir in the vanilla and set aside. 
  3. In the bowl of a stand mixer, combine the flour,  1/2 cup plus 2 tbs sugar, baking powder and salt. Mix with the paddle attachment on low speed for 30 seconds, then add in the cold butter and mix on medium until the butter incorporates with the mixture to form a wet, sandy texture. Lower the speed and add in the milk and vanilla mixture. Transfer batter to a separate bowl and set aside.
  4. Completely clean and dry the mixer bowl and add the egg whites and remaining sugar. Using the whisk attachment, beat on high until soft peaks form. Fold the whites gently into the flour mixture until full incorporated, with no visible white streaks.
  5. Divide the batter between the pans (about 1/2 full) and bake 20-25 minutes, until golden and a cake tester comes out clean. Transfer to a wire rack to cool in the pans for 10 minutes, then gently loosen the cakes from the pans and turn out on the rack to cool completely.
  6. While cakes are cooling, make the frosting: Cream the butter in the bowl of a stand mixer with the paddle attachment, until butter is fluffy. Add the cream cheese 2 ounces at a time while beating butter on medium. When cream cheese is fully blended in, add the vanilla, then lower speed and slowly add in the sugar. When all the sugar is added, add food coloring, if using, then increase the mixer speed to high and beat for 30 seconds, until fluffy and smooth. 
  7. Cut the tops of the cake layers to even the layers if needed, then cut each cake layer in half horizontally. You now have 4 cake layers. Stack the layers, spreading a bit of frosting between each layer, then frost the sides and top as desired. Add sprinkles if you want, and pipe decorative designs with any leftover frosting if you like. Serve and enjoy!
In Recipes, Allie Dreams of Cake Tags Dessert
Comment
← Newer Posts Older Posts →

For those who plan their next meal while eating the last.

Β 

INSTAGRAM

🎢When pizza’s on a bagel*, you can have pizza anytime**!🎢

*donut
** after you fry some donuts
FINALLY perfected these Burnt Honey Butter Biscuits & what good timing! It’s carb season & we are all hibernating! 🐻
Final thoughts on Small Thanksgiving: take your sweet potato + marshmallow combo firmly into dessert or even breakfast, and consider a cozy mashed potato soup with stuffing croutons to use up those leftovers. Stay safe & Happy Thanksgiving! πŸ˜·πŸ¦ƒ
Part 2 of Small Thanksgiving: all the stuff to stuff yourself with! An Italian sausage pasta-inspired stuffing and a vegetarian, spiced wild rice stuffed squash. Everything serves 4-6, gather safely this year! πŸ˜·πŸ¦ƒ #thanksgiving #smallthanksgiving #v
Now that we (and the world?) can let out that collective sigh of relief, I can  finally think about my favorite holiday! Everyone is probably (hopefully 😷)looking at smaller gatherings this year, so I’m sending some Small Thanksgiving ideas ou
So happy Disney keeps justifying my dumb baking purchases! This matcha shortbread is delicious, but make a good sandwich cookie it does not. I hid all the broken pieces πŸ™ˆ
Subscribe to Tea and Fog!

RECENT RECIPES

Featured
polenta with rosemary and goat cheese.jpeg
Salmon Wellington and Warm Rice Salad.jpeg
Pizza Donut Hero.jpeg
Burnt Honey Butter Biscuits.jpeg
Mashed Potato Soup with Stuffing croutons.jpeg
sweet potato donuts with marshmallow frosting.jpeg