• Home
    • Recipes
    • The Roast Chicken Project
    • Allie Dreams of Cake
    • Sunday Suppers
  • Travel
  • About
Menu

Tea and Fog

Street Address
City, State, Zip
Phone Number

Your Custom Text Here

Tea and Fog

  • Home
  • Recipes
    • Recipes
    • The Roast Chicken Project
    • Allie Dreams of Cake
    • Sunday Suppers
  • Travel
  • About

Chicken Pot Pi Day!

March 13, 2018 Allie
Chicken Pot Pie

Tomorrow is Pi Day! 

Pi Day is maybe my favorite food holiday, because it involves pie (duh) and falls on a date that is meaningful rather than arbitrary. I mean, why does National Donut Day fall on the first Friday of June? Why is there another one in November? It's all very confusing. 

Pi Day is not confusing, and it's as easy to remember as May the 4th. Pi = 3.14 = 3/14 = March 14th. You could also use Pi to figure out the circumference or diameter of your pie. Or you could just eat it, which I recommend.

This year, I decided to deviate from previous years' sweet celebrations (2015, 2016) with a savory pie. A chicken pot pie!

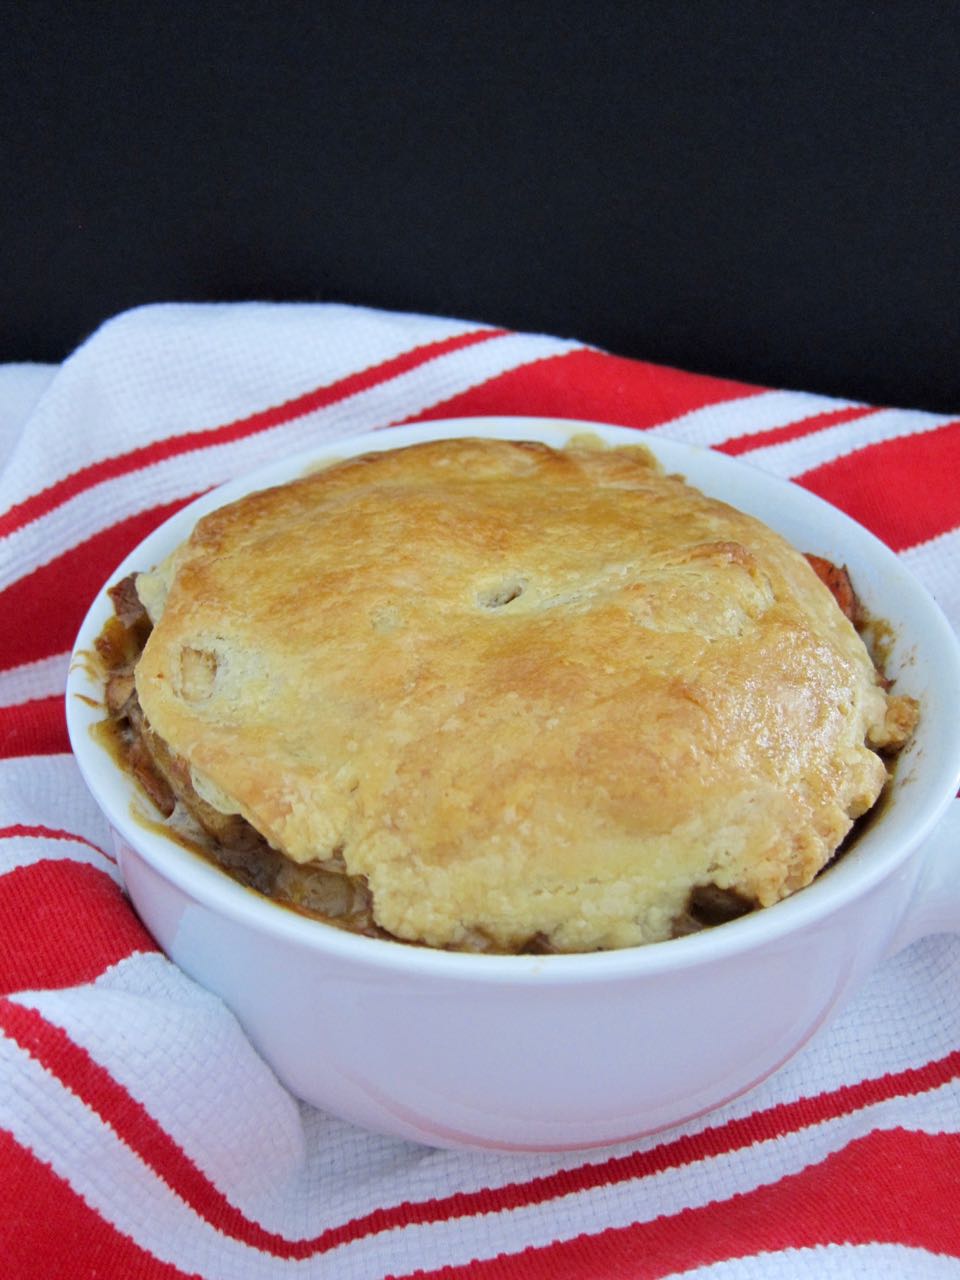
I recently encountered some controversy on Facebook over the true meaning of a pot pie. Does it have a crust or is it just stew with a crust baked on top? I'm going to go with the opinion that a pie has a crust on the bottom and anything else is just a cobbler (except when I call it a pot pie). So, today I've got a chicken pot pie with both a top and bottom crust, though I did actually bake it in a pot-shaped dish. I'm covering all my bases here.

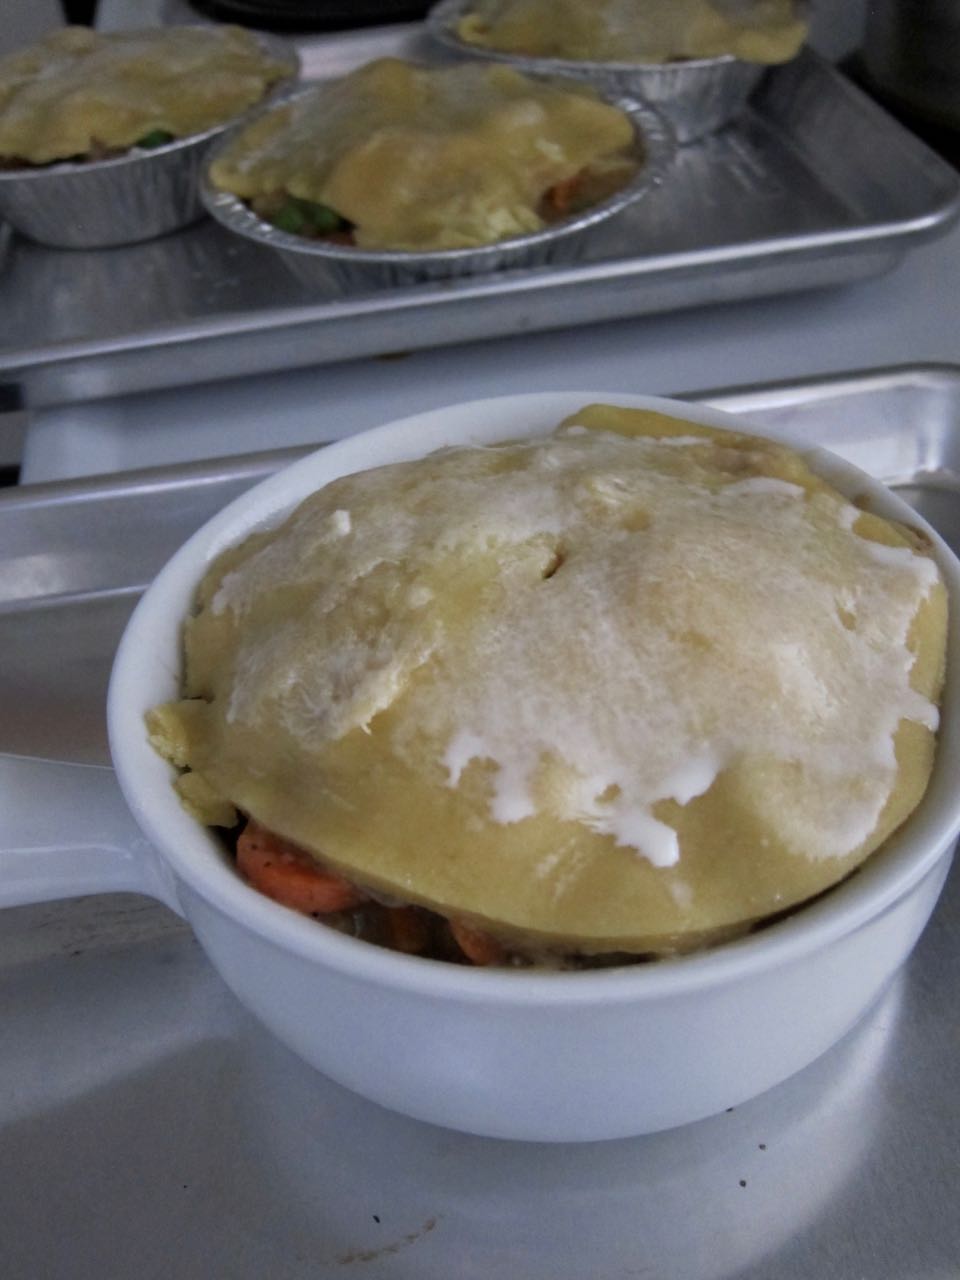
We've got all the classics. Chicken, potatoes, carrots, peas, and onion, all swimming in a thick gravy and baked into a buttery, rich crust. It's cozy, perfect, wintery heaven. You can bake it up into one giant pie, or if you don't want to consume that much chicken pot pie, do as I did and bake it up in individual pie pans so you can freeze smaller portions for later. Keep the pot pie party going into Spring, why not?

IMG_5992.jpg
IMG_5995.jpg
IMG_5996.jpg
IMG_5999.jpg
Chicken Pot Pi Day

Chicken Pot Pies

Adapted from Flour, Too

For the crust:

  • 1 3/4 cups flour
  • 1 tbs sugar
  • 1 tsp kosher salt
  • 1 cup unsalted butter, cold, cut into pieces
  • 2 egg yolks
  • 3 tbs cold milk

For the filling:

  • 2 tbs unsalted butter
  • 1 onion, diced
  • 1 large carrot, thinly sliced
  • 1 celery rib, thinly sliced
  • 1 small russet potato, cut into 1/2 inch cubes
  • 1 lb boneless, skinless chicken breast, cut into 1 inch pieces
  • 5 tbs flour
  • 1 1/2 cups chicken stock
  • 1 cup frozen peas
  • 1 tsp dried thyme
  • 1 1/2 tsp kosher salt
  • 1/2 tsp fresh ground black pepper
  • 2 tbs heavy cream, plush more for brushing
  1. Make the crust: in the bowl of a stand mixer, stir together the flour, sugar, and salt on low speed for about 10 seconds. Add the butter pieces and mix on low for 1-2 minutes, until butter clumps are about the size of pecans and the mixture holds together when you squeeze it. In a separate bowl, whisk together yolks and milk and then add to the flour mixture. Mix on low for 30 seconds, just until the dough comes together. Turn out the shaggy mass onto a counter and gather it together with your hands. Use the palm of your hand to smear the butter through the dough, sliding your hand down the sides of the mass of dough, until it all comes together in a smooth ball of dough. Wrap the ball of dough in plastic and flatten into a disc. Chill for at least 1 hour.

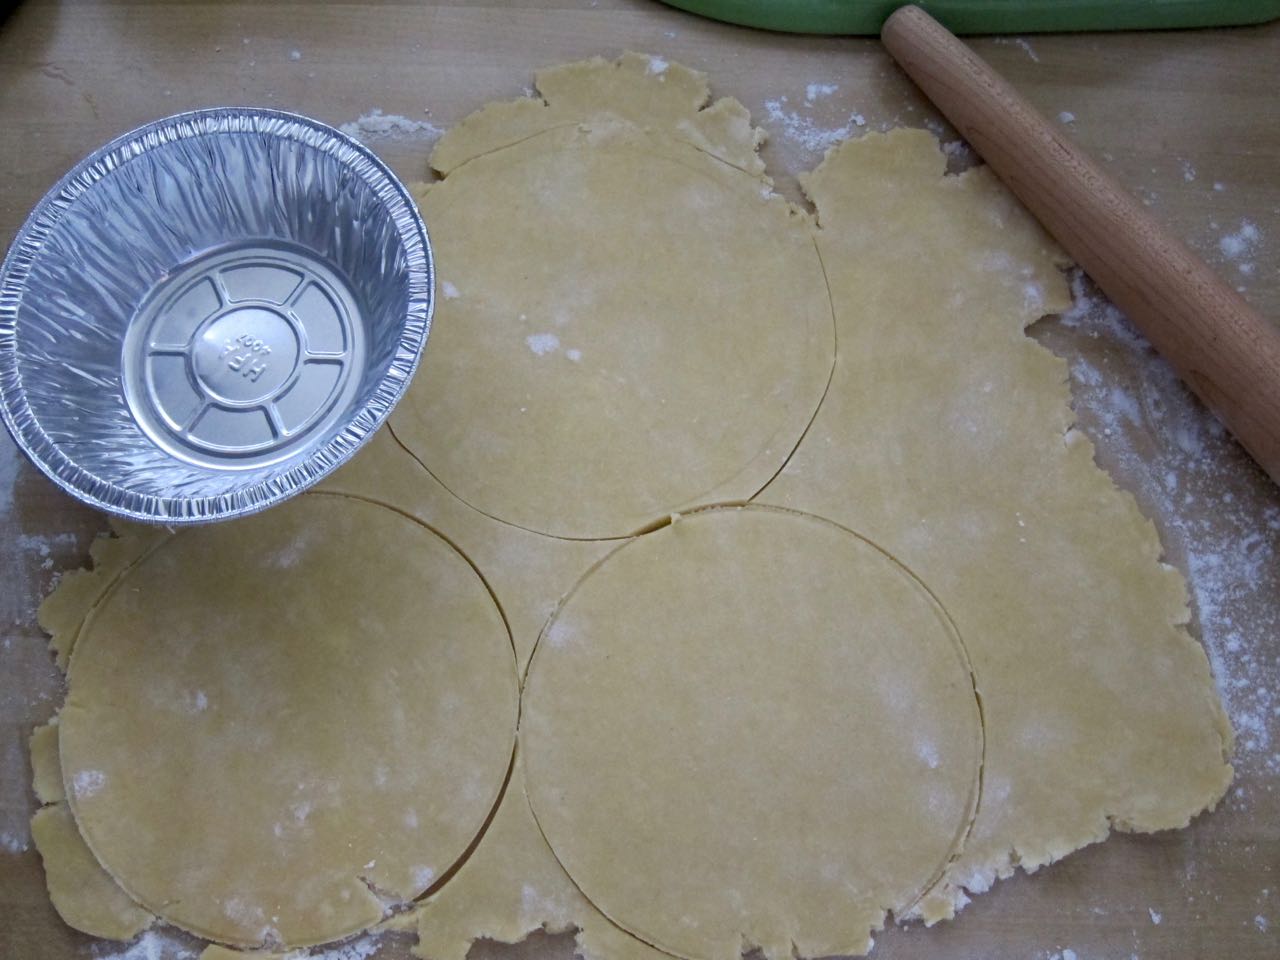
  2. When ready to bake crust, divide the dough into 2 pieces, one piece 2x the size of the other. Roll out the larger piece for the bottom crust to about 1/8 inch thick and cut out 4 large circles out of the dough,  using your pans as a size guide. Press dough circles into the pie dishes. Chill for 30 minutes.

  3. Heat oven to 350 degrees. Line crusts with parchment and fill with pie weights. Blind bake for 30 minutes. Transfer to a wire rack, remove pie weights, and let cool completely.

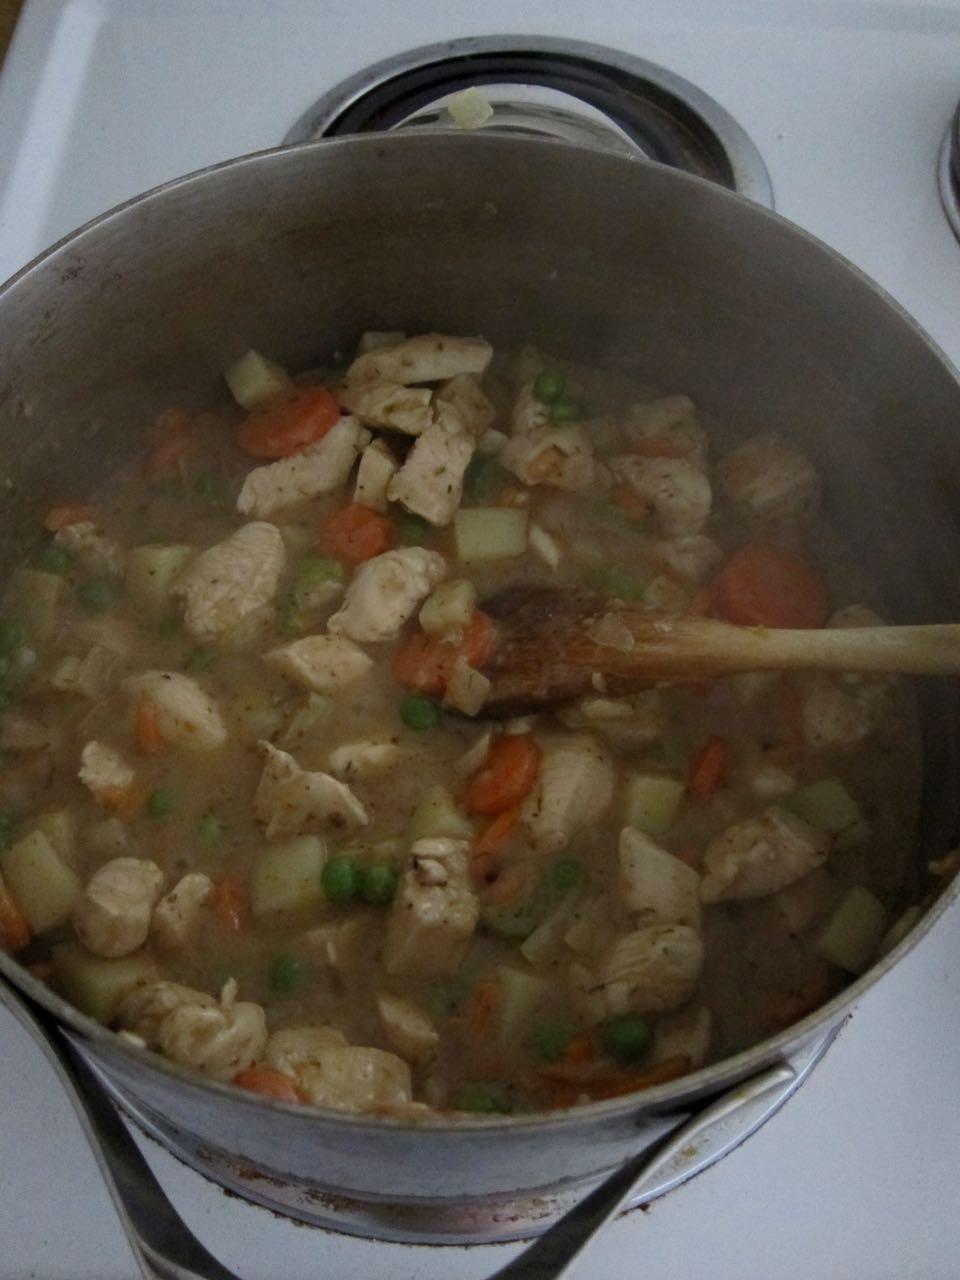
  4. Make the filling: In a large pot, heat the butter until foamy over medium-high heat. Add the onion and cook for 3 minutes, until softened a little. Add a bit of salt and then add the carrot, celery, and potato. Cook another 5 minutes, then add the chicken and a little more salt and cook 3 minutes. Sprinkle the flour over the mixture and stir it in, cooking another 2 minutes. At this point, it won’t look great. Add the stock and bring to a simmer. Add the frozen peas, thyme, 1 1/2 tsp salt and the pepper, then the cream, and stir to combine well. Simmer about 5 minutes more, stirring and scraping up any browned bits on the bottom of the pan. Remove from heat and then spoon into the pre-baked pie crusts.

  5. Roll out the remaining smaller dough piece on a well-floured surface about 1/8 inch thick and cut into 4 circles again, then drape over the filled pies. Do not worry if your crust doesn’t quite cover the pie, it can be rustic. Brush the tops with a little cream and poke a hole in the middle for steam to escape. 

  6. Place pies on a baking sheet to catch any overflow, and bake about 25-30 minutes, until crust is dark golden brown. Let cool on a rack for about 10-15 minutes, then serve and enjoy!

Notes:

  • You can assemble the pies fully and then freeze before baking. Wrap tightly in plastic wrap and freeze. When ready to bake, remove plastic and bake from frozen, adding 20-25 minutes to the cooking time.

  • I adapted the original recipe to make 4 mini pot pies instead of 1 large one, using disposable mini pot pie pans I found at the grocery store. It wasn't a perfect switch, and if I do it again I'd probably increase the crust recipe a bit.

  • If you want to make one large pie, simply roll the dough pieces into large rounds and don't cut them, and use a deep dish pie pan for baking.

In Recipes Tags Main Dish
Comment

Sunday Supper: Corned Salmon Tacos

March 11, 2018 Allie
Corned Salmon Tacos

I will freely admit I'm about to bastardize a holiday tradition here, but I'm going to argue that St. Patrick's Day is a holiday that reached peak bastardization with the invention of green beer, so it's all fair game at this point.

I've stolen the genius idea for corned beef tacos from Sam Sifton and changed the beef to salmon, because I adore fish tacos, and also because last year in his article about homemade corned beef, there was a throwaway line about another chef making corned salmon every year. I was instantly fascinated. How does one corn salmon? Wouldn't fish be utterly ruined if you use the same process as corning beef? I wanted to find out!

This year, I googled "corned salmon" and it seems that there is some sort of consensus that you shouldn't subject salmon to the same process as beef when corning it. At least, all the recipes I found for corned salmon skipped the five-day bath in a spiced brine, and none called for using pink curing salt, either. I suspect fish does not do well in a week-long watery grave and that sodium nitrite is maybe a little harsh for it. Instead, most recipes called for rubbing a piece of fish with kosher salt and spices and letting it sit for a mere 45 minutes. How boring.

But then! I found a recipe from Andrew Zimmern that was more along the lines of what I wanted to try. Still a salt and spice rub, but marinated for up to 18 hours, and including salmon flavor buddies like parsley and dill. So, basically a piece of salmon that is partially cured and then cooked? LET'S DO THIS.

The salmon is succulent and well-flavored. The slaw is spicy. The jalapenos are spicy. And the flour tortillas are warm and perfect. These are some of my favorite fish tacos I've ever eaten and you should get on this immediately.

corned salmon fish tacos
corned salmon brine mixture.jpg
wrapped corned salmon.jpg
cured corned salmon.jpg
corned salmon.jpg
cabbage slaw and sauce.jpg
roasted corned salmon and taco fixings.jpg
corned salmon tacos with slaw

Corned Salmon Tacos

Adapted from Sam Sifton and Andrew Zimmern

For the salmon:

  • 1/2 cup minced dill
  • 1/2 cup minced parsley
  • 1/3 cup salt
  • 1/2 cup sugar
  • 3 garlic cloves, minced
  • 4 tbs pickling spices
  • 2 tsp smoky salt
  • 3 lb salmon fillet, skin on
  • 1/4 cup brown sugar
  • zest of 1 lemon
  • juice of 1 lemon

For the slaw:

  • 1 small head green cabbage (or 1/2 medium-large size cabbage), thinly sliced or shredded
  • 3 carrots, shredded
  • 1 cup mayonnaise
  • 3 tbs greek yogurt
  • 3 tbs cider vinegar
  • 1 1/2 tbs tabasco
  • salt and pepper, to taste

For the tacos:

  • 12 flour tortillas
  • 1 jalapeno, thinly sliced
  1. Prepare the salmon: Grind the pickling spices, then add to a bowl with the parsley, dill, garlic, salts, and sugars, and lemon zest and juice. 
  2. Place the salmon skin side down on a large sheet of plastic wrap. Pack the curing mixture on the surface of the salmon. Wrap tightly in the plastic wrap and refrigerate 16-18 hours, overnight, on a rimmed baking sheet.
  3. When ready to make tacos, mix the slaw. Mix the cabbage and carrots in a large bowl. In a separate bowl, whisk together mayo, greek yogurt, cider vinegar, tabasco, and salt and pepper. Pour half the sauce over the cabbage and carrot mixture and toss to coat evenly. Season with more salt if needed. Set aside and refrigerate a few hours ahead, if possible. The salt will help soften the cabbage and release moisture, adding to the sauce. 
  4. Heat oven to 400 degrees. Unwrap salmon and wipe off the curing mixture with a damp towel. Bake salmon until just done and flakes apart, about 15-20 minutes. 
  5. Warm the tortillas and shred the salmon. Pile in to the tortillas, then top with the slaw and some sliced jalapeno, and more of the sauce, if desired. Serve immediately.

Notes:

  • The original recipe called for marinating the salmon for 16-18 hours, but I think you could safely go up to 24. Any longer and you are on your way to gravlax, so I wouldn't push it. 
  • Use the best quality salmon you can find. You wouldn't waste effort on corning a sub-par piece of brisket, would you? Here, you don't want to put all this effort and time into a piece of farmed, dyed for color salmon either.
In Recipes, Sunday Suppers Tags Main Dish
Comment

Guatemalan-Style Refried Black Beans

March 9, 2018 Allie
Guatemalan black beans

Refried beans are, and have always been, one of my favorite foods. From the giant portion puddled next to my enchiladas at every Mexican restaurant, to the trough I guiltily point to when ordering a burrito at Chipotle, to the giant pot my friend Ginny's mom makes every Christmas morning, I will never turn them down. Even when I start with too many chips, even when I tell myself I should be going for the healthier black beans, even when I've already had one too many tamales, I'm just never going to turn down the refried beans. 

So, when I went to Guatemala several years ago, I was a bit surprised to encounter refried beans that looked a bit different than all of the above. For one thing, the beans were black beans, not the pinto beans I was used to. They were also thicker and stiffer than the soupier refried beans I knew, and they had been plated in sort of a twisted log shape that seemed to defy physics.

Then I took a bite. 

Look, I'm not going to tell you that refrying pinto beans isn't tasty, because of course it is. But these refried black beans were something else entirely. They were sweet, first of all, with a depth of flavor from onions and various spices blended in, and they had been cooked into more of a paste-like consistency, perfect for piling into a warm corn tortilla along with eggs. It was breakfast heaven. 

The week I was in Guatemala I ate many delicious dishes, including pepian and carne asada and sweet bread and pupusas, and so, so many churros, but these beans made the biggest impression on me, for sure. It's amazing how something so simple to prepare can taste so, so good. Beans get cooked with spices then blended with onion and cooked again (admittedly, you have to cook them for about an hour, but I think it's worth it). It makes for a filling and delicious breakfast, and pairs excellently with escabeche as well as the more traditional plantains.

It's going to take a little more practice to get the shape of the log exactly right, but I'll settle for a result that's less "artistic" and more "B.M." if it tastes this good.

Guatemalan black beans and eggs
black beans and spices
guatemalan black beans breakfast

Guatemalan-Style Refried Black Beans

  • 1 lb black beans
  • 1 tbs ground black pepper
  • 1 tbs salt
  • 1 tsp dried oregano
  • 1/2 tsp chili flakes
  • 1 tsp granulated onion or shallot flakes
  • 1 tsp garlic powder
  • 1/2 tsp baking soda
  • 4 cups water plus more, if needed
  • 1 white onion, chopped fine
  • olive oil, for frying
  • cilantro, for garnish
  • tortillas, for serving
  1. Add all ingredients except white onion and olive oil to a slow cooker and slowly cook on low, for 5 hours. You may need to add more water if the beans seem too dry.
  2. At this point, you can serve the beans whole, or fry them. To fry, heat a little olive oil in a large skillet. Reserve a couple tbs of the chopped onion and add the rest to the oil in the skillet. Cook the onion over medium heat until well-browned, then transfer to a blender. Add the cooked beans and their liquid and puree.
  3. Heat a little more oil in the skillet and pour in the pureed bean mixture. Cook on medium heat for a bit. As the moisture evaporates, lower the heat and cook the mixture for about an hour, until it is thick enough that you can "roll" it into a rough log shape. Transfer the roll to a plate and garnish with cilantro and reserved chopped onion. Serve immediately with warm or fried tortillas and eggs, for a full breakfast.
In Recipes Tags Breakfast, Main Dish
11 Comments
← Newer Posts Older Posts →

For those who plan their next meal while eating the last.

Β 

INSTAGRAM

🎢When pizza’s on a bagel*, you can have pizza anytime**!🎢

*donut
** after you fry some donuts
FINALLY perfected these Burnt Honey Butter Biscuits & what good timing! It’s carb season & we are all hibernating! 🐻
Final thoughts on Small Thanksgiving: take your sweet potato + marshmallow combo firmly into dessert or even breakfast, and consider a cozy mashed potato soup with stuffing croutons to use up those leftovers. Stay safe & Happy Thanksgiving! πŸ˜·πŸ¦ƒ
Part 2 of Small Thanksgiving: all the stuff to stuff yourself with! An Italian sausage pasta-inspired stuffing and a vegetarian, spiced wild rice stuffed squash. Everything serves 4-6, gather safely this year! πŸ˜·πŸ¦ƒ #thanksgiving #smallthanksgiving #v
Now that we (and the world?) can let out that collective sigh of relief, I can  finally think about my favorite holiday! Everyone is probably (hopefully 😷)looking at smaller gatherings this year, so I’m sending some Small Thanksgiving ideas ou
So happy Disney keeps justifying my dumb baking purchases! This matcha shortbread is delicious, but make a good sandwich cookie it does not. I hid all the broken pieces πŸ™ˆ
Subscribe to Tea and Fog!

RECENT RECIPES

Featured
polenta with rosemary and goat cheese.jpeg
Salmon Wellington and Warm Rice Salad.jpeg
Pizza Donut Hero.jpeg
Burnt Honey Butter Biscuits.jpeg
Mashed Potato Soup with Stuffing croutons.jpeg
sweet potato donuts with marshmallow frosting.jpeg